Autumn crafts for school are needed for various exhibitions. They help develop imagination and creativity. On the theme of autumn, we will make a hedgehog from leaves.
We will need:
- dried leaves;
- PVA glue;
- colored paper for background;
- a sheet of white paper;
- scissors;
- brown felt-tip pen or pencil.
Step-by-step instruction:
- First, let's cut out the face for our hedgehog. To do this, take a sheet of white paper and scissors. First, use a brown felt-tip pen to draw a thick outline to make it easier to cut out. We make a pointed muzzle with a circle at the end (this will be the nose).
- Glue the cut-out piece onto colored paper closer to the left edge.
- Now we are making an imitation of needles on a hedgehog. Glue the dried leaves overlapping. It is better to take multi-colored elongated blanks. We start doing this from the top and cover the entire back of the animal.
- Use a brown felt-tip pen to paint over the hedgehog’s nose, draw a mouth and paint over the outline of the entire face.
An interesting and simple autumn craft for school is ready. You can also make hedgehog grass from small green leaves. This manual work only takes a few minutes.
Autumn gives us not only a harvest of vegetables, fruits and berries, but also a large number of dry leaves of a wide variety of colors and shades, which gives us the opportunity to show our imagination and use them for joint creativity with children or to create some kind of decoration for the interior of our home.
In addition, in order to engage in this type of activity, practically no financial investments are required (with the exception of glue and cardboard) - dry leaves lie under your feet, collect as much as you want. And how much joy and positive emotions your child will receive if you entrust him with this important task.
Maple leaves are especially popular for autumn crafts, since the shape of its leaves and beautiful colors allow them to be used in a wide variety of applications. In general, you can make a huge number of crafts from autumn leaves - it all depends on your imagination, but today we will focus on one of them, namely the applique called “hedgehog made from natural maple leaves,” or rather, its most interesting variations.
Making the applique "Hedgehog from maple leaves" with your own hands
In order to make any crafts from dry leaves, you need to dry them - this can be done in two ways - place the leaves between the pages of a large and heavy book or iron them with a warm iron through newspaper pages. The second option is faster, and the first is simpler. The choice is yours - if you have a few days left, then you can dry the leaves in a book, and if you need the craft by tomorrow, then grab the iron and go ahead and dry the collected leaves.
In order for the application to be a success, and for nothing to distract you from the creative process, you need to carefully prepare your work area. By the way, it will also be useful to accustom the child to such preparation - and adults will not be distracted by trifles, and learn to plan the work process.
In addition to dried leaves for the applique, you will need PVA glue, scissors, thick cardboard, felt-tip pens or pencils (for drawing individual elements), plasticine (for making individual parts) and, of course, oilcloth to protect the working surface from glue, paints and other contaminants, yes and it is more convenient to remove small debris.

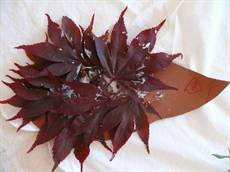
The hedgehog applique, which is made from maple leaves, can be made in a variety of ways. Let's take a closer look at one of them. For this craft, in addition to maple leaves, we will also need plum and acacia leaves or other leaves of suitable shape.
So, all the necessary materials and tools are prepared, we can begin our work.
Stage 1.We sort the leaves by color, shape and size. By the way, leaves can be collected not only in the fall, when they have turned yellow, but also in the summer - while they are green, this way you will get an even larger palette of colors for your crafts.
We choose the largest leaf - it will be the basis of our application, and we will glue smaller leaves to it. The glue should be applied only in the center of the sheet (a couple of drops is enough), so that in the future you can easily glue the remaining parts of our hedgehog.
Stage 2.We make the hedgehog’s belly from a plum leaf, carefully sliding it under the thorns, and from yellow acacia leaves we make legs, also pushing them under the pasted belly.

Using plasticine, we shape the face of the hedgehog - we sculpt an eye, a nose and a tongue, and stick it to the body of the animal. If you are afraid that the plasticine will fall off, secure it additionally with PVA glue.
To give our picture a complete look, we will sculpt ripe red apples, one of which we will attach to the back of the hedgehog, and the second next to it.

The hedgehog applique is ready, you can place it in a frame and hang it on the wall to constantly admire your creativity.
To make the task easier for the child, you can draw the silhouette of a hedgehog with a pencil, and entrust the “needles” to the baby - let him choose the appropriate leaves and place them as he wants - an additional exercise for the development of creative skills and imagination.
In addition to such a hedgehog, you can make many different prickly animals from the same materials. The photo shows the cutest and most interesting specimens that a child in 1st grade or older can make on their own. A younger child will still need the help of an adult.

Video on the topic of the article
In conclusion, we present you with several videos about what kind of crafts, including hedgehogs, you can make from autumn leaves with your children, because nothing develops a child’s imagination better than joint creativity with parents. In addition, in the fall, kindergartens and schools traditionally hold competitions for the best autumn crafts - and what could be nicer than being proud of your child who has won such a competition.
Tatiana Butova
Prickly impatiens
Lives in a dense forest
There are a lot of needles
And not a single thread.
So wonderful hedgehog we did with the children of the middle group from autumn leaves, collected by us during our walk.
Target:learn from leaves create a conceived image, develop children’s creative abilities, expand their cognitive interest in nature.
For work we need:

Dry autumn leaves
Landscape sheet
-felt-tip pen
Progress:

Using a felt-tip pen, draw the outline of a hedgehog, eye, nose.

Use scissors to cut off the sticks leaves.

Glue it leaves along the contour of the image hedgehog.

We supplement the composition with grass and fungus at the bottom sheet glue the small ones leaves.
The children did the work with great pleasure and were happy with the results.
This is the “thorny touch-me-not” we have, all that remains is to place it in a frame and decorate the interior of our group.
Publications on the topic:
Applique of autumn leaves is always a fascinating and creative process. And the collective application is especially important. In senior preschool.
I bring to your attention a master class on applique from natural materials - autumn leaves. Before you start composing and designing.
Description: the work can be done with children of older preschool age. The material may be useful for preschool teachers.
Objectives: To teach children to create plot compositions from natural material - dried leaves; develop a sense of color and composition. Bring up.
Today I want to present to your attention a master class from autumn leaves “Outfit for Masha” Early autumn is a beautiful time - the time when.
Autumn is such a time of year. when you want to be creative. Some people write poetry, some people write music, artists paint pictures. And I collect it in the fall.
The golden time has come! Everything on the street turned golden-purple. The kids and I also decided to decorate our reception room with beautiful leaves. Now.
How beautiful autumn is, every time this time of year appears in a completely new color. Despite the fact that all nature reduces its activity and prepares for sleep, everywhere we can observe bright and rich colors and endless beauty. At this amazing time, you can create real masterpieces using a variety of natural materials, bringing your most fabulous fantasies to life. It is especially interesting to do arts and crafts with children. In this tutorial you will learn how to make a cute “Hedgehog” applique from maple leaves.
Appliqué is a special technique of decorative and applied art that came to us from ancient times, when nomadic peoples decorated their everyday life in this way. In simple terms, applique is cutting out any elements from paper, fabric and other materials and gluing them onto a background prepared in advance.
What do applique classes give a child? Of course, first of all, it is the development of imagination and the ability to bring your ideas to life. This type of creativity does not require large financial costs, because all the necessary materials can be found while walking in the forest. It’s so nice to make such outings, especially when the sun gently warms us with its autumn warmth. In autumn, sometimes maple leaves are painted in very bright and fresh colors, and with their fancy carved shape they undoubtedly attract the attention of passers-by.

Applique using maple leaves is one of the most favorite for children. Thanks to its bizarre shape and bright colors, maple leaves make beautiful and unusual crafts. The applique in the shape of a hedgehog is very funny. We have prepared for you a selection of interesting paintings made using the appliqué technique of autumn leaves. All actions are described in great detail and accompanied by photos.


Where to begin
Regardless of which appliqué technique you choose, there is a certain procedure that must be followed. First, natural material must be collected. You need to choose whole, undamaged leaves of a wide variety of colors. Then the leaves should be dried. There are two main technologies for drying leaves:
- Place each sheet separately between the pages of an old book;
- Carefully iron each sheet placed between two sheets of paper with a warm iron.

Choose the method you like best. Next, let's prepare our workplace: cover the table with oilcloth, take sheets of paper or cardboard, PVA glue and scissors and felt-tip pens.
It is important to remember that teaching a child to keep the workplace in order is an important element of raising a little person.


If you are creating an application together with a small child, it is better to use fresh leaves and then dry the entire finished composition. In other cases, after preparing (harvesting and drying) the natural material, you can come to the most interesting thing - creating the image of your future application. After choosing the main idea of the painting, you should prepare the necessary leaves and arrange them on the sheet in accordance with your creative idea. First, we need to glue the base of the future figure onto our background - for the hedgehog, the base will be its torso. Other leaves will be attached to it. Do not apply glue to the entire sheet , otherwise after drying the craft will become uneven. After all the dried leaves are glued, the application is placed under a press, for example, in an old thick book for two to three days.

Let's start the lesson
How to make a hedgehog from dry maple leaves for 1st grade children? Below we will describe the method of making such an application. In addition, for the base we need one birch leaf. We make a body for our hedgehog from a small birch leaf, and we will have a maple leaf protruding in the form of thorns. After gluing with felt-tip pens, we draw a cute face for the hedgehog and supplies in the form of apples.
In the photo below you can see what kind of hedgehog you will get:

You can make an applique using a pencil sketch that will replace the hedgehog’s body. Then the forest dweller will look like this:


If you come across a maple with multi-colored leaves in the forest or park, you can make such a bright hedgehog. On a sheet of colored cardboard (we took blue cardboard) we draw the outlines of the future hedgehog. We glue multi-colored maple leaves onto the body, and outline the muzzle and legs with a dark felt-tip pen.


Autumn gives us not only a harvest of vegetables, fruits and berries, but also a large number of dry leaves of a wide variety of colors and shades, which gives us the opportunity to show our imagination and use them for joint creativity with children or to create some kind of decoration for the interior of our home.
In addition, in order to engage in this type of activity, practically no financial investments are required (with the exception of glue and cardboard) - dry leaves lie under your feet, collect as much as you want. And how much joy and positive emotions your child will receive if you entrust him with this important task.
Maple leaves are especially popular for autumn crafts, since the shape of its leaves and beautiful colors allow them to be used in a wide variety of applications. In general, you can make a huge number of crafts from autumn leaves - it all depends on your imagination, but today we will focus on one of them, namely the applique called “hedgehog made from natural maple leaves,” or rather, its most interesting variations.
Making the applique "Hedgehog from maple leaves" with your own hands
In order to make any crafts from dry leaves, you need to dry them - this can be done in two ways - place the leaves between the pages of a large and heavy book or iron them with a warm iron through newspaper pages. The second option is faster, and the first is simpler. The choice is yours - if you have a few days left, then you can dry the leaves in a book, and if you need the craft by tomorrow, then grab the iron and go ahead and dry the collected leaves.
In order for the application to be a success, and for nothing to distract you from the creative process, you need to carefully prepare your work area. By the way, it will also be useful to accustom the child to such preparation - and adults will not be distracted by trifles, and learn to plan the work process.
In addition to dried leaves for the applique, you will need PVA glue, scissors, thick cardboard, felt-tip pens or pencils (for drawing individual elements), plasticine (for making individual parts) and, of course, oilcloth to protect the working surface from glue, paints and other contaminants, yes and it is more convenient to remove small debris.
The hedgehog applique, which is made from maple leaves, can be made in a variety of ways. Let's take a closer look at one of them. For this craft, in addition to maple leaves, we will also need plum and acacia leaves or other leaves of suitable shape.
So, all the necessary materials and tools are prepared, we can begin our work.
Stage 1.We sort the leaves by color, shape and size. By the way, leaves can be collected not only in the fall, when they have turned yellow, but also in the summer - while they are green, this way you will get an even larger palette of colors for your crafts.
We choose the largest leaf - it will be the basis of our application, and we will glue smaller leaves to it. The glue should be applied only in the center of the sheet (a couple of drops is enough), so that in the future you can easily glue the remaining parts of our hedgehog.
Stage 2.We make the hedgehog’s belly from a plum leaf, carefully sliding it under the thorns, and from yellow acacia leaves we make legs, also pushing them under the pasted belly.

Using plasticine, we shape the face of the hedgehog - we sculpt an eye, a nose and a tongue, and stick it to the body of the animal. If you are afraid that the plasticine will fall off, secure it additionally with PVA glue.
To give our picture a complete look, we will sculpt ripe red apples, one of which we will attach to the back of the hedgehog, and the second next to it.

The hedgehog applique is ready, you can place it in a frame and hang it on the wall to constantly admire your creativity.
To make the task easier for the child, you can draw the silhouette of a hedgehog with a pencil, and entrust the “needles” to the baby - let him choose the appropriate leaves and place them as he wants - an additional exercise for the development of creative skills and imagination.
In addition to such a hedgehog, you can make many different prickly animals from the same materials. The photo shows the cutest and most interesting specimens that a child in 1st grade or older can make on their own. A younger child will still need the help of an adult.
Video on the topic of the article
In conclusion, we present you with several videos about what kind of crafts, including hedgehogs, you can make from autumn leaves with your children, because nothing develops a child’s imagination better than joint creativity with parents. In addition, in the fall, kindergartens and schools traditionally hold competitions for the best autumn crafts - and what could be nicer than being proud of your child who has won such a competition.