Crocheting is not always the embodiment of clothing for the whole family - it is also about creating comfort in your own home. Every needlewoman has at least once thought about knitting artificial flowers - they will always remain bright and airy, but there is no care for them. Moreover, every needlewoman ends up with a lot of leftover yarn, which takes up a lot of space in cabinets and storage boxes. To get rid of leftovers with benefit, you can resort to crocheting a whole bouquet of flowers. The article presents crocheting flowers, patterns and descriptions for free.
Crochet roses
Crocheted roses seem difficult to make only at first glance. In fact, their knitting turns out to be the simplest and most promising - in a short time, literally in a few hours, you can create a whole bouquet. This is also a great opportunity to please your loved ones with a bouquet of flowers, especially in winter and on an unplanned visit.
So, to crochet roses you will need the following materials and tools:
- red and green yarn;
- hook of a suitable number;
- small diameter wire;
- double sided tape.
Crocheting roses occurs in the following sequence:
- Select a rosebud knitting pattern. Here you can use a simplified knitting pattern in the form of a long strip, which is then twisted and folded into the shape of a bud. This type of knitting requires sewing up the base of the formed bud.

- The second option for crocheting a rosebud involves crocheting each petal separately - this is not difficult, but painstaking. After knitting the required number of petals, they are simply collected into a bud and tied at the base with wire or thread.

- Having chosen a pattern, make a bud. Sew the base or tie it with wire. It is easier to collect individual petals on a base - this can already be a wire stem with a cotton or thread tip. The tip should be completely covered with petals.
- Next, tie the sepals according to the presented pattern. Of course, now you should use green thread.

- In the same way, using the diagram presented above, tie the leaves. Beginners do not need to start knitting a whole shoot with leaves - it is enough to knit from 3 to 7 leaves, which depends on the length of the main stem. When knitting leaves, leave the long end of the thread at the base.
- If you used the first method of knitting a bud - knitting a strip folded into a bud - insert a wire in the middle intended to form a stem. Place the sepal on the bud and wrap the second piece of wire around the bud from below - this will form a peduncle.

- Use double-sided tape - wrap the stem with tape, capturing the peduncle. As you wind, attach the leaves, grasping their base by 5-7 mm, wrap the stem with a piece of thread from the leaves and also secure with tape.
- From the sepal to the end of the stem, carefully and evenly, without leaving gaps, wrap the wire and tape with green thread.
- Make several roses in a similar way and arrange them in a bouquet.
Several other variations can be made in this manner. Some needlewomen prefer to simply place such bouquets in vases. The second wants to make a bush, resorting to using a simple flower pot, having previously installed roses in pieces of foam plastic. Still others crochet pots separately to complete the composition. The following is a selection of ready-made compositions of different variations and a video with a master class for beginners in knitting. 


Knitted peonies

Peonies are knitted similarly to roses. Here you should also use the diagram presented below and tie the bud. Next, a peduncle is formed with wire or thread. To knit leaves, you can use the above pattern. A stem is made from wire in the same way and leaves are attached. 
Tied peonies often form a simple bouquet of flowers that looks great in a long, narrow glass vase. A master class on knitting peonies is offered in the video.
Knitted daffodils

After crocheting the simplest flowers, you can begin to implement the most complex ones, namely crocheting daffodils. You can connect them in the same sequence as presented above, with the exception of using other patterns and threads.
So, start knitting daffodils in the following sequence: 
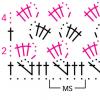
- Start knitting from the whisk - use pattern 1 in the picture below. The color of the corolla can be different - white, yellow, brown or even black.
- Attach a yellow or brown thread to the base of the corolla and continue knitting the core according to pattern 2.
- Attach a yellow, orange or white thread to the base of the core to knit the petals of the buds - use pattern 4.
- To finish knitting the bud, you should attach a green thread to the base and knit the cup according to pattern 3. The cup can be knitted separately, and then attached to the bud.
Stems and leaves are knitted in the sequence presented earlier. The only difference here is the shape of the leaves - to match, they are knitted according to the suggested pattern in the picture. 

Irises

Craftswomen are attracted to knitted irises, which are also formed into bouquets and placed in vases. There are two ways to knit irises.
First way 
The first method involves knitting the bud petals in a more airy way. Here we resort to the scheme presented below. 


Otherwise, the technique of forming a flower is no different from others. So, after knitting the required number of petals, they begin to form a bud - you will need to connect the petals and attach them to a wire, which also acts as a stem. This stem may have a base at the tip - it is either knitted or formed by winding thread or cotton wool (it should be painted with diluted paint). The leaves can be knitted according to the pattern that was used for knitting daffodil leaves.
Second way

The second method offers denser petals and “massive” buds; two schemes are used here.
The first pattern is intended for knitting the lower petals of the bud - the detailed technique is presented in the photo. A schematic interpretation of the proposed knitting is also given - the numbers in the diagram indicate the number of single crochets.


 The second pattern is knitting more wavy petals - the upper ones. It also offers complete instructions and the sequence in the photo, as well as a diagram of the number of single crochets for each row.


Both types of petals are assembled as shown in the picture; the formation of the stem occurs using the same technique as before.

Tie several irises and put them in a vase - they will look attractive in any interior.

Tulips

“Yellow tulips, oooh!” - this phrase and melody arises every time we talk about these beautiful spring messengers. They can be connected using 2 methods - simpler or more complex.
Easy way

In a simple method, a tulip bud is a cup knitted with single crochets, which is stuffed with cotton wool and sewn up in a certain way. In order not to read the descriptions for a long time, it is enough to simply offer photos that represent the craftswomen - their fruits of crochet needlework. 


In a similar way, many tulips are knitted, which are later collected into bouquets - it is better to put them in a basket, because such a composition represents a spring sketch. 
Second way
The second method involves knitting the bud petals separately. So, to begin with, they begin to knit the inner petals in the amount of 3 pieces according to the pattern, the pattern of which is proposed - it also contains symbols. 
Next, they begin to knit individual petals. First you need to knit the petals of the second layer - for this they use a cone-shaped shape. Then 2-3 petals of a more rounded shape are knitted - they will be the outer and final ones. 

All petals are collected together on a wire for the stem. Next, they continue to form the flower in the same sequence as the previous flowers - do not forget about the leaves, which can be presented in the form of simple double crochets.
Crocheted flowers always mean spring in the house and a spring mood in the soul. Make the atmosphere in the room cozy - place tied flowers on the windowsill and admire the spring landscape.
Using a crochet hook you can knit a wide variety of products. In general, any item can be decorated with knitted elements. For example, a hat can be decorated with beautiful knitted flowers. colors have their own characteristics. Despite the fact that the loops are knitted using standard ones, you can create very realistic plants.
In contact with
Knitting tools
A master class on step-by-step making of a voluminous hat and its diagram can be found on the websites of needlewomen.
Pansy flower
Pansies can be made according to different patterns. Knitting can occur without interruption, but you can connect two separate parts and connect them with thread. The scheme for making such a plant is quite simple.
 You need to start by knitting an element consisting of three purple petals. Then you should repeat the knitting, but with thread yellow color. All that remains is to correctly apply the resulting parts and.
If it is needed tie the plant together, first perform the first part of the flower. And the second part of the petals begins to be knitted from the existing loops of the first half of the petals.
Field poppy
Mac is quite simple to do. First you need to cast on a chain of air loops, 4–6 loops are enough. They are connected into a ring. Single crochets are knitted in a circle. The core can be made black thread like a real poppy.
Then they switch to knitting red thread. She is knitted in single crochets in the round. In each row it is necessary to make an addition so that the petals are terry. The poppy hat should be voluminous, and you don’t have to use the pattern. When the desired result is achieved, the knitting is finished; the ends can be emphasized by knitting the last row with black thread.
Snowdrops
Snowdrops are knitted with thread white or lilac. It is necessary to knit the core from a chain of air loops and tying with single crochets. Then three long petals are performed. The petal is done like this: directly from the middle, pick up several air loops and perform single crochet stitches along them. When the work has reached the core, you need to do the petal again. This is how the whole bud is knitted.
 In addition to flowers, leaves and stems, you may also need to tie a bud, sepal and other elements.
Crocheting flowers does not work out the first time; you need to practice crocheting. It’s best to watch a video or a master class crocheting flowers and see all the intricacies of knitting. In addition, knitting is done small fragments. This is a painstaking task and, probably, this is why knitted flowers turn out airy, light and openwork.
Crochet flowers


Even beginners can handle crocheting this flower. They will be helped with this: photos, detailed descriptions and diagrams.
Yarn: CotoLin (Cotolin, 50% cotton, 50% acrylic, 780m/100g)
Hook: №2,5.
Description of work:
!!! Knitting in two threads.
Crochet a chain of 75 chain stitches.
2nd row: in each chain stitch, knit 2 double crochets.
3rd row: *skip 2 loops of the previous row and knit 7 single crochets into the third loop, skip 2 loops of the previous row and knit a single crochet into the 3rd loop* repeat from * to *.

Crocheted flower pattern.
Then roll the flower in a spiral and secure with thread on the reverse side.
The crocheted flower is ready!

You can decorate your things with it.
This flower has 25 petals. If you want to knit a flower of a smaller diameter, reduce the number of air loops in the chain. And vice versa - if you want to knit a larger flower.
Attention! If you liked our crocheted flower, and based on its description you crocheted a flower for yourself, and now you want to show your work - send a photo of the crocheted flower to [email protected]. We will place a photo of your work under the description of this model. We would like some brief information from you - what is your name (name or nickname), what city are you from, what materials were used and how the work progressed (was it easy or were there difficulties), wishes and suggestions.
We are waiting for your works!
Your works
 Faith Saransk.
“I don’t knit very often, but my daughter wanted a knitted handbag. I knitted the bag, but
it looked a little boring, I spent a long time searching on the Internet for something to decorate it with. And then I found it. It was your flower. I knitted it very quickly. The technology is not complicated and the description is clear. Thank you very much."  "My name is Julia, I’m knitting Panama hats for my daughter and my friend’s daughter. This time I used the description of knitting a flower from your site! Thank you very much for the clear explanation! Very easy and simple. I tied it up quickly."
  "My name is Victoria. I live in Germany. But not so long ago, before that I always lived in Russia. In my free time, I began to enjoy knitting. There are a lot of sites about knitting on the Internet, but unfortunately, on most of them, the patterns are incomprehensible. With the help of your diagram and detailed description of the work, I was able to knit this flower quickly and easily! From now on I will always use this site. Thank you very much!!!"
 pensioner Nina Mikhailovna
Rostov region
Tarasovsky district
“Thank you very much, with your help I knitted a hat with flowers for my granddaughter. I am sending a photo - rate my work.” 

 Alexandra Moscow
"I knitted a brooch for a friend according to your pattern. The flower is knitted easily and quickly! Thanks for the easy pattern!!!" 
 Larisa Irkutsk
“I was knitting a hat for my daughter, I wanted to decorate it with a flower - I accidentally found your pattern.
Thank you - the diagram is very clear and easy to implement."  Ksenia Lavskaya Lviv
“A housewife, mother of three daughters. I rarely knit, somehow I don’t have enough time. But then I saw your pattern and got excited. It knits very quickly. My daughter is delighted, others also ordered similar flowers, but in the form of brooches. Thank you for the clear pattern. " 
 Site guest, forum member ZINDOWS(Zinaida Solnyshkina, Voronezh region)
"Novelty VITA Yarn" /vr/vrzvetok24092012.jpg) Diana Tyumen.
Diana Tyumen.
“Recently I wanted to decorate another hat with a flower, but I didn’t like the one included in the pattern. I found it on your website and knitted it in about 20 minutes. I used “Solnyshko” yarn (100% cotton, 425m/100g), a 1.9mm hook. The only thing that caused confusion was how to fasten it, but this “problem” was resolved quickly.
Thank you very much. :)" /vr/vrzvetok24112012.jpg) Alina
Alina
“You really helped me with the idea of such a flower, which became a great decoration for a headband for my daughter. It’s a pleasure to knit it))) Easy and simple, I really liked it!!! Thank you!!!” /vr/vrgetimage.jpg) Oly Balabutkina
Oly Balabutkina
Thank you very much to everyone who sends photos of their work!
Knitted flowers are widely presented on various Internet sites. But most of the beautiful flowers are crocheted. We have compiled a small selection of interesting knitted flowers in our opinion.
Knitted flowers can be used to decorate almost any thing knitted with knitting needles: hats, bags, scarves, tops, dresses, baby blankets, T-shirts, etc. You can also make beautiful compositions from knitted flowers - panels, or put them in a vase or pot. Although flowers are not real, they will add zest to your interior.
Knitted flowers are widely used in women's accessories. From flowers you can make earrings, a necklace or an unusual hairpin or brooch.
If you have a photo or description of beautiful flowers knitted with knitting needles, send them to our website. We will definitely publish them.
Knitted flowers, patterns from the Internet.
MK from Irina Chernysheva on flower knitting

Openwork knitted flowers from Victoria Babkina
The flowers we are going to talk about are so simple that even a child can handle them! Just 5 minutes and the flower is ready! They can be used to decorate interior items and personal items, and to use them in making clothes for dolls and other toys. We will need: a pair of knitting needles, yarn, scissors (the size of the flower directly depends on the yarn you choose).

Knitted rose flower
Knitted flower needle chrysanthemum
Simple flower knitted from hollow cord
Video tutorial on knitting hollow cord:
The video should load here, please wait or refresh the page.
Knit a hollow cord using knitting needles of a suitable size (65-70 rows).
Divide the cord into 5 equal parts, fold it in the shape of petals, pull the needle and thread through the center and assemble the flower.
Cut the thread and fasten. The knitted flower is ready!
Knitted flower rose:
Dial 20 p.
1st r. (IR): purl. loops
Row 2: *knit 1, yarn over, *, finish knit 1.
3, 5th row: purl. p. (knit yarn overs crossed).
4, 6th row: *knit 1, yarn over*, finish knit 1.
7th row: cast off 8 purls, *1 long loop 1 row below, knit it together with the next row. n. out. p. and close it, close 7 purl; rep. from * 5 times, * 1 long stitch 1 row below, knit this one together purlwise. with trace p. and close it, close 10 p; repeat, from * 3 times, *1 long stitch 1 row below, knit this one together purlwise. with trace p. and close it, close 13 p.; rep. from * to the end.
Purple knitted flower:
Cast on 12 loops.
Row. 1: slip 1, knit 11.
Row. 2: slip 1, purl 11.
Row. 3: slip 1 and knit pattern *1 knit stitch, 1 yarn over*
Row. 4: slip 1, purl stitches.
Continue knitting stitch until
the length and width of the petal you choose.
Then start knitting 2 stitches together on each side of every 2nd row.
Knit the number of petals you choose. On this sample - 6.
Sew all the petals together, securing them in the center and decorate with buttons or beads.
Knitted flower poppy:
Crochet a ring of 4 ch, knit 6 single crochet stitches into it, then 2 stitches in each loop, 12 in total, cast on stitches along the edge on knitting needles (short, for knitting socks, circular ones are not very convenient)
Row 1 – knit
Row 2 – knit 3 from each stitch
Row 3 – knit
Row 4 – knit 3 from each stitch
Row 5 – knit
Row 6 – knit 3 from each stitch
then 3 rows with knit stitches and if any more are needed to achieve the desired size
close the loops
Knitted flower using mohair knitting needles:
We start knitting a petal from 2 balls (we knit each part separately). On one needle, cast on 3 stitches from each ball.
Row 1: (1 RS, inc 1 st, 1 RS, inc 1 st, 1 RS) the first 3 sts from the first ball, then the same on the loops from the second ball.
Row 2: 5 and 5 SP
Row 3: (1 RS, inc 1 st, 3 RS, inc 1 st, 1 RS) the first 3 sts from the first ball, then the same on the loops from the second ball. (7 and 7 points came out)
Row 4: Connect both parts of knitting.
6 IP, 2 p. together purl, 6 IP
Row 5: 1 LP, inc 1 p., 11 LP, inc 1 p., 1 LP
Rows 6, 8, 10,12, 14
Row 7: 6 RL, 3 sts together (middle at top), 6 RL
Row 9: 5 RL, 3 sts together (middle at top), 5 RL
Row 11: 2 stitches together, knit to the left, 2 stitches, 3 stitches together, knit (middle at the top), 2 stitches, 2 stitches together, knit
Row 13: 2 stitches together, knit to the left, 3 stitches together, knit (middle at the top), 2 stitches together, knit
Remove for extra knitting needle and knit 3 more such petals.
Then collect all 4 petals on one knitting needle, knit 1 row purlwise, then gather all stitches onto a thread, tighten and secure.
Translation from julia_kh from Osinka.
Knitted flowers. Schemes from our website
Knitted cornflower flower
To knit a flower you will need: wool yarn in dark blue, bright blue and blue colors and knitting needles.
Knitted flower with stockrose knitting needles
To knit a flower you will need: cotton yarn of dark pink and light pink colors, stocking needles No. 4.
Knitted rose flowers in 15 minutes
Knitted flower rose bud
Rose is the queen of flowers. This is probably why there are many different variations on the theme of crocheted roses, not only crocheted but also knitted. Our collection of flowers contains the most roses. Here is another description of how to tie a rose in a bud. A chic brooch can be made from one flower or a bouquet.
Knitting is a painstaking activity, but interesting and addictive. From threads of different qualities and colors alone, you can create beautiful items of clothing or small elements for decorating them. For example, you can crochet small flowers, which will then be useful in decorating children's things, women's handbags, hats and much more, the main thing is to choose a suitable pattern.

Simple flowers
The simplest petal flower crochet patterns are those in which the flower consists of a central circle and individual petals. These flowers are easy and quick to knit, and their size depends on the selected yarn thickness and hook size. In such flowers, the center is knitted using a chain of chain stitches and a series of double crochets.
All variants of such inflorescences have the same basis and, if desired, can become more complex and modified.

The petals make up the next row after the circular one. In it, the semicircular shape is achieved by making the outer parts of the petals with single crochets, and in the middle with single crochets:

So, you can start with a chain of six air loops and close it into a ring with a half single crochet. The knitting of the first petal will begin with it - two lifting air loops, then a double crochet, which rests on the ring. Then, two more chain stitches to go down and a half double crochet to finish the first petal. The remaining four petals are knitted according to the same pattern. The end of the working thread can be removed to the wrong side by pulling it through the ring.

Petals can be knitted either with support on each column of a circular row, or in one loop using several columns from a row with petals:

In some slightly more complex designs, the row of petals consists of arches of air loops, as shown in the diagram:

By slightly modifying the existing pattern, you can get a completely different flower: by adding teeth on the tops of the petals, their shape changes.

Multilayer products
After mastering simpler flower knitting techniques, you can begin to create more complex flowers. In nature, many flowers have several rows of petals; repeating such an inflorescence is not difficult. A voluminous flower can be made using the previous schemes of single-layer flowers, placing layers one on top of the other.

First, you need to knit a circle - the basis of the future flower - and knit an arch of petals for it, as shown in the first diagram. Knitting the second row, consisting only of petals, again begins from the central circle, exactly above the bottom layer. The second tier should be larger than the previous one by the height of one loop, that is, if three lifting air loops were made in the lower layer to create an arch, then four or five should be made on the next one. In this case, you should focus on the thickness of the thread, which determines the appearance of the knitting and the size of the pattern.

The third and all subsequent rows (no matter how many there are) in such a way that the new loops rest on the first row of loops of the previous row. That is, the “base” of the petal arch in one row is a continuation of the base of such an arch for the next row:

Yarn pansies
Asymmetrical flowers like pansies are no more difficult to knit than simple small flowers. The basis for them is the same - a circle made of a chain of air loops tied with double crochets. The difference is in the knitting of the petals.

Knitting pansies can be divided into three steps. The first of which is the round middle, for which yellow threads are taken. The air loops in the center are tied with connecting posts. Then, a narrow edging is knitted with a lilac or purple thread.
From the upper part of the flower core, two arches of air loops are knitted with purple thread. Next, the petals themselves, consisting of columns with several crochets, will be built onto these loops. In order for the petals to acquire a rounded shape, the outer columns are made with two crochets, and the central ones with three.
The upper part of the inflorescence has light lilac petals. To do this, you need to divide the central yellow circle into three equal sectors, each of which should begin with an arch of air loops. Then, according to the general scheme, petals of a suitable size are built onto these arches, where the outer columns will be shorter than the central ones.

Video on the topic of the article
You can use knitted flowers in any way you like. The advantage of such colors is that they are resistant to moisture - they can be washed, but they retain their shape. They can be easily attached to any material - with threads or glue. Small knitted flowers make beautiful hand-made jewelry, hairpins and decor for clothes, accessories and even complex postcards or photo frames.