Evgenia Smirnova
To send light into the depths of the human heart - this is the purpose of the artist
Content
Macrame has been around for a very long time. Over the years, it has been improved, new weaving methods have been created, and new materials have been used. Gradually, in addition to bracelets, various interior decor items began to be created. Tablecloths, flowerpots, napkins and much more. Macrame is a real art.
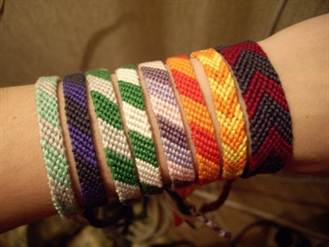
Weaving uses laces or thick threads. The principle of weaving is similar to weaving from floss, but bracelets made from laces are more massive. These decorations are not suitable for all clothes, unlike delicate ones and floss; a certain style is needed here. Only then will the bracelets look stylish and original. For weaving you will need safety pins, a pillow on which the products will be attached during the work process, scissors, thread and glue.
One thread, which we fasten horizontally, should be longer than the width of the future product. The rest will be attached to it. It is very important to use high-quality materials, otherwise over time the bracelet will lose its appearance and the threads will begin to unravel.


Weaving knots in macrame
Knots are the basis of weaving in macrame. There are different types of weaving: flat, figured, and knotless.The simplest Herculean knot:
1. Take two threads and secure each of them with a pin.
2. The right thread must be braided under the left, and the left thread must be braided into the loop from bottom to top. We weave to the desired size, and make a knot at the end.

For straight nodes:
1. You will need two threads, which are secured with an uneven fastening to make 4 ends.
2. The outer threads are considered working, and those in the middle are considered the warp.
3. Then we take the working one on the right and place it behind the base, and then behind the left working one.
4. Take the working thread on the left, then bring it under the warp, and then from below into the loop between the main and working ones.
5. To weave the left-hand chain, tie three more flat knots and turn the bracelet to the left 180 degrees.
6. Turn it every four knots.
7. When we get the desired length, tie a knot and finish the bracelet.


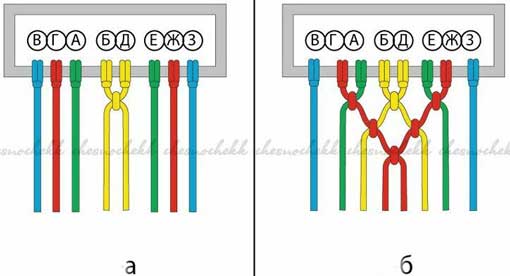
“Spider” pattern in macrame
We attach four threads that have eight ends. On the first row we weave several square knots. On 3-6 threads in the second row we tie one square knot, the basis will be the 4th and 5th. In the third row we make one square knot using the same warp, adding 2 and 7. The warp of threads 4 and 5 is also used for the square knot in the fourth row using 1 and 8.
“Chain” pattern in macrame
We need six threads. Numbering always goes from left to right. We make 3 and 4 as the basis. Then we weave one square knot using threads 2 and 5, and the second using 1 and 6. We retreat approximately 1 cm and repeat the steps as in step 4 until the desired length of the bracelet is obtained.
Scheme "Vertical Breeds"
We take a long thread as a base and fasten two on it. Next, vertically we make rep knots on each thread from left to right. When the first brid is completed, turn the working thread over and continue weaving the knots in the reverse order.
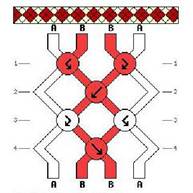
Scheme “Rhombus with hemstitch”
For work we use 20 threads. We take one color for 10 and 11, for the rest we need a different color. Using threads 10 and 11, we make one row with vertical knots and place them diagonally. Next, at 8 and 13 we open a small rhombus. Then we weave a square knot and close the diamond with threads 10 and 11, and for the large one we use 9 and 12.

Scheme "Tatting"
We take four threads. We will create the base using 2 and 3 threads. On them, using 1 and 4, we perform four tatting knots. We connect the warp threads and secure with a bead. Continue until you get the desired length of the bracelet.

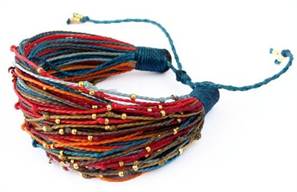
Macrame bracelet with nuts
A bracelet does not have to consist only of laces or threads. You can weave the most unusual decorations. For example, nuts, combined with gray or beige ropes, will create a nautical style. The figure shows the technique of weaving the base of the bracelet. We weave the nut onto two middle threads and tie a knot. This way we create the length we need. 


If you delve into history, macrame developed precisely thanks to the navy. It was the sailors They ate nets, ropes, wove various decorations for ships, as well as covers for the steering wheel. The knots became more complex and improved all the time. Now about 4,000 sea knots alone are known. The works were distinguished not only by their beauty and unusualness, but also by their durability. There are currently six known types of knot weaving.
The word “macrame” itself is of Arabic origin, which means fringe, so all products made from ropes and threads were called that way.
Since then, as soon as a person figured out to wrap his body in animal skin, bracelets began to appear. At first, like belts, they had a purely pragmatic task: they supported clothing. Then the clothes became more and more elegant, sleeves appeared, and the bracelets on the wrists changed their meaning. They still supported the clothes and became more and more beautiful. Men wore leather and steel guards to protect their wrists. Girls and women preferred silver and gold. Poor people, who were the majority, tied up their sleeves with leather straps or thread bracelets. The color and pattern on the bracelets, like a heraldic coat of arms, indicated that a person belonged to a certain clan - tribe. This is from the depths from which thread bracelets came into our century. In those days, every girl knew how to make a bracelet from threads with her own hands. Now this art has come back into fashion, and beauties are happy to wear bracelets on their wrists.
Thread decorations
They are worn by young girls and very little girls.
The pattern depends only on the imagination of the needlewomen:

Weaving bracelets from threads is an activity for those who are patient and attentive. Usually in any home there are several skeins of multi-colored threads. But thin, ordinary threads make faded, impractical jewelry. In addition, it is difficult to work with them.
For those who have decided to take up weaving for the first time, it is better to start with cords or thick threads.
To avoid confusion, you need to choose two colors. In addition to threads, you will need some kind of fastener to secure the workpiece: a stationery clip, a pin, tape. And, of course, scissors. Both threads are folded in half and a knot is tied, leaving a loop. The loop is attached to the surface and the weaving process begins. How to weave is shown in the diagrams:


Variety of colors and patterns
Needlewomen prefer floss to all other threads. Before purchasing, you should ask what threads are on sale. Spatula threads are fragile; for bracelets you need to use cotton or silk. The good thing about floss threads is that you can choose the thickness of the strand you need for your work. Iris threads are best suited. They are thicker than the others, ribbed and the decoration looks more beautiful. The wide range of colors provides a huge scope for patterns on floss bracelets. Floss threads make the highest quality items.


As a rule, floss threads do not fade, but you still need to check. To do this, a strand of thread is moistened in hot water and applied to a white cloth. If there is no color stain left on the fabric, you can start working, otherwise, when wearing the bracelet, unsightly stains will remain on the skin.
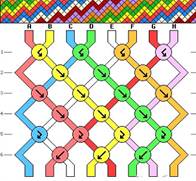
Schemes for those who have already mastered the weaving technique:


The most common among young people is the wish bracelet. As you know, color has its own properties, and when choosing, you need to take this into account.
- Red – from damage and the evil eye;
- Light green – harmony, protects love;
- Dark green extinguishes quarrels;
- Pink – tenderness and love;
- Orange – sunlight, helps to find friends;
- Blue – intuition, insight;
- Purple – protection from harm, creativity;
- White – spiritual purity;
- Yellow - training;
- Raspberry – power.
When weaving the selected threads, you need to imagine your desire in all its details and details, and then it will certainly come true. The simplest bracelet is braided with three threads. To enhance the effect of the talisman, you need to weave 7 beads into it. When finished, you need to tighten the knot at the end and ask a loved one to tie it on the hostess’s wrist. The remains of the threads are burned so that all the bad things burn out, like this thread.

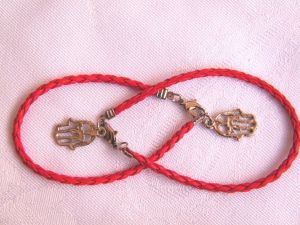
Red, the color of fire and blood, is revered throughout the world as a symbol of vitality. By adding a red thread to the wrist, it is as if a person is adding another vein, strengthening and saturating the energy of his heart. Wish bracelets on a red thread have been protecting people from evil for a long time.
The easiest way to assemble a bracelet is with an elastic band. Use strong, reliable thread. If the thread is thin and stretches too much, or you are worried that it will fray, then it is better to take it in several folds. To assemble with an elastic band, it is better not to use heavy beads (large glass or stone) or beads with sharp holes. For such bracelets, a jewelry cable is more suitable.
To work you need an elastic band, I use a thick silicone thread 1.2 mm thick, code on the website 351-011. It is soft, so you will need another needle. If your thread is thinner, then use it in several folds. We select any suitable beads and decorative elements. I have metal cast caps and crystal translucent beads. Beads made of polymer clay are made using the mokume-gane technique:
I string beads onto a thread. To make it easier to thread the needle into the eye, I melt the edge of the thread a little; when melted, no solid drop remains on this thread, but the fibers become more ordered:

I tie the ends of the thread in a knot, the bracelet is ready. Read more about nodes below:

For securing synthetic threads, elastic, spandex and fishing line better use the following nodes:
Surgical knot:

Look like him Academic node:

Also reliable Flemish knot:

Another knot that is very difficult to untie is Water node, suitable for elastic:

Also good for fishing line and synthetics Furrier's knot:

Excellent Liana Knot:

These knots are all well suited for jewelry, but have different sizes, volumes and patterns. If this is not important for the thin thread that I use, then for a round thick elastic band or waxed cord it can be important, so before making the product, it is better to practice on a piece of thread.
Now a few words about the nodes that should not be used:
Oak knot don't come near t for securing synthetic threads and fishing line. When tensioned, it slides easily and comes undone:

Also not suitable Babi knot, although it is so common in everyday life. He will not be able to hold the elastic at all:

Just as insidious Mother-in-law's knot, also not for our purposes:

Weaving knots good for threads, but slip on elastic:

The drawings and descriptions of the properties of the knots were taken from L.N. Skryagin’s book “Sea Knots” and were tested by me practically on an elastic band.
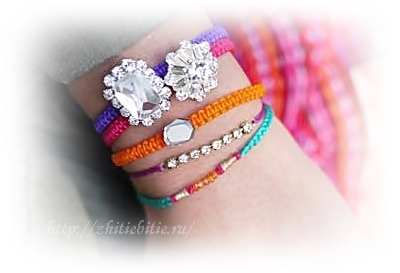
Here are some more photos of bracelets as an example. Using different fittings and beads, we can change the style of the bracelet.
This bracelet uses crystal beads of different sizes, a shaped spacer bead, caps for beads, a pendant holder, a connecting ring and a pendant with a sparkling effect:

In this work, polymer beads Natasha beads, crystal beads, bead caps and spacer beads with spirals:

These simple bracelets have minimal details. Striped resin beads and wooden beads. With purple beads I used 6 mm uncut glass beads.

Bracelet with a rose pendant, crystal beads, polymer beads decorated with caps for jewelry. The rosette is attached to the bail using a connecting ring.

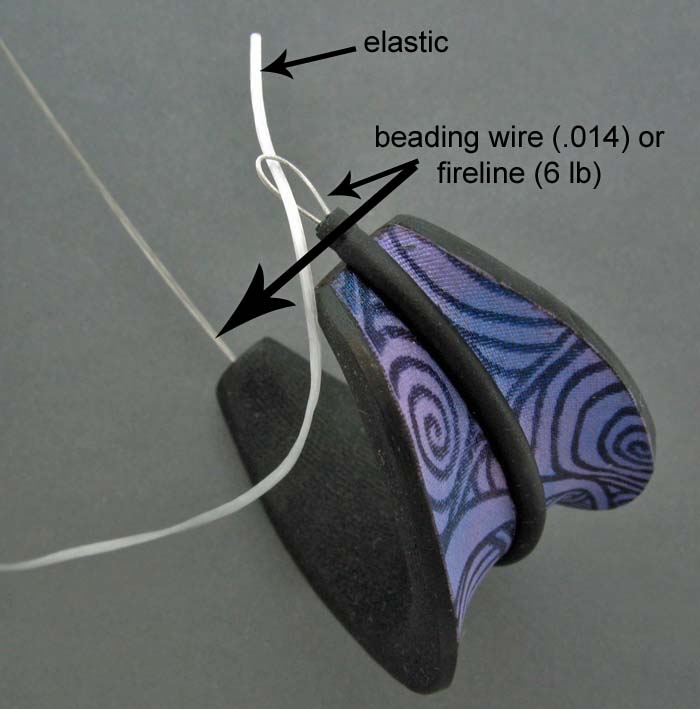
To complete the collection, I will add a link to another master class. How to stretch an elastic band inside a long hollow tube. Follow the link for description. Briefly, a loop of jewelry cable or wire is inserted inside the bracelet, a soft elastic band is hooked into it, and when the cable is pulled out, the rubber band is also removed from the other side:
Good luck and creative mood! I hope that you will get the most beautiful and reliable bracelets!
See also other lessons.
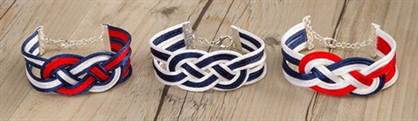
Braided bracelets made of laces, threads, ribbons, ropes and similar materials are an interesting accessory that can be worn by both men and women. Such bracelets are simple and unobtrusive, perfectly complementing the sports style that is so popular now.
In childhood, many people weave various baubles and trinkets and give them to each other, so this bracelet can become your little talisman.
There are a lot of options and methods for weaving laces and twine with your own hands for beginners. Choose the material and method that you like and get to work quickly! There are both more feminine baubles and masculine ones.
In addition to fancy ways of weaving threads into an ornament, you can use pendants and accessories to decorate and add a special zest to your craft. In addition, the choice of colors can be huge; you can try the brightest and most unusual combinations. To weave one bauble, you won’t need a lot of time and material costs, because the material in the form of laces and threads is available in any home.
The simplest narrow bracelet made of two cords, male version
As you can see, the pattern of weaving a bauble from two cords is quite simple. We will call one of the threads the main one (the one marked in orange and is the “rod” of our future bracelet), and the second - the working one (the one marked in blue and performs all the actions). Take the warp thread vertically and make a loop with the working thread.
Carefully follow the diagram for the position of the working thread relative to the main one and relative to itself (keep track of which thread will be the top at the intersection). Then make another loop, pull both loops up. This way your threads will switch places. Now the main one will be blue, and the working one will be orange. Continue weaving until the bracelet reaches the desired length. Secure the threads at the end with a knot and make a clasp. We’ll talk about different types of fasteners a little later, but now let’s move on to the next, no less interesting and beautiful method of weaving with cord.
Gallery: lace bracelet (25 photos)


DIY three cord bracelets
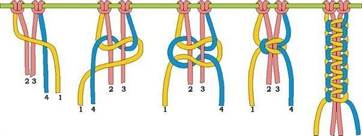
Double flat knot
 In this case, you can use either 3 laces (replace the halves of the laces, marked in red with one cord), or 2 long ones, which you fold in half (as shown in the picture). This cord will serve as the basis of our bracelet; we will braid it with outer threads. The weaving is simple, called a “double flat knot”. Let's figure out how it's done.
The leftmost thread (yellow) is placed on top of the others, and then the rightmost thread (blue) is braided around it. In this case, it lies on top of the yellow one, but passes under the main (central) thread. This will be the first part of our loop, the second half is performed according to the same principle, only in a mirror image. Now the blue thread will pass over the yellow and under the main one. We tighten the first knot of our bauble and continue weaving in the same spirit until the desired size.
DIY bracelets made from more laces
This weaving is more feminine, and the bracelet is wide and free. It looks best when made from thick and strong round threads that are quite rigid and hold their shape well. In weaving 2 groups of threads are involved. You can make this knot simply from 2 laces, but it will look much less interesting than, say, weaving from 4, 6 or 8 threads, divided by color into 2 similar or, on the contrary, contrasting groups. The number of threads must be a multiple of 2, and exactly how many of them there will be depends on the thickness of the material itself and the desired thickness of the product. For convenience, the groups are called right and left threads.

Bracelets with woven beads (shambhala). How to weave shambhala?
Shambhalas can be woven from laces, strong thick threads or waxed cord. There are 2 options for how to weave this beautiful bracelet. In the first case, on the first piece of material approximately 50 centimeters long, you need to string all the beads in the right order and secure it to a plane, for example, on a book using paper clips. In the second case, you won’t have to fasten anything, but put on the beads as you work through a certain number of knots. You can choose any of these options depending on which one is most convenient for you.
To weave, we will need another piece of cord approximately 1 meter long. The weave consists of 2 types of knots. I will call them the “right” and “left” nodules. The left knot is an ordinary knot that will be turned down (the place where the laces are intertwined will be below the base), and the right one is the same knot, only with the weave upward.
Whole bracelet consists of alternating these nodules.
- Thus, before the first bead we make a combination of left-right-left knots.
- There will be two knots before each next one.
- Before the second, we change the sequence and tie knots right-left, and before the third, left-right. And so on after each bead, until the last one.
- Behind the last bead there are again 3 knots.
- To secure the bracelet, turn it over and insert the left end into the loop on the right. Cut the end and preferably secure it with glue. We leave the long end for the fastener.
To do Shambhala clasp(in principle, it will be suitable for any such lace bracelet), you will need another piece of material. Cross the long ends of the bracelet and tie the same knot as at the beginning of the bracelet (the warp threads should be in opposite directions, but they will act as a single warp). We weave a small segment on them, alternating right and left knots.
Have you ever left a fabric store empty-handed? No to me. I’ll definitely stop at the stand with multi-colored floss, get lost in heaps of thin lace ribbons, pick up a handful of shiny crystals, buttons and brooches with rock crystal….
What can you do to prevent all these random purchases from being stored in boxes? That's right, start weaving bracelets, belts, necklaces and other jewelry with your own hands for yourself and your friends. This is a surprisingly interesting and exciting activity!
Previously, I already presented the Master Class: . And today I will tell you how to weave charming bracelet made using macrame technique with a neat clasp.
You will need:

- 2 meters bright lace diameter 0.8 mm
– 1 large brooch with rock crystal
— 1 small button with crystal or rock crystal
- thick needle
- scissors
- lighter
- a piece of tape

Cut the lace into two parts: 50 and 150 cm each. Fold the short section in half and tape it to the table. This thread is called an auxiliary thread. Determine the middle of the long part of the cord (active thread) and place it under the short laces as shown in the photo.

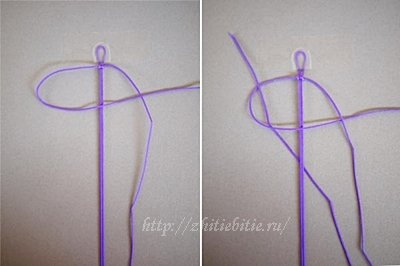
We begin weaving: we pass the left end of the active thread over the auxiliary ones and under the right active one, and pass the right active one under the auxiliary ones and over the left active one. Now we tighten the ends lace and we get the first node.
We repeat the steps described above, starting with the right active thread, and continue weaving until we begin to get an even bracelet.

When you reach the middle (measure as you work, placing the bracelet on your hand), thread the large brooch onto both auxiliary threads and secure it with active threads, continuing further.


To finish bracelet, thread the side laces through 2-3 already tied knots using a needle. Attach a button with a crystal to both auxiliary threads and secure with active ones.

Cut off the resulting protruding ends so that no more than 5 mm remain. Carefully melt them with a lighter and “seal” them on the back of the bracelet.

Using bright multi-colored ones, you can weave bracelets with a wide variety of inserts - with beads, with beads, with decorative buttons, etc.


In a word - fantasize, experiment boldly and always be original and unique in your decisions!