Good afternoon Today MK is making another figurine... for those... who like to please children))) by the way, both children and adults love gifts from balloons!)) We will make a bear or another dog... as your imagination allows)))
For work we will need:
- 6 12-inch blue balls...or 5 balls and one lincoloon (more on that later)
- 3 balls 5 inch white
- one five-inch black ball for the spout
- 4 blue 5 inch balls
- 2 shdm 260 (shdm balls for modeling...in common parlance, sausage balls))) for handles
- one small ball for a weight of any color
- permanent markers
beads...(in my case, vitamins are revitalized....in my opinion, this is an ideal option...even if the child bites through the figurine...which happened in my practice...vitamin beads...will not harm him)
- shdm trimmings
- a pair of hands and a great mood... it's as usual)))
Let's start) let's inflate a cluster of 4 12-inch blue balls (a cluster is 4 inflated balls of the same diameter connected together) in order... for the balls to be the same, there are several ways... but since for this figure we need a few calibrated balls... .we will count the pump strokes by inflating each ball...so we inflate each of the balls by 20 pump strokes..


Now we are making the body....there are such balls...called lincoluns...these are balls with two tails like the one in my photo...but if there is no such ball...no problem...let's make a button on a simple ball ..to which we will then attach the head...to do this, we will inflate the ball to the required size...and without tying it, we will put a mark on the top with a marker...we will deflate the ball...we will lower the bead inside it...we will roll the bead to our mark and tie a piece of shdm-ki for a couple of turns... and tie a knot.... attach the body to our base...

The next step... we inflate a cluster of small balls and tie them to our body... make sure that all the balls in the cluster are the same... otherwise the figure will be crooked and sloppy...


Let's inflate the ball for two or three strokes of the pump... tie it... then with both hands we press the walls of the druk ball against each other... with one hand pushing the knot inside... and with the other hand we try to grab it from the other side.... as soon as we we grabbed him... let's spin him around three times and tie him...

let's fix it with a shdm cut... this way we'll make two ears... it's difficult for one person to cope with this at first... ask for help... at least in tying a knot while you hold it... this way we'll make two ears... for the muzzle we need ties to be on both sides... one to tie the muzzle to the head... the other... to tie the nose to the muzzle... the technique is the same... but when we inflate and tie the balloon... we will tie a piece of shdm to the tie...in order to push the knot inside the ball...there will be a tie left on the outside...unfortunately, I forgot to take a photo....if something is not clear, write...I will explain...

These are the blanks we got... to one of them... which has two ties... we attach a spout...

We collect all the blanks... inflate the blue blank with three buttons... and tie the ears and muzzle in place...

Let's tie our head in place) there is very little left))

If you have already mastered the simplest figures and are confidently making all kinds of pirate sabers, dogs and giraffes, it’s time to move on to more complex figures. We offer another “airy” master class - a figurine of such a cute bear cub.
Pump up the ball. 
We tie the end of the ball. 
It's funny, but there is nothing accidental here, and even the resulting knot will not need to be hidden - it will become the nose of our bear. 
When inflating the balloon, do not forget to leave a tail for twists. In our case, it should be at least ten centimeters. 
We start forming the figure from the knot. Making the first small bubble. 
The second one should be even smaller. Here's a round little ball: 
The third one is longer, but not too long. 
The fourth bubble is equal to the second. 
Fifth to third. 
Sixth to the second and fourth. 
And the seventh - to the third and fifth bubbles. We should get this original design that looks like beads or a caterpillar: 
We hold our “caterpillar” tightly so that it does not unravel. Now we connect the second twist to the last one, modeling this triangular window with two small and three oblong bubbles: 
Twist, holding the first two bubbles tightly. 
Next we work inside this triangular window: we pull off the small bubbles with our thumb and forefinger. 
And we twist it around ourselves several times, forming such a small shell - an ear: 
The teddy bear's ears are ready. 
Now carefully push the first bubble into the triangular hole. 
Look how cute our bear is! 
We make a neck for the bear - a small round bubble. 
We measure out a small loop - a foot. 
And we twist it. 
The second similar loop will become the second foot. 
Modeling the tummy. 
And similarly to the previous ones, we form the two remaining legs. 
The tip of the ball becomes a tiny tail. 
Meet us, a new figurine from your collection is ready – a bright, cheerful teddy bear! 
A wonderful gift-souvenir, original and cute, most importantly, made with your own hands with love! I wish you happiness and fun minutes (hours, days, years, centuries) with your loved one!
Teddy bear with a heart.
Materials:
A sausage ball and a heart ball.
Step-by-step master class from the Creative Workshop “Inflators”.:
- 1. Take a bright red 5-inch heart balloon, inflate it and tie it.
Now we will make a bear cub that will hold this ball in its paws.
Here is a complete diagram of twisting a bear cub. Do not be alarmed by their number, but simply carefully read the further instructions and look at the photographs, sequentially performing all the steps.
- 2. Take a long ball (sausage), for example, pale purple or blue, and inflate it, leaving the 10-12 cm tip uninflated.
- 3. Then twist seven bubbles in succession: 3 centimeters (nose), 3 centimeters (back of the head), 5 cm (cheek), 3 cm (ear), 4 cm (forehead), 3 cm (ear), 5 cm (cheek). The main rule is to twist all the time in one direction, constantly holding the first and penultimate bubbles with the fingers of your left hand (remember, you have five of them! We hold the penultimate bubble with your thumb and forefinger, and use the rest to support the first bubble, the remaining bubbles dangle between them) , and hold the last of the twisted bubbles with the fingers of your right hand, while at the same time twisting this bubble three times with your right hand. If you don’t do this, the bubbles will unwind (this may not work right away, practice!).
- 4. Twist two 5-cm bubbles with a lock to make a loop of 5 bubbles (now these five bubbles will not unwind, hold only two bubbles - the nose and the back of the head),
- 5. We’ll stick the bear’s nose into this loop (so that the back of the head doesn’t stick behind it, but stays behind!),
- 6. then we twist the ears using a technique called “ear” (with one hand we press the forehead and cheek together, and with the other, pulling the bubble of the ear with the thumb and forefinger, we twist this bubble, preferably twice (so that it certainly does not unwind). We do it This happens first with the right ear, then with the left.
Now the muzzle is ready! If you succeeded, the rest is quite simple.
- 7. We twist the neck 3 cm, and then make a large 20 cm bubble, folded in half and twisted into a loop with a lock, these will be the front paws of the bear. Then we make a 5-6 cm bubble for the body, and then two more 6 cm bubbles for the hind legs, we twist them into a “lock”. A small tail bubble will remain.
- 8. Now take a red 5-inch heart balloon. Let's push it into the bear's front paws, as if the bear is hugging him. We will tie the knot on the heart ball (you can just wrap it) to the twist in front of the hind legs. The bear cub with a heart in its paws is ready!
You can familiarize yourself with other lessons and master classes on modeling toys from balloons on the website of the Creative Workshop “Inflators”
What do you associate with balloons? Holiday? Childhood? Fun? Perhaps almost everyone will answer this question exactly this way. And that’s all, because when we were little, balloons could be found at birthdays, in the circus or during other festive events in the city, where cheerful animators turned into real wizards, creating various figures from balloons. Such small or large figurines of various animals and colors look very unusual and therefore attract the interest of not only children, but also adults.
You can create crafts from balloons yourself at home and for this you do not need to have any special skills. It will be enough to buy just a few balls and you can start working miracles. As a rule, crafts made from balloons are not particularly complicated, but the result is stunning, so even a child can take up this unusual art form called twisting. You can decorate your home for the holiday with crafts made from balloons or give the figurine you made to friends.
In addition, you can make good money on crafts made from balloons. Since such crafts are very popular. As a rule, they decorate holidays, creating a fabulous atmosphere, and the process of creating such figurines is even a separate type of entertainment for children's parties. In addition, crafts made from balloons in the form of flowers are in great demand during such holidays as March 8 and Valentine's Day, because such an unusual bouquet will be a very original gift. So you can make good money on crafts made from balloons.
If you decide to get serious about creating crafts from balloons, then purchase a small pump, thanks to which you can inflate balloons faster and create figures, while using less effort.
What do you need to create crafts from balloons?
Before you start twisting, you need to do a little preparation. To do this, you first need to clearly define what kind of craft you want to create. After you make your choice, go to the store and buy a little more balls than you need for the chosen craft. This is necessary in order to avoid the situation of going to the store again if the ball unexpectedly bursts during operation.
When you have all the necessary materials, you can start working, but don’t forget to free up a few extra hours so that you don’t rush anywhere in the process of creating a craft, but simply enjoy creativity without wasting unnecessary nerves. In addition, it is important to tune in to the right mood, namely, not to think that nothing will work out, because the work of creating crafts from balloons is very painstaking and requires clear confidence in one’s abilities.
Balloon dog
Perhaps this is the craft that is most familiar to everyone since childhood. Animators most often make a dog out of balloons as a small gift for their viewers, and all because it takes very little time to create it, but at the same time the craft still looks magical, beautiful and original.
So, to create this craft you will need:
- Just one oblong ball of any color you like.
- Desire to make a craft
- Patience
This craft is very simple and quick to make. First, inflate the craft balloon, but not all the way! Leave a little void of about 5-10 centimeters.
Twist three small sausages from the other edge from the free side. Now let's move on to creating the head, to do this, take two sausages, namely the first and second, and twist them together, the head is ready!
Let's move on to the further creation of the dog, which will be carried out according to the same principle. So, in order to make the neck and front legs, you also need to twist 3 sausages and intertwine the second and third ones with each other, only now you will need to twist the legs down.
The body is made even simpler; for this you need to twist just one large sausage. The craft is almost ready, all that remains is to make the hind legs and tail. To do this, twist three more sausages, but now you need to twist the first and second ones together, so you get legs, and the third sausage will make a tail.
That's it, the balloon dog craft is ready!
Chamomile from balls
Balloon flowers are a beautiful and original gift for various holidays. Making such a gift with your own hands is quite simple, and besides, there are quite a lot of options for how to make a flower from balloons, but it is the daisy option from balloons that is the most beautiful and widespread among all.
For this craft you will need:
- White round balls 5 pieces
- Yellow round ball
- Two long green balls
- Patience
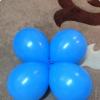
So, in order to make a daisy out of balloons, you first need to inflate all the round balloons, both white and yellow. White balls should be larger in size than white ones. To begin, take two white balls and secure them with a strong knot. Now tie 3 more balls together and combine these structures. The petals are ready, let's move on to the stem.
To do this, you need to inflate the green balloon, but not completely leaving a little free space. At the end, make two small sausages and tie them together, wrap them in different directions.
Now you need to fasten these two parts using the core. To do this, take the remaining inflated yellow ball and stretch it through the center of the petals, wrap the tail of the ball around the circles on the stem and tie this structure with a knot.
The balloon flower is ready!
To make it easier to attach the flower, you need to make all the petals the same size. To do this, cut out an opening of the required size in the cardboard and, while inflating the balloons, measure by inserting half of it into the template, and inflate the balloon until it fits perfectly into your circle on the template. Thus, do this with each petal, then all the balls will be the same size.

Heart made of balloons
Perhaps this particular craft made from balloons is very multifunctional, because a heart made from balloons is used both as a simple gift and as a decoration for a holiday design. Wedding halls are often decorated with such a heart, because it is the heart that seems to speak of the love of the newlyweds. This figure is used to decorate rooms in honor of the birth of a child or simply for a birthday. In addition, with such a heart you can declare your love in a very original way. Therefore, almost everyone must be able to make such a craft from balls, and besides, this activity is not particularly difficult.
For the craft you will need:
- For the heart you will need as many as 150 round balls, this is certainly a lot, but it’s worth it
- 2.5 meters of wire
- pliers
- A few hours of free time
- Patience
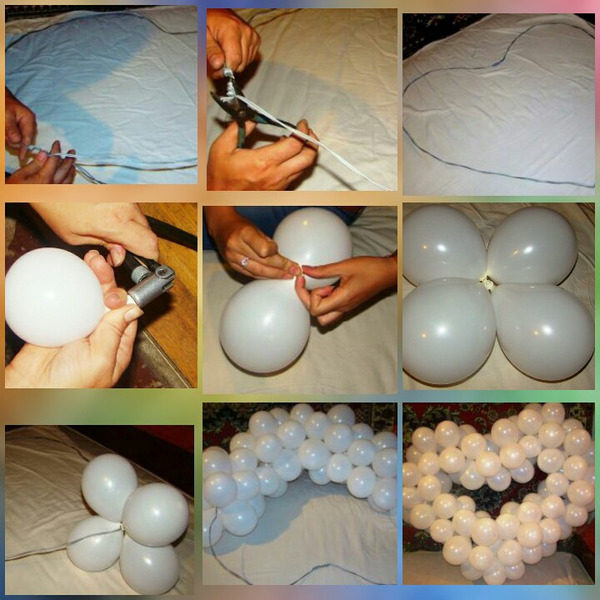
So, first you need to make a heart out of wire. To do this, connect the wire into a circle using pliers and make the perfect heart shape as carefully as possible. This process is very important, so it is recommended to pay special attention to it.
After you have made a heart out of wire, make balls. They all need to be inflated, of course, this process is quite long and painful, so use a small pump to inflate the balls, so you will finish much faster.
When you inflate all the balloons, you will need to tie them together in four pieces. To do this, first tie two balls per knot, and then combine two such structures with each other.
After this, all the resulting designs of four balls will need to be put on the prepared wire heart. Putting on the balls is quite simple, you just need to wrap them around the wire.
When you put all the balls on the wire, you will get a beautiful heart made of balls, which can be given as a gift or used as a decoration.
In order to make the design of the balls more beautiful, it is recommended to put them on the wire in a checkerboard pattern, so that between the two balls of the previous row there would be one ball of this one. This way you will hide the wire under the balls and your heart will look much better.
Bright decoration of balloons for the New Year
For this composition you will need:
- 20 green balls, round
- Threads
- And, of course, the desire to create a holiday
So, take 5 balloons and inflate them to the maximum. After you have inflated 5 balloons, tie them by the ends to each other. Then we inflate 5 balloons in the same way, only not as much as the first 5, and tie them together in the same way. And so we continue until you have a very small composition that looks like petals like a flower. After which the very first one we made will be the base, the next one is a little smaller and we connect it. And we continue to do so. If you do everything correctly, you will have a beautiful Christmas tree. You can put a real star on top of your tree. And this composition can be wrapped in rain. 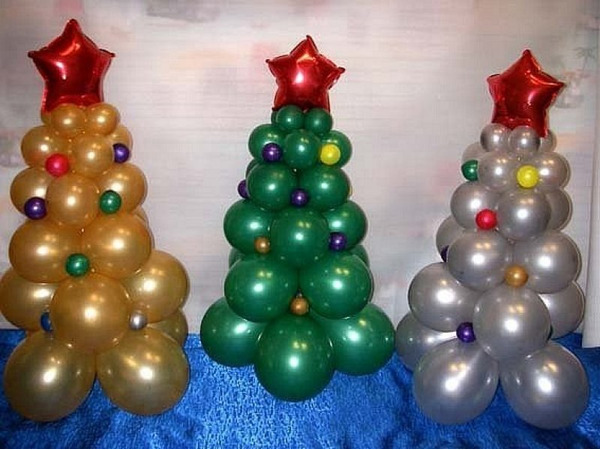
Now we will make a fairy-tale character of Santa Claus's assistant, a snowman
For this we need:
- White round balls 10 pieces
- Red round ball 1 piece
- Balloons for decoration 1 blue, 1 orange and 1 white
- Scissors
- Double sided tape
- Self-adhesive film red, black, blue and white
- Marker
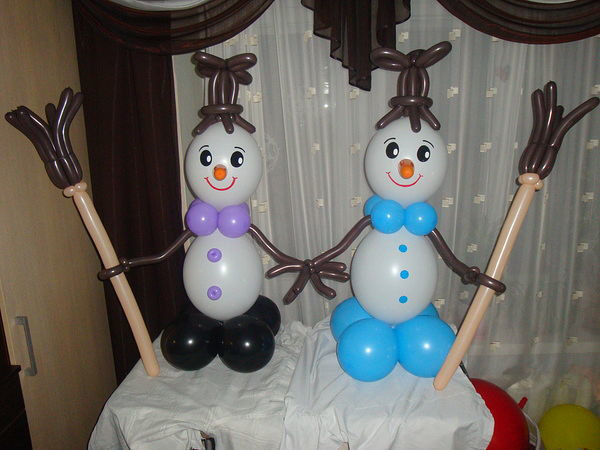
Let's start, take two white balls and inflate them, one should be larger than the other. After inflating, tie the balloons. Now the balls need to be connected to each other. Now you should prepare the snowman's collar. To do this, take 4 white balloons and inflate them, and tie them. Afterwards you need to tie them two at a time. Now the resulting balls, 2 at a time, need to be twisted so that they come out like a flower. Now we twist the two large balls that we made at the very beginning with the resulting collar. And you will get a torso and a head and a collar. Now we create the same as the collar for the stand. We glue the tape onto the resulting stand and place our snowman.
We take balls for decoration and make hands for our snowman. For this you need sausage-shaped balls. We inflate the balloons and divide the ball in half and twist it. Now, in place of the connection of the torso and head, we wrap our hands. For mittens, at the beginning of the ball we twist it 2-3 times, and on the other side we do the same.
We make a hat for our snowman, take a blue decoration ball and inflate it. Then we tie it together to make a circle. We take our red ball and inflate it in the same way. Now we need to connect with tape and you should have a hat. We attach the hat to your snowman's head using tape.
Now we make eyes and a mouth for our snowman from self-adhesive film. And glue it to our snowman. Take the remaining orange ball and inflate it lightly. This will be our spout, which we attach with tape. Our snowman is ready.
Now we have a snowman and a Christmas tree, these are integral attributes of the New Year and which bring a smile and joy to everyone who sees them.
Bear made of balloons
This craft in the shape of a bear will definitely appeal to both children and adults. This original toy can be an interesting decoration to create a festive atmosphere, or the bear can simply be a very unusual gift. Buying a bear made of balloons will not be cheap, and why spend money if you can make it yourself and, at the same time, it will be quite no worse.
For the craft you will need:
- 5 large round balls of any color
- Linkolun
- 3 small balls of a different color from the big balls.
- 4 small balls of the same color as the big ones.
- 2 oblong balls
- Beads
- Unnecessary ball
So, first of all, you need to inflate all the balloons, this will not take you much time. Now take four balls and tie them together, these will be the back legs of the bear and also the basis for the figurine. In order for the craft to stand, you will need to make a weight for this base; this task is very simple to complete. To do this, you need to take a small unnecessary ball and pour a little water into it, tie the weight well in a knot and tie it to the place where the 4 balls meet.
After this, you need to make the body, it is quite simple, to make it you will need one linkolun, which must be attached to the base. The body is ready.
Now you need to take 4 small balls of the same color as the large ones and tie them together. Now attach the resulting structure to the linkolun on top and proceed to making the head. This is the hardest part of making a balloon bear. To make the head, take a large balloon and inflate it, mark the places for the ears and muzzle and deflate the head. Drive the beads into the places you marked and wrap them with pieces of torn balls. After this, you can carefully inflate the balloon. Now make the ears and nose. The ears and nose need to be done using a technique called bullseye; you can find out more about this technique on the Internet. Now connect the parts to the head, and draw the eyes.
Attach the head to the rest of the structure and make handles. To do this, inflate two oblong balloons and make twists at their ends that connect at the ends. Now we attach the arms to the body and, if desired, decorate the bear with small details. That's all, the balloon bear craft is ready.

Balloon bunny
This balloon craft like a bunny is sure to please all children. The craft looks very unusual and original. It can be both a wonderful gift and an interesting decoration for a holiday design. This figurine of balls is very simple to make and to create it you do not need to have any special talent, all you need is your desire and patience and everything will definitely work out.
To create a bunny from balloons we will need:
- Pump
- Scissors
- Black marker
- Blue balls ShMD 2 pieces
- White ball SMD 1 piece
- Trimming of a pink ball SMD
So, take a blue balloon and inflate it, tie it and make a ring. For the tracking action, you need to find the middle of the ball, and with the other hand take it where we tied it. Now we make a figure similar to a figure eight, and put it aside for now. We take the second ball and inflate it, so that there is a tail of about 6-9 centimeters. Now we make a bubble about 5 centimeters on it.
We take our figure eight and apply the joint to the bubble and twist them together. Now on the resulting leg we make a second bubble, the same as the first. We twist the resulting bubbles several times, but this must be done so that the bubbles do not unwind. Set aside what came out for now and take a white ball and inflate it.
You should leave a tail of about 10-13 centimeters, now on this ball we make 3 identical bubbles. The resulting bubbles need to be twisted together, the next step that needs to be made is another bubble of about 20 centimeters, and we bend it in half and twist the ends. We make another exactly the same bubble and repeat the same procedure. We lower the remaining piece of the ball and make a knot.
Now we take the blue balls, and put the long end on the resulting muzzle from the white ball. On the blue ball, on which we put a white ball, we make a bubble about 15 centimeters in size. We make the same bubble as we just did and twist it together. Make two more bubbles slightly smaller than the previous two bubbles. We push the first two bubbles apart and insert the two bubbles that we just made between them. Take a pink balloon and inflate it slightly. We tie it to the blue ball with a long tail. Now cut off the rest of the pink ball. Take a marker and draw eyes for our rabbit.
If everything is done correctly, you get a beautiful bunny that will be a wonderful decoration for any holiday. 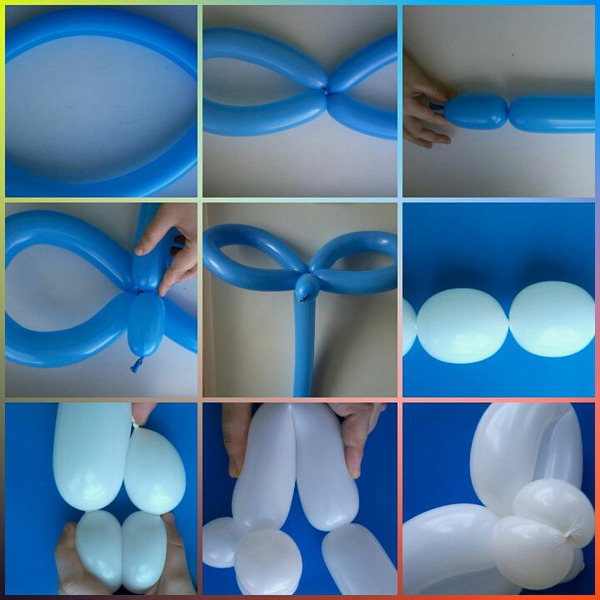

To summarize, I would like to note that the balloon figures that are presented in this article are only a small part of what can be made from balloons, since it is simply impossible to list all such crafts. The number of options for balloon figures becomes more and more every year, people come up with more and more new ideas, which they successfully implement.
But, despite the fact that there are a huge number of options for such crafts, they all have one definite feature, which is that all such figures are very easy to make and this activity can be done even with children. DIY crafts made from balloons are an interesting and unusual hobby for both children and adults. In addition, you can earn good money from such a hobby. So making balloon figurines is an interesting and exciting and also useful activity, from which you can also make money.