This cute little felt frog will happily settle into a child's room and meet other toy inhabitants. You can sew such a frog from soft green felt. The pattern for this toy is simple and consists of a small number of parts, so it can be made quite quickly.
To make a small frog we will need:
- - felt in green, pink, white and yellow colors;
- - threads of green, white, yellow, pink and black;
- - scissors;
- - padding polyester;
- - needle;
- - checkered paper (for making a toy pattern);
- - pencil.

The procedure for making a small frog
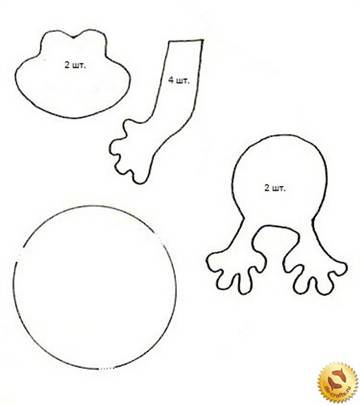
1. The pattern of this little frog consists of only five parts. On checkered paper we will draw a frog's head, a body with hind legs, a front leg, a tummy, and a small flower. We cut out the drawn parts of the pattern from paper.

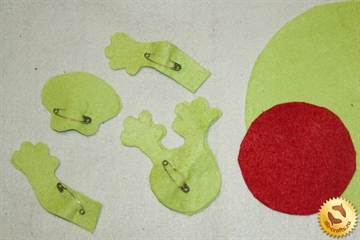
2. Lay out a sheet of green felt on the table and place the details of the head, paws and torso on it. We will circle each detail the required number of times and cut it out. For the toy frog we will need two head parts, two body parts and four leg parts.

3. You need to cut out the eye detail in one copy from white felt.

4. Cut out one part of the tummy from pink felt.

5. Cut out one small flower from yellow felt.

6. Let's start sewing a toy frog from the head. First, take one part of the head, attach the white part of the eyes to it and sew it on with basting stitches of white thread. Stitches should be made small and even.

7. Combine this head part with another head part and sew them together using loop stitches of green thread, leaving an unsewn area at the bottom.

8. Now let’s sew the frog’s body. To do this, first take one part of the body, attach the pink part of the tummy to it and sew it with pink threads, making small basting stitches.

9. Let's add this part of the body to the second part of the body and sew with green threads along the edge, making loop stitches, and leave an unsewn area at the bottom.

10. We put the parts of the front legs of the frog in pairs and sew them with green threads using loop stitches, and leave a hole on each leg.

11. Take a padding polyester and evenly fill all parts of the toy - paws, head and torso.

12. Sew a hole on the frog’s body with green threads, making neat loop stitches.

13. Place the head to the body and sew with hidden stitches of green thread.

14. On each front leg, carefully sew up the hole with green thread.

15. Sew the paws to the body with the same green threads, making sure that the paws are at the same level.

16. Use black thread to embroider small pupils on the white part of the eyes; the pupils should be located at the same level symmetrically.

17. Using pink thread we will embroider a small mouth in the shape of an arc for the frog.

18. Take a flower cut out of yellow felt, attach it to the part of the frog’s belly and sew it with yellow threads, making small basting stitches.

The little felt frog is ready. This frog can be not only an ordinary children's toy; if you sew a loop of ribbon or colored decorative cord to the figurine, the frog can serve as a key ring or a pendant for a child's bag. If you sew several of these frogs, you can make a mobile for a crib or stroller. In addition, such a frog can turn into a Christmas tree toy and decorate the New Year tree.


If you love handicrafts, then your children probably want to take part in it all the time. But it’s not always possible to come up with “handicrafts” that kids can handle. This is where simple felt crafts, like this cute little frog, come in handy.
Making crafts from felt is very simple, and your kids will be happy to do this with you. After all, in essence it is no more complicated than paper appliqué. Well, I think you can help me sew it. The structure of the felt is such that its edges do not require additional processing and sewing them together is very simple. And a new soft toy, also made with your own hands, will certainly become a family favorite.
To make such a frog, you will need:
- two small pieces of felt (no larger than a landscape sheet) in green and white or beige colors;
- two buttons for the eyes;
- thread and needle;
- a little filler for our frog, you can use synthetic polyester, batting or regular cotton wool as a filler;
- some free time and a desire to make crafts with children.
Simple felt crafts - work progress

1. Print out the proposed pattern - patterns and cut out the necessary parts.
2. Lay out the parts on felt and trace them with a pencil. Keep track of the number of parts: some are needed in one copy, others in several.
3. When the markings are finished, feel free to cut out all the parts and start stitching.
4. Sew the abdomen onto one of the parts of the frog’s body, and attach the legs on top, as shown in the picture. On the other side, attach the second part of the body and sew along the contour with an overlock stitch. Don't forget to leave a small hole to fill the frog's body with stuffing. Filled? Stitch.
5. Let's start with the frog's head. On one part of the frog's head, sew a piece of light felt for the base of the eyes, embroider a mouth and draw the cheeks of the frog. Now you can sew both parts of the head along the contour. We fill it with filler and sew it together completely. Using the tightening technique, sew on the frog's eyes - buttons. If this is difficult for you, sew them in advance, before sewing both parts of the frog's head.
6. Sew the frog’s head to the body; if the seam is not very neat, don’t be upset. Decorate the frog's neck with a scarf made from a ribbon in a contrasting color or a bow made from regular ribbon.
The felt frog is ready! Enjoy your creative achievements!
felt crafts, simple felt crafts, felt crafts with kids
Pretty Toys Workshop has a large selection of frog patterns. We invite you to sew a funny toad, a Frog Princess, a funny little frog, and even a whole family. Do you know what creature is believed to bring money? Of course, a frog! It is believed that the more of these amphibians you are surrounded by, the faster your wealth will grow. It's time to think about how to sew a frog and get ready to get rich.
You can turn the queen of the swamps into the queen of your children's room or your sofa. Sewing a frog toy with your own hands is a pleasure, the main thing is to find pieces of fabric of different colors, the only condition is that there must be a green tint everywhere! To create a primitive toy you will need: green fleece, yellow, white and red felt, two large black beads, embroidery thread, scissors, needle, filler. Be sure that all the work will not seem like some kind of dreary hard labor and boring pastime. It will fly by unnoticed and leave pleasant memories!
To sew a frog with your own hands according to a pattern, you can use any fleecy fabric (some people create theirs from a leather substitute and satin). The size of the toy may vary. We offer to sew both a compact animal and a full-size pillow. The products are stuffed with padding polyester, millet, peas, and lentils. Finished toys are decorated with glasses, a scarf, a tie, beads, etc. The paws can be sewn on or connected with a rope hinge. Fantasy is unlimited! Frogs using the Tilda technique deserve special attention. Cheerful, cozy, natural.
If you sewed an original frog toy using a Pretty Toys pattern, send it in a photo. We will be glad to receive useful recommendations. Our Workshop is regularly updated, we will be happy to add a new interesting pattern to it. There are a lot of toys on store shelves, some interesting and some not so interesting. But only a hand-sewn toy is truly original and unique. If you have some free time, spend it usefully!
Who doesn't like stuffed animals? After all, interest and love for these subjects does not go away even in adulthood. Young children especially like such toys, but it is difficult to constantly acquire something that increases in price every day. Therefore, you can save money and learn how to sew yourself. One of the most popular toys is a frog, which can not only be sewn, but also knitted and made from scrap materials. In our master class we will learn how to make it from fabric, namely, we will see how a frog will be made from felt.
Everyone remembers such toys in their childhood, especially in the crib at night. These best friends are not only easy to use, but also safe, because the baby will not hurt himself, will not hit himself, he may just tear him, but even here the mother can come to the rescue and carefully sew up the product. Therefore, beginning needlewomen should turn their attention to this particular material, which will help please the child and at the same time create exactly the frog from fairy tales that will be able to serve for a long time.

Naughty frog
Now modern needlewomen are able to create any toy, while spending a minimum of money and time. But beginners will have to allocate a little more of their own free time. After all, those who have already gotten the hang of it can complete everything in a few hours, but those who are just starting to learn the basics of sewing toys will have to tinker a little. In our master class we will learn how to make a frog from felt. The fabric itself is quite durable and at the same time soft, so it is perfect for sewing toys with your own hands.
What we need:
- frog pattern;
- green felt;
- red felt;
- threads in the color of the main fabric;
- red strings;
- eyes that are used for sewing toys;
- padding polyester;
- scissors;
- needle;
- paper;
- chintz fabric with flowers;
- two buttons.
We transfer the pattern to paper and cut out all the details of the future frog. Then we apply it to the fabric and use chalk to draw an outline onto the fabric. When everything is drawn, we cut everything out from the fabric. We put everything that has a pair together and secure it with pins. And with the help of scissors we smooth out all the unevenness. We begin to sew together the parts from the body. We sew carefully and make even seams, because we work on the front side. The paws need to be sheathed. Look at the photo below to see how it should look. Then we begin to fill them with padding polyester using a pencil or pin. Again we begin to sew in a circle and work until a small hole of up to one centimeter in size remains. We fill the frog's body with padding polyester through this hole. And when the entire abdomen is filled, we sew everything together.


We take a red circle and stitch along the edge, after which we do not cut the thread, do not fasten it, but simply tighten the product, as shown in the photo below.
Threads can be used in different colors; this does not matter, since they will not be visible later.
Now we need to tighten it well so that we get a tight circle, then we cut the thread, and our collar is ready. We won't need it for now, so we'll put it aside.
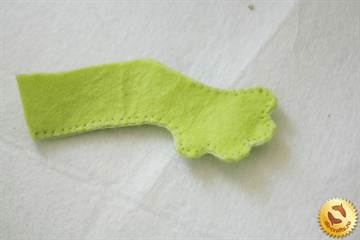
We begin to make the head of our princess. Take glue and glue the eyes to the desired location. And if there are no such eyes, then you can take a thread and embroider it yourself. We embroider the frog's mouth with red threads. When everything is done on the muzzle, put it aside. Let's start working with the upper legs. It is recommended to sew from the shoulder and further along the wrist. Next, fill it tightly with padding polyester. Then we sheathe it further, but at the same time leave a transverse hole and fill it completely with padding polyester. And only after that we can close the part. We do the same with the second paw.
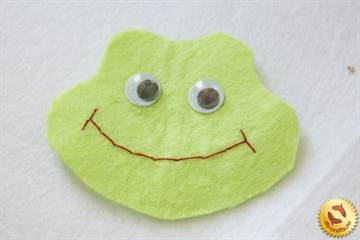

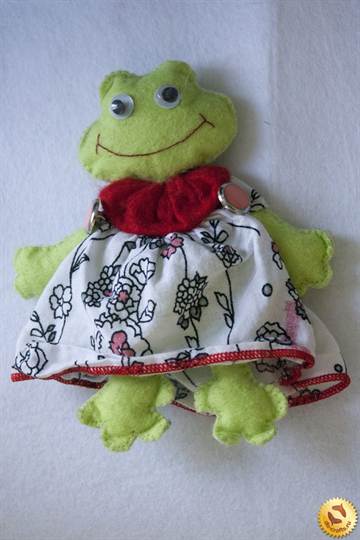
Let's return to the frog's head. We sew the two parts together, but leave a hole in the neck area. Then we fill it completely with padding polyester. Make sure everything is filled evenly. All we have to do is connect all the parts together. We begin to sew on the legs first; it is best to assemble them into an accordion on top. To hide all the imperfections, we sew on a red collar. And only after that we sew on the frog’s head.
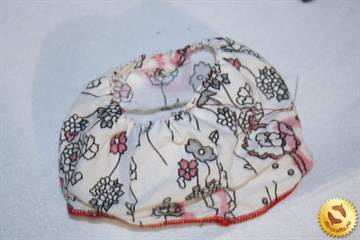
Our frog is almost ready, now we need to dress it. We take a colorful fabric, the width of which will be 9 centimeters and the length - 20 cm. Now we sew the fabric and collect it from one edge. It turns out to be a skirt that we put on the frog. And from two small strips of fabric we form straps, which we decorate with two buttons on the front. Now the princess is ready!


There are old things in every home. Using fabric from an old hat or jacket, you can sew a wonderful thing. A felt frog is easy to make, but it will allow adults and children to feel the joy of joint creativity and significantly refresh the interior of a children's room.
Learning how to properly sew a felt frog: tools and materials
Before you start making the toy itself, you need to make a pattern. You can transfer it to the fabric yourself, approximately as shown in the figure below. Cutters use chalk for such purposes, but you can get by with a pencil:

The list of materials for making a frog is quite extensive, but if something is missing, you can easily replace the element with another:
- Felt fabric (green and red);
- Threads (preferably white, green and red);
- Material for the eyes (possibly buttons or rivets);
- Material for stuffing the toy, ideally padding polyester;
- Cotton or chintz fabric in bright colors;
- A few nice pins or buttons.
- Chalk or chemical pencil.
- Materials for the design of clothing elements and surroundings.
Take a piece of felt with silhouettes of frog parts drawn in chalk and carefully cut them out.
For cutting felt, it is best to use a sharp stationery knife or, in extreme cases, scissors.
Further sequence of actions.It makes sense to fold all paired elements one with the other and sew them with several large stitches. There is an option to pin them with pins. The main task is to ensure that the frog’s body is not “slumpy”, does not slope down, and parts do not fall off from it:

The second stage is carefully sewing together individual parts of the soft toy with inconspicuous (ideally white) threads. It is worth sewing as shown in the picture or “over the edge”, the main thing is to connect the edges of the pattern as accurately as possible to avoid overlapping pieces of fabric on each other. It is advisable to ensure that the seam is as even as possible.
Some craftsmen sew using a sewing machine, but if you instruct your child to do it by hand, it will only be more interesting.
Then you need to fill the resulting “bags” with padding polyester. You need to fill it tightly, but make sure that the filler does not “leak” from under the seam and is evenly distributed throughout the entire volume of the toy. The most convenient way to do this is with a pencil or pin. An example of a successfully “filled” frog.
By the way, it is not necessary to use padding polyester. If you want to make a toy with your own hands, but do not have this material, you can stuff the frog with sand, cotton wool, or even shredded paper.
How can and should you make a face for a frog?
Of course, a frog without eyes, nose and mouth does not look very cute. In order for her face to gain expressiveness, it is worth cutting out the missing elements from black and red fabric (not necessarily felt, by the way!) and carefully fastening them with glue or, again, threads.
You can even simply embroider a mouth with red thread. As for the head as a whole, sometimes craftswomen make it separately, effectively design and decorate it, stuff it, and then simply carefully sew it to the body. It turns out beautifully and unnoticeably, as in the picture below:

By the way, in this version of the Groom, small multi-colored buttons are used to decorate the costume and create the eyes - it turns out very impressive. There are options for decorating coins, empty yogurt boxes, matches, and even the shells found inside children's chocolate eggs.
And of course, your pet cannot afford to remain naked. “Clothes” for it can be cut out of paper, leftover felt or any other fabric, scraps of leather and soft plastic - there are many options, and it all depends on the imagination of the needlewoman.
The resulting frog can not only be “dressed”, but also given, for example, an arrow or a book in its paw. Knowledge of Russian folk tales opens up the widest scope for the most daring experiments, including when choosing a habitat for a frog. For example, you can “plant” it on a lily pad or “settle” it in a Castle pre-made from cardboard.
The main thing, given the miniature size of the craft, is not to rush and do everything carefully. Simple work, for example, cutting felt according to templates, can and should be entrusted to a child, because the joy of owning a toy made by yourself is much greater than from a purchased one!
Video lessons on the topic of the article
There are some nuances in creating a felt frog that are difficult to understand without watching a master class. The method of connecting the body and legs, designing the facial expression, preparing the pattern and stuffing the frog with filler will bring many pleasant moments and will not bring disappointment from a spoiled craft if you combine making your future pet with watching the following videos: