Handmade gifts are always original and memorable. Especially if it's a doll. This detailed Master Class from invites you to sew a charming textile doll for games or interior decoration.
Pattern

Torso
To make a body this kind of doll material was used gabardine stretch. You can use thick cotton or knitwear. A cut measuring 40x50 cm is required. We place the pattern on the fabric folded in half along the grain thread and trace it along the contour.


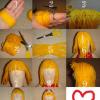
The photo with the pattern details shows dotted lines. There is no need to spend time on these places. They are necessary for turning and subsequent stuffing. The head consists of three parts: the two occipital ones are sewn together and connected at the edges with the part for the face. At the legs, unfold the toe part and grind it down.

Turn all the parts right side out and carefully straighten your fingers. You can even lightly coat the seams in these places with PVA glue. We fill the blanks with padding polyester or holofiber. The padding should be very dense, without lumps or folds. We sew open sections with a hidden seam.


Next, we assemble our doll. We sew the head to the neck with a hidden seam, the arms and legs with a button-thread fastening. This method will make the toy partially movable, that is, it can be planted and its arms raised.


The doll's body is almost ready.

Cloth


Homemade toys are always received with warmth, and sewing in itself is a useful skill. So have fun creating!
Did you like the product and want to order the same from the author? Write to us.
Girls at all times love to play with dolls most of all, and their mothers have no choice but to learn how to make DIY fabric dolls to give your child a little piece of a fairy tale. The difference between the dolls that you make yourself and those plastic products sold in the store is that homemade dolls are endowed with individuality; you yourself can choose a theme for them, choose the desired image, so that the toy becomes an indispensable companion for children's games. However, no less often there are ones whose main task is to decorate the space around them. They are sewn not only for children, but even for adults, as a wonderful gift from childhood.
Make a doll with your own hands from fabric
To make a doll with your own hands from fabric, in fact, you don’t need so much - this is the right pattern that will create the contours of the doll’s body, this is a fabric that is suitable in texture and shade, as well as a filler, by adjusting the amount of which, we can achieve either stability of the body, or, conversely, its pleasant softness and plasticity. The remaining details will be classified as auxiliary: woolen threads for hair, threads for embroidering facial features or paints for the same purpose, as well as numerous pieces of different fabrics for creating clothes.
Creating a fabric girl is an entire art that has been around for many thousands of years, because at all times little ones love to play with them as daughters and mothers, this is an integral part of growing up and forming a future woman. When we grow up, our love for these toys does not seem to go away, but transforms into the desire to provide our children with the most beautiful dolls possible. And, since this is a very beautiful and atmospheric thing, their own fashion trends and their own trendsetters of this very fashion began to appear in this craft.
The pillars of modern decor fashion include Tilda dolls, which have already conquered the whole world. They are found in people's homes in various countries, and sewing them allows you to get fashionable and very beautiful decor with your own hands, since Tilda patterns and patterns are sold or posted for free everywhere. It is very difficult to describe what exactly makes Tild so incredibly attractive; these are toys with an amazingly kind appearance, they seem to personify home comfort. Among them there are also their own recognizable images, such as the one in which the girl’s pattern is complemented by wings and a halo above her head, but the most popular are simple girls who have small wings behind their backs. They are all sewn from thin flesh-colored fabric (at hobby centers you can easily buy everything you need for work), and special attention is paid to clothes and hairstyles, since they always look like miniature copies of real things.

We can say that Tildas are the ideal option for those who are looking for lessons on creating DIY fabric dolls step by step, because the toy is very popular and there are simply plenty of master classes with photographs, diagrams, and videos. In the picture you can see the most common pattern options, as well as a diagram for assembling the finished toy. They are usually cut from two types of fabric, thin flesh fabric is used to create the arms, legs and head, and the body, which according to Tilda canons remains covered by clothing, is made from another material, denser and softer; natural cotton or similar options are suitable. The arms and legs are sewn together and stuffed with filler through the seams that are not completely sewn, which are then closed. But creating a frame is only the very first and simplest stage of the process. You need to pay special attention to embroidering hair and creating hairstyles, as well as sewing clothes and accessories. However, having successfully completed your first such toy, you will probably want to repeat this creative process again and again.
Maybe it was the popularity of Tilda, which made such a splash several years ago, that contributed to the fact that needlewomen forgot about it and rushed into a creative search for the ideal doll. Therefore, modern fashion trends are inspired and developed by specific people, and now their patterns and ideas are repeated by thousands of admirers. We will show you the two most popular types of fashionable DIY dolls made of fabric, master class which you can easily find: these are Snowballs and Pumpkin Heads.

Pumpkinheads are usually called unique DIY dolls made of fabric, photo which you see above. Their body proportions are quite ordinary, but the head is made using a special technology - several sectors are sewn together, which makes it look like a pumpkin, hence the name. It is the head that can be called the main detail for the entire craft, so maximum attention is paid to it. Unlike Tilda, for whom face painting is very symbolic and is not given special attention, for pumpkin heads it is important that the face not only has large, beautiful features, but also expresses the given emotions. They paint the face with a thin brush and acrylic paints, literally endowing their creation with history, character, and habits. The remaining parts of the pumpkin head's body are made according to the doll standard, complemented by clothes, shoes, and accessories.

No less beautiful are Snowballs, which are also a designer toy that everyone has been repeating with ecstasy for several years now. Even in the photograph you can see how Snowballs differ from others - these are wide, well-padded legs that make the figure stable, while the faces are not just made schematically, they are generally practically clean, with small dots instead of eyes and the obligatory blush on the cheeks. Many people do it in the Snowball style, when toys are intended for New Year's compositions, decorating shelves and coffee tables.
DIY fabric doll for beginners
The beauty of many varieties of children's toys allows them to compete with the most expensive ones, but if you remember that the initial goal should be for children to play, then the simplest varieties will come in handy. No wonder DIY fabric doll for beginners in many ways it will be so similar to those dolls that our great-grandmothers had the opportunity to play with.

But before we talk about the so-called primitives or attic dolls, let's look at another variety, which can also be classified as simple. However, another reason was that this is a toy, and not an interior decoration, and a useful, educational toy. We are talking about the so-called Waldorf doll, which is used in educational gardens and schools that work using the Waldorf technique. Such a doll for a child will be an ideal playmate, because the proportions of its body will perfectly replicate real human proportions, both for adults and for doll children. Therefore, to sew Waldorf toys, you need to correctly adhere to the proportions, make the doll’s body itself correct and beautiful. The second aspect of the toy is a schematic representation of the face; it is believed that the child himself will endow his toy with character, he will “think out” and imagine, without any imposed stereotypes. That is why we can say that sewing just such a doll is both an exciting creative process and an important point in the pedagogical program. And if you already know how to make fabric ones, then you will probably be able to make such a product, especially since this is indeed a very useful thing for a child’s development.

For beginners who do not have experience working with complex patterns and specific materials, the so-called primitives, which can also often be recognized under the name of attic dolls, are suitable. These are toys that absolutely anyone can sew; one might say that pillows are even more difficult to make than them. Primitives are distinguished not only by their schematic faces, but also by their clothes. Their bodies have the most basic shape, are not overly stuffed, so that even a small child can easily pick them up, and absolutely all the scraps that you can find in your home will be useful for sewing.

Children all over the world adore primitives, as they are very convenient to play with, sleep with, and carry with them everywhere, and mom can sew so many of them that with their help you can tell the biggest fairy tale with many characters. Standing apart among them is the Raggedy Ann doll, with a face made of patches. This doll has its own history, it has become a real symbol of America, but is loved by girls all over the world.
DIY dolls made from fabric with patterns
Sewing primitives, as we have already said, is quite simple and so that you can verify this, we will show you several methods of making DIY dolls made from fabric with patterns.

The good thing about this variety is that you are not at all limited in the choice of fabric, materials, degree of padding, you have a huge field for experimentation in search of the ideal toy for your baby.
Do-it-yourself amulet doll made of fabric
The so-called DIY amulet doll made of fabric. I recall ancient folk traditions, when it was believed that by creating a small likeness of a person, one could endow it with magical qualities, not only using it as a toy for a child, but also as an amulet that protects against evil forces, giving goodness and fulfillment of desires.

You can find many master classes on such a folk toy, and they can differ significantly depending on the region where they were once invented. Modern amulets, in addition to their some mystical meaning, are also very decorative, they are complemented by skillful embroidery in folk style, the most beautiful dresses are made with them, and braids are woven from woolen threads. But the face is not made for them at all, and this fact is very important for those who believe in the miraculous power of amulets. Here's for DIY Maslenitsa dolls made of fabric a slightly different approach is used - this is an image of the embodiment of winter, so her facial features can be painted, but her eyelids do not last long, since the effigy of Maslenitsa was usually burned at the end of Maslenitsa week.


Do-it-yourself motanka dolls made of fabric
Different toy amulets have regional characteristics, but the most popular is the motanka - a piece of ribbon rolled around hay or sticks, decorated with fabric imitating clothing. The face for the motanka is decorated with a ribbon with the image of a cross and in general they are considered a very powerful amulet for the well-being of the home, hearth and household.
You can embody your entire idea of beauty, create a faithful playmate for yourself or your daughter if you make a doll at home. It may not be as perfectly beautiful as those toys that are sold in the store, but it will be 100% yours, unique and inimitable.
By the way, you can buy a doll inexpensively!
Making a doll at home master class
In addition to the fact that the toys that we make with our own hands always turn out to be different from others, they also carry a huge amount of positive energy for play. They are made with great love, created like real masters, so in the end the dolls are each with their own character. It will be easier for small children to play with, they can be easily squeezed in your hands, and you won’t get hurt when playing. Older girls will certainly appreciate beautiful dolls made of clay or cold porcelain. Playing with them is not so active, but using these materials you can make a doll at home. A master class on creating these toys proves that homemade porcelain toys can outperform store-bought dolls.
Other news
Dolls are not at all like ordinary toys, especially when we are talking about handmade designer dolls. They don’t just look like they’re alive, because any master who creates these little masterpieces with his own hands puts a whole world into each doll: he invents and thinks through to the smallest detail its future image, endows the creation with a name, character, destiny and its own history. That is why all dolls are so original and unique.
If you want to become a part of the world of doll creators, try to learn from already recognized and venerable masters. Thanks to their tips, photo tutorials and master classes, you too can make a beautiful doll with your own hands. The main thing is to just want it and start inventing her image...


The doll is like a mirror of the soul of its author
Any creation begins with a plan, with a spark of an idea. Not all master classes can show this, but often masters draw sketches of the future doll so as not to miss or forget anything. Depending on what image is planned, the material is selected. However, sometimes a master can only work with one material, always trying to improve and achieve the ideal in his creations.
Designer dolls are created using a variety of techniques: they can be made of plastic, papier-mâché, sculpted from polymer clay or porcelain, sewn from fabric, have a soft body or a wire frame, etc. Today we will talk about frame dolls for making which use such material as paper glue.

Translated, its name means “paper clay.” This material is a pliable mass created on a cellulose basis (it is worth distinguishing between a polymer-based and a clay-based material). You can sculpt and model anything from it. Paper glue has many advantages over other plastics:
- it is lightweight and is not susceptible to dust sticking during the modeling process, like baked plastic;
- you can easily sand the product so that sandpaper will not leave scratches on it, and you can get rid of small flaws with a simple putty;
- paperclay is like a canvas, which you can paint in any desired color, based on the range of the doll’s costume and her image; it is also worth noting that paperclay can be easily painted with acrylic paints (their advantage over oil is that they dry faster).

True, this material is quite fragile, but this small drawback can be overcome by following some secrets of master puppeteers.
For inspiration and search for possible images, look at the works of famous authors who have been creating dolls for a long time: Alisa Bazhenkova, Galina Shitova, Lyubov Lukyanchuk, Victoria Minenko, Yulia Nazarenko, Oksana Dyachenko and many others. Their dolls can be found in various famous art galleries, they are also often exhibited at thematic exhibitions and are purchased by avid collectors for private collections.
Of course, such designer dolls cost quite a lot, for example, the simplest copies can be bought from 10,000-12,000 rubles, and if you want to get a custom-made doll in the outfit of some historical era, completely made by hand using various techniques, with expensive fabrics or accessories, then its cost can start from $100 and above.

From theory to practice, from idea to creation
Don’t be discouraged and afraid that you will succeed like the masters, because they too once started small. Be prepared for some not-so-successful specimens at first, but believe me that after numerous practical sessions you will definitely be able to make the doll of your dreams with your own hands.


Frame paperclay dolls are presented in collections in the most unexpected images: gentle angels, mysterious fairies, nymphs, elves, fatal beauties and prim ladies, sophisticated dancers and graceful cocottes, harlequins, hat makers, sweet and naive children, etc. However, the manufacturing process , as a rule, will be the same.
- After creating a sketch of the future doll and preparing all the necessary materials, you can get to work. Your initial task will be to make a frame and stand on which the doll can sit, stand, or take the pose that you have in mind.
- You can make your own frame from wire. It is better to use thin steel or copper wire (copper is suitable with a cross-section of 2.5-3.5). The wire frame is a very important point for a wire-frame doll, because if you make it weak, the doll will fall over and will not be able to stand on its feet. It is also worthwhile to carefully approach the anatomical features and proportionality of the body parts of your creation, so that you can then sculpt them correctly.
- So, according to the proportions, we turn the skeleton out of wire. Prepare yourself several pieces of different lengths so that you don’t have to stop while working. You can take two approximately identical wires and bend them in half - this way you will get two segments that will have four tails at the bottom and a bend at the top. Form a neck and bend the tails perpendicular to it to create shoulders. Then twist all the tails below - you will get a waist. Spread them at the bottom of the waist shoulder width apart and form a pelvis.
- Next you will need new pieces of wire to make the legs and arms. Bend one piece and tape it in the pelvic area to the already created frame (you can use a heat gun, medical plaster, electrical tape or the same wire for attachment). To make the handles come out, take another piece, place it in the shoulder area and bend it on both sides. Attach these handles to the overall frame.
- Additionally, you can twist other parts of the body from wire, such as a breast or butt for a doll. This is not necessary, but they will make it easier for you to wrap the frame later.
- There will be five wires in the legs. Wrap them in a spiral with wire of a smaller cross-section so as not to twist each other. If the doll's arms or legs are longer than you wanted, you can cut off the excess.
- Check body symmetry. Next, work begins on its formation. Some craftsmen use cotton threads impregnated with glue for this, others prefer batting or padding polyester for volume; you can also take foil, toilet paper, and for the final winding - floral tape or a medical bandage with PVA primer. We extend the body and cover it with knitwear. At this stage, it is worth deciding on the pose of your doll, since once the “carcass” dries and hardens, it is unlikely that you will be able to change it.
- We move on to sculpting the head and hands, as well as modeling the face. For this we need such a wonderful material - paper glue, which is called self-hardening plastic. However, it doesn't look much like plastic. You can sculpt, building up any number of layers until you achieve ideal facial features. If you dilute it with water (to make a paste), you can smooth out unevenness or smooth out a sharp corner. When you're done with the sculpting so that the head, face, and hands look the way they should, you'll need to sand the surface again using zero sandpaper (you can also use a nail sander at the end).
- Paint all exposed parts of the body with acrylic paint (very carefully, making sure there are no drips). Then paint the doll’s face, apply the desired makeup, make eyes (you can use store-bought ones, outline a bead, make them from Fimo, etc.), lips, cheeks. You can add glitter at the end and apply matte acrylic varnish as the last layer - this will protect the doll from dust and moisture.
- You make eyelashes and hair at your own discretion - you can use thread wigs, dreadlocks, fur, special elements for dolls or real natural wigs.
- Clothes can be sewn directly on the doll, then they cannot be removed. If you want to make her a wardrobe, then you need to create outfits separately. Don't forget about shoes, hats, jewelry and other accessories your doll needs.
Sometimes you really want to create something extraordinary, soulful, beautiful, for example, sew a lovely doll. But one little thing stops me... To work, I need a full-size textile machine.
And this article will help needlewomen solve this problem. From here, life-size textiles of the manufacturing technique that most appeals to him will be transferred to the master’s piggy bank. And then let your imagination help you create something that will surprise and captivate everyone around you.
Such different hand-sewn dolls!
A child learns about the world through play. And that is why textile dolls appeared on earth. They served as toys for children from poor families and were created using the most primitive technology.
But gradually manufacturing as a separate type of creativity occupied its niche in handicrafts. It can even be called one of the trends in art. Today, there are dolls not only for games, but also for interior decoration. They are often used as a heating pad for a teapot.
The arms and legs are sewn to the body in the right places. Some people put stitches in their knees. Then the tilde will be able to bend its legs. Just don’t stuff the part too much in this case.
The tilde face is not very developed. Usually the craftsman limits himself to small eyes, sewing on buttons or beads or embroidering a small “dot”. But more attention should be paid to the hair - this is an important part of the appearance of a real tilde.
Waldorf doll
Most often, the tilde is an interior decoration. But the Waldof doll is quite suitable as a children's toy. And all because the faces of these cute dolls are worked out with greater precision than those of tildes.

A distinctive feature of these dolls is their protruding nose. Making it is not as difficult as it might seem at first glance. It is enough to first make a preparation for the head - make a ball out of fabric and fill it tightly with filler. Then a smaller bead or ball is attached to the template - it will imitate a spout. A thin layer of padding polyester is laid on top of the resulting workpiece and the main fabric is stretched. Now it is clearly visible that the nose rises above the cheeks.

The face itself is either carefully drawn with paints or embroidered with floss threads.

Sometimes craftsmen pay special attention to the toes and arms of the dolls. This is true for those toys that represent babies. It will help the master to ensure that a textile doll has such feet, master class.
Pumpkin head patterns
And these dolls have their own technique for making the most important part - the head. It is cut out from four to six identical parts, reminiscent of a flower petal. Here is a head which is made of 6 parts.

Arms and legs are sewn in the same way as for dolls made using other techniques. But the problem with keeping the rather large head of a toy on a thin neck may arise for the master. Experts advise using wooden skewers to solve this problem. First, they pierce the doll’s body with a skewer, bringing the sharp end 4-5 cm above the cut on the neck. Then the ready-made pumpkin head, stuffed with filling, is pricked onto the tip. For insurance, you can use a couple or even three skewers. It is best to break off the lower end and take it out at the level of the doll’s waist.

Each master must understand that he has every right to make his own changes to the appearance of the product. After all, only thanks to the manifestation of the creative imagination of the authors, new technologies for making textile dolls appear in the world and this type of creativity develops.