A braided belt always looks very impressive. It can be worn with jeans or trousers, and if it is very thin, over a blouse or tunic.
It is not difficult to make such a belt with your own hands. We only need a buckle and threads for weaving. The buckle can be taken from an old belt. This is very convenient if the belt is worn out and you don’t want to throw it away. An old buckle will sparkle in a new way in a beautiful frame!
You can weave a belt from laces, twine, leather ropes, braid, satin ribbons, etc. Choose what you like and suits you. Even fabric tightly twisted into strands will do.
How to make a belt?
We fix our threads for weaving at the base of the buckle and begin to weave according to the diagram. This simple weaving in the macrame style seems difficult only at first glance. You can secure each end of the cord to prevent them from running away from you as you braid. You can come up with weights for them (hairpins, for example), or you can ask someone close to you to come to the rescue and hold the unruly laces. However, if you know how to braid and do hairstyles, you can handle macrame in no time.


braids and cords. The work could contain from 3 to 15 or even more threads. Braided braids can be different: narrow and plain, wide and multi-colored and vice versa. Braids can be used as a belt, as a braid, as handles for bags. Braids, threads and cords are also suitable for braiding braids.
For example: braided belts- they have always accompanied man since ancient times. Belts were tied over clothing and were mandatory. Belts were woven from linen or wool threads. The belts were both wide and narrow, simple and ornamented. They were used for weaving in different ways.
Seven-strand colored braid
Video
First you need to cut the threads, their length should be 1.5 - 2 times longer than the finished product. Then we get to work. We arrange the threads in the desired order, tie a knot and attach it to the bolster or pillow with a pin.

Our threads are arranged in the following order: light, dark, and so on. Now we take the light thread on the far left, place it on the adjacent dark thread and pass it under the next two (light and dark).

Now we do the same on the right side: a light thread on a dark one and under two (light and dark).

All further weaving continues according to the principle: we pass the outer thread under the adjacent one and overlap it with the next two. And this is what we end up with:

If we weave a little differently: the outer thread on two adjacent ones from above and down under the next thread; Continue this way on both sides alternately, it turns out:

Threads for weaving a belt can be used in different colors.
Woven thread belt
A belt is a small but very important wardrobe detail. It's not always possible to match a belt to your clothes. The solution to such a problem can be very simple. If it goes with the outfit braided belt, then you can weave it from threads, braid, ribbons.
My friend urgently needed a belt. Time for production is a day. The color of the belt is beige-brown. Belt length 1.50 cm.
We measure and cut the threads: “Astra” peach threads in 4 folds, light brown synthetic (spool thread No. 80) in 28 folds, “Lilac” brown thread in 4 folds, linen twisted thread in 2 folds. I collected an assortment of what was available. I tied 7 strands into a bun and braided it like a braid. I tied knots at the ends of the belt.
I decided to make a detailed description of my experience in the form of a photo lesson only because on sites dedicated to this method everything is somehow written very superficially and on your own, it’s not easy to figure it out. Moreover, using the example of a headband with a simple swastika ornament, and not with some incomprehensible design.
Let's weave a necklace
1. Not everyone can make 3mm wooden plates. Sometimes they offer to make them from plastic bank cards or beer cup holders. But I think that this is not the best topic for weaving amulet symbols.
Therefore, I propose a simpler approach to this problem:

Take ordinary A4 cardboard - draw it into 9 rectangular parts (7 by 8 cm), laminate the sheet and then cut it into these 9 rectangles. For ease of weaving, I advise you to cut the cards as evenly as possible. And do this just in case (if you ever have to weave a belt) 5-6 sheets, i.e. there will be 45-54 cards. Although I needed 60 cards for the bass guitar strap. I just repeat, first draw it out and then laminate it. But not like I did: first I laminated it, and then tried to draw it on the slippery laminate. Then use a hole punch to punch 4 holes, but not in the perimeter of the rectangle, but in the form of a square about 5 by 5 cm. It is advisable to use a sharp hole punch because so that the inside of the holes in the card is smooth, without any debris. And then slightly dull the sharp corners of the card. Then, as shown in the photo, number each card with a red and black marker. Of course, over time, the corners of the cards get lost, and the laminate comes off a little, but there are enough of these to weave headbands for a large family and friends. And then you can just glue these corners.
2.
Threads with less lint are best suited for this type of weaving. I use Iris. It is convenient to put balls of thread in plates and place them on the floor to your left.

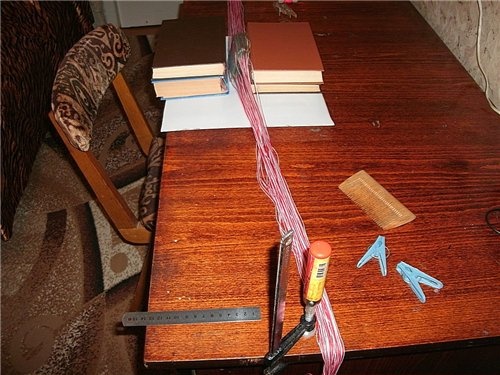
3. On the Internet you can see many different special designs for such weaving. But this is probably good for those who do it professionally. I have a different method, the essence of which is to make do with what is in almost every home. Vise, desk, clamp, clothespins and 2 combs. I secure the front tail in a vice with a comb, and wrap the rear tail around a clamp. And the weaving does not take place in the air (as in the original), but on the table.
4.
Secure the vice 13-15cm from the edge of the table and firmly clamp the comb in it.

5. Place card number 1 face up. Now we cut 2 pieces of red thread and 2 pieces of white thread. The length of my table is 1 m, and therefore I take the length of the threads to be 1 m 80 cm. Now we thread the threads into the holes of the card: threads of the color with which you want to make the background of the headband (red) are threaded into the front 2 holes, and threads of the color of the ornament (white) are threaded into the back ones.
In order for the fabric of the headband not to be “bent” (curved plane), it is necessary to thread all the threads into odd cards from the top, and into all even cards, thread the threads from the bottom of the card. Or vice versa. In general, it is important to alternate the method of pulling
6.
All the threads are drawn from above. Red threads (background) are in front, and white threads (ornament) are behind. Now fold the front ends of the 4 threads together and tie them into a knot.


8.
All the threads are drawn from below.

9. Now we fix the second knot in the comb next to the first, and place the second card on the first.
10.
And so we do all 19 cards (not forgetting to alternate the method of pulling the threads).

11. Since the centering of all the cards is now slightly higher than the table, you need to put some kind of backing (2-3cm) under them. In general, after pulling the threads onto the clamp, you yourself will determine the height of the backing that is necessary so that the cards do not dangle in the air.
12.
Now on the sides so that the cards are in a horizontal position, place them with books 1-2 cm from them, i.e. Do not clamp the cards, but simply so that they do not fall.

13.
Now fasten the clamp on the other edge of the table so that its shaft is in the center of the row of knots on the comb. You can simply measure with a centimeter.
14.
Since one of the important conditions for high-quality weaving is good tension and no loosening of the threads, it is necessary to comb the entire back tail well. You need to comb especially well the section of threads from the cards and 20-30 cm behind the clamp. Do not use a thick comb. Pull tightly, but of course so as not to break the comb.

15.
Make 4-5 turns and secure with clothespins. Remove books from cards.

16.
Make this “chip” from the remaining laminated cardboard and wind the threads on it that you use as the background of the headband, i.e. red. It will be a DUCK. In other matters, ducks can be made at any time, and not right now. For example, before threading cards.

17.
If necessary, tighten the threads with wire to a width of no more than 22-25 mm. Secure the beginning of the threads with some dies. For example, I have oak dies. In essence, there is no particular need for these dies now, but I, for example, like it when the first woven row rests on something.

18.
Now place the weft between the top and bottom threads, and “tap” it to the dies with a ruler.

19.
Now we proceed directly to weaving.
To do this, using the GTT program, I created my own headband program for 19 cards:

I deliberately did not write 2, 4, etc. rows because they are done exactly with the previous one, i.e. 2nd as 1st, 4th as 3rd, 6th as 5th, etc.

At the beginning, all the cards are arranged so that the red numbering is at the top.
20.
Rotate the 1st and 2nd cards 90 degrees clockwise.

21.
Then from the 3rd to the 11th we also turn 90 degrees counterclockwise. Then from 12 to 14 clockwise. From 15 to 17 counterclockwise. And 18 from 19 clockwise.


A small digression:
It is common practice to make square cards rather than rectangular ones. But I prefer rectangular ones because... Let's say, when you are doing some line and you are distracted, for example by a phone or something else, then sitting down at the table again, you immediately see where you stopped because... Due to the rectangular shape of the cards, you can see which ones stand horizontally and which ones stand vertically.
22.
First, we tap the weave with our fingers.

23. Then we press it with a ruler. We remove the ruler.
24.
Then we place the weft between the top and bottom threads, again take the ruler, press the weft with it, and do not stretch it too much, i.e. all the way and no more. It is necessary to pull the wefts with the same force throughout the weaving of the fringe so that the width of the fringe is the same and does not narrow or widen in different places. Well, this experience will come with time.

25.
Now we make the second line, i.e. We exactly repeat all the turns of the cards on the first line. And after that, also, we tap the fingers of our palms - a ruler - we lay out the weft, pressing it with a ruler.

26.
Now all the cards are again in a horizontal position, but with black numbering at the top.

27.
Next we make line 3:
from 1 to 8 we turn counterclockwise, from 9 to 11 clockwise, 12-14 counterclockwise, 15-17 clockwise, and 18-19 counterclockwise. Well, then, as before: we beat it with our fingers - with a ruler - we lay out the weft - we pull it and press it with a ruler. And then we make the 4th line, i.e. repeat 3rd. And don't forget to lay the wefts.
28. And this is how we do it until the 12th line (which, I remind you, is a repetition of the 11th).
29.
Here we went through the entire program for the first time and received the first rotifer. When we started the first line, all our cards had red numbers on top and ducks to the right of the fringe. Now, before executing the program a second time, we should again have red numbering at the top and ducks on the right. In general, sometimes check the color of the numbering of all cards. Before completing the 1st, 5th, 9th lines, all cards must be red numbered at the top. And before the 3rd, 7th and 11th - black. If any card has the wrong color on top, then you made a mistake. Therefore, we must return urgently, i.e. unravel and locate the location of the error. And it’s not easy to unravel, i.e. you need to go from the stopping place and turn over all the cards back to the direction indicated. In general, unraveling and discovering a mistake without experience is usually a thriller, where “Alien” takes a rest. Often, while untangling, the student gets confused again, and ends up taking scissors and cutting everything up. And he gives up this creativity altogether. Therefore, I advise you to be very careful. At first, I don’t even recommend listening to music because... she can be distracting.

30.
In general, in this way, we make 6-7 kolovrat, i.e. In fact, we go through the entire program 6-7 times. Due to the increase in the length of the woven section, the tension force of the threads increases, and each new Kolovrat turns out to be slightly longer than the previous one. But this is not scary, because... after soaking the headband in water, it will “sit down” and all the rotors will be leveled out.

31.
We furnish the cards (as before, 1-2 cm from the cards) with books.

32. Untie the tail from the clamp. Naturally, after weaving, the tail became intertwined. Therefore, separating a group of threads from each card from the rest of the bundle, we unravel it.
33.
We move the cards along with the backing and books closer to the vice. Release the comb. And we clamp part of the woven section in a vice between the wooden dies.

34. Then, pulling the back tail of the threads with your left hand, with your right hand we move the backing with cards and books away from the vice, i.e. to its original place (middle of the table).
35. Now, as before, we begin to carefully comb the tail of the threads, and first of all the area from the cards and up to 20-30 cm behind the clamp. And again we wrap it around the clamp and secure the tail with clothespins. We put away the books. Use a ruler to tighten the weft that has weakened during the process of rearranging the wefts. And then we make another 6-7 kolovrat.
36. And in this way you need to make the desired length of the headband. Which one is needed? Measure the circumference of your head and add 9-10 cm. This is necessary because... After washing, the weaving “shrinks” by about 4-5 cm and plus 4-5 cm in the whip. For an “average” head length you need about 27-28 Kolovrat.
For many centuries, the belt was among the first items of clothing. Almost all nations have a belt in their national costumes. It was not simply used to support certain parts of clothing or for decoration. The belt was important in traditional folk rituals, especially for the Eastern Slavs, for whom the belt was the main component of both men's and women's clothing.
The belt served as a talisman for its owner. In Rus', parting with a belt against one’s will was a terrible disaster or even punishment for any person. It was believed that the belt not only protected the owner, but also gave him physical strength. The belts were different: woven, woven from threads or even bast. They were woven from wool and linen threads.
Photo from above - Altuzarra
Photo below - Altuzarra and Brock Collection

The woven belt still remains, only now an object of fashion. Braided belts using the macrame technique or made from rope with many knots look especially expressive and stylish. Due to the fact that fashion has seriously turned to things made in the simplest form, where you can clearly see traces of manual labor, and without much care, in the latest spring-summer 2019 collections, rope belts turned out to be quite remarkable.
Some are wondering what to make a rope belt out of, and many fashionistas have picked up this trend and made belts from clothesline. They look fun and funny. For those unfamiliar with the macrame technique, now is the time to learn a thing or two and make your own rope belt. There are different .

Chloe
Luxurious accessories are obtained using a crochet hook, there is fork knitting, macrame, bobbin weaving, and there is simply knitting without the use of any special devices - knitting on fingers, and there can be several ways. Therefore, you have the opportunity to show your imagination in an exciting and completely uncomplicated job and weave a rope belt to your favorite dress.
You can see the new looks with rope belts that designers have prepared for us in the 2019 season. The belt can be woven from wool, nylon, linen, cotton threads, rope, braid, ribbons, leather, the ends can be decorated with pompoms and tassels.

Claudia Li, Etro
Knitted or woven belts have long had a certain meaning and symbolized tireless adherence to specific rules. By the way, the knots on the belt and their number also have a secret meaning.
But everything related to the belt, both in the Bible and in folk traditions, is based on the desire for piety, purity, fidelity and other good intentions. Make your own belt and let it be a symbol of modesty, chastity, protection and decoration for you.
(developed by M.A. Boyko, teacher at children's art school, Moscow)
Belts were made, as a rule, from multi-colored woolen threads, sometimes with the addition of linen (less often, silk). Their patterns were very diverse - from simple longitudinal or transverse stripes to beveled geometric motifs, made using the bran method (on boards). Folk belts were made long, their ends were decorated with lush tassels, and trimmed with beads, bugles, and cannon balls.
The colors for the belt were mostly chosen to be bright and contrasting, but folk craftswomen knew how to avoid excessive variegation - all multi-color schemes were subordinated to one leading color: red, orange-yellow or another .
An elegant colorful belt served as an addition to the folk costume, both women's and men's. Belts were made in different ways.


Belts

Children's works
Weaving "twitching"
The simplest method of making belts and braid is the so-called “pulling” - a type of weaving that was used especially often in the Ryazan province. This method is simple and does not require special equipment; children 7-8 years old can easily cope with this work.
Before you start tugging, you need to prepare the threads - make five loops of the same length out of them, taking into account the fact that the weaving will be one and a half times shorter than the loops. On one side, we tie the loops tightly together and attach them to some stationary object: a nail, a wall, a door handle, etc. We put the free ends of the loops on the fingers: three loops on the index, middle and ring fingers of one hand, and two loops on the index and the middle fingers of the other hand (the hands should be turned with the palms facing you, the fingers slightly bent), the ring finger of the right (or left) hand remains free for work.
We pass the free ring finger into the loops placed on the fingers of the other hand, picking up the far loop from the bottom up, and pulling it through the other loops towards ourselves, after which it will be put on the ring finger of the other hand. The ring finger of this hand was freed up for work. Now we will pass this free finger through the loops put on the fingers of the other hand, pick up the far loop and pull it towards ourselves - the loop will end up on the ring finger of this hand again. Now let's repeat the whole cycle from the beginning. Having pulled through the next loop, you need to spread both hands to the sides and pull all the loops to tighten the work. This must be done evenly so that the belt is even and does not expand or contract. The pattern is formed by alternating loops of different colors. Having made the desired length, we tie the threads, leaving a few centimeters for the brush.
This method can be used to weave a round or flatter belt. If the length of the belt or braid must be more than one meter, then two people must work, since the large length of the loops will not allow one person to spread their arms to the required width to tighten the braid. In this case, one actually pulls, and the second helps to tighten the loops. In this way, you can weave a narrow patterned belt from woolen threads of different colors.
Weaving "on a bottle"
Variants of the simplest forms of weaving belts are technologies based on knots and loops. For weaving round belts or braid, there is a “bottle” weaving method. Weaving was most often used in the Russian North, in the Arkhangelsk province. Woolen threads were used for weaving. The pattern was obtained in the form of stripes twisted in a spiral. The preparation of threads using this method consisted in the fact that a certain number of threads (the number of strips depends on the number of threads) twice the length of the future finished product was collected on one side into a bundle and tied into a knot together with the main thread, and on the other - each thread rolled into balls. The end of the knitting needle was inserted into the knot and lowered into the bottle. Weave around the knitting needle, tying a knot around the main thread with patterned threads.
Plain and twill weaving
For weaving wider belts, there was another method, which also did not require additional equipment. Threads for weaving were taken from wool or silk, and the pattern was obtained in a bias check. The preparation of threads using this method consisted in the fact that a certain number of threads (depending on the width of the product) with a length of one and a half times longer than the future finished product were collected on one side into a bundle and left free on the other. It was necessary to attach the tied bundle to a stationary object, for example, to the back of a chair, placing it in front of you. When we started weaving, we distributed the threads in the desired order, dividing them into two equal strands. Now you need to separate the outer thread on the left side and move it to the middle (i.e. to the left edge of the right strand), forming a plain weave, and then attach it to the right strand.
Then, in the same order, the rightmost thread is laid to the middle and attached to the left strand, and so on.
The pattern is obtained by interlacing colored threads.
The order of weaving threads can be not only according to the principle of plain weave - through one thread, but also through two, each time with a shift of one thread, that is, according to the principle of twill weave. Weaving of this type is somewhat more complex, but with its help you can get an interesting effect reminiscent of a transverse or longitudinal scar. With the first type of weaving, it is better to take an even number of threads, with the second - an odd number (for better processing of the edges). Another variant of this weaving is with additional threads that are braided with patterned threads .
Fabric on boards
Another way to make patterned belts is to weave on small square-shaped thin boards with holes in the corners. Children of different ages can cope with this weaving, but the teacher helps younger children (7-9 years old) thread the threads into the boards, while older children (12-16 years old) cope with the task on their own.


Threads tied into a bundle and attached to a stationary object are inserted into the holes of the boards: one thread into each hole (four threads into each board). The number of planks can be different - they determine the width of the product. Usually they take from ten to thirty, and in some cases more. The threads for such weaving are usually woolen, multi-colored, and of medium thickness.
When weaving in those places where threads of the same color were threaded into the boards, you will get a narrow longitudinal strip of that color. In the place where threads of two colors were threaded into one board, you will get a motley stripe. Then the planks are connected and the threads are tensioned. Before weaving begins, the planks must be installed in pairs, so that two adjacent threads are threaded symmetrically relative to each other. For the weft, use the same thread as for the warp.
When weaving, the threads must be in a taut position. To do this, they are tied to the belt in such a way that there is about half a meter left for work, counting from the garter to the stationary object. The planks are folded close to each other so that a shed is formed between the threads threaded into the upper and lower holes.
The weft thread is laid into this shed and nailed onto itself with a finger or a wooden knife. Now the planks are carefully turned over all together 90 degrees towards themselves, and another weft thread is laid into the shed thus obtained and nailed to the first weft thread as tightly as possible. Then the planks turn towards themselves again, another weft thread is laid, pulled up and nailed to the previous one. We repeat the whole process from the beginning. We work in this way until the threads become so twisted that it becomes difficult to work. Then we begin to turn the planks in the opposite direction, laying the weft threads in the same order.
The pattern is formed by alternating colored stripes, smooth and variegated. You can come up with various patterns framed by smooth stripes along the edges or make multi-color checkers. You can also make a pattern in the form of a large Christmas tree in the middle, bordered by smooth and variegated stripes along the edges. Christmas trees are made from the same checkers, but made with a shift of one turn of the board.

There is also a known method of weaving belts and other products with ornamental patterns on tablets. Products with such patterns are made on two types of boards: regular and with threads of two colors located diagonally. The edges of the product, as a rule, are made on ordinary boards, with a pattern of longitudinal stripes. The pattern is made from threads of two contrasting colors.
The number of patterned boards is taken, depending on the width of the pattern being made, one pair for each ledge of the pattern.

At the beginning of the work, the patterned boards are installed in such a way that in the upper part of the pharynx there are threads of both the first and second colors, arranged in the same order as in the pattern in its original position. The transition from one position to another corresponds to one turn of the planks and one insertion of the weft. Simple planks are always rotated the same way - 90 degrees. Patterned boards are rotated depending on the pattern. By turning a pair of patterned planks together with non-patterned ones by 90 degrees twice (and, accordingly, laying wefts each time), we thereby leave the first color at the top. But with the next turn by 90 degrees, it should go down, so we look at the drawing: if, according to the pattern, it should go down with the next weft insertion, then we turn this pair of planks, as usual, by 90 degrees. If we see that this color should remain at the top in a given place, then we rotate the board 270 degrees so that the desired color is at the top again. And we do this with all pairs of patterned boards, strictly following the pattern. The more pairs of patterned boards, the wider and more complex the pattern that can be made on them. There is only one indispensable condition - smooth stripes must be placed along the edges of the pattern, made on ordinary boards.
The ornamental motifs themselves can be varied. If desired, you can make a belt or other product with inscriptions, dates, arranging them into a pattern.