Interesting crafts made from autumn maple leaves.
With the arrival of autumn, schools often assign children crafts made from leaves. Let's look at some interesting craft ideas in this article.
How to process maple leaves for crafts?
The autumn palette of trees gives us bright colors. The carved maple leaves are especially beautiful. Moreover, their colors are varied: green, yellow, burgundy. This natural material makes beautiful crafts that are interesting to both children and adults.
But in order for the results of your creativity to please you for a long time, the leaves need to be properly prepared. Experienced craftsmen use several options for processing maple leaves.
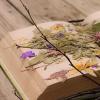
Drying under pressure- this is the simplest and most familiar method for us, which is suitable for applications and collages:
- Place maple leaves between the pages of albums or books.
- Place some flat weight on top.
- leave for a week or two.

Drying iron— an accelerated version of the preparation of maple leaves:
- Place the leaves on thick cardboard.
- cover with a thin sheet of paper.
- iron with a not very hot iron.
- remove the paper and let dry for about an hour.

Soaking in paraffin, with this treatment the leaves retain their bright color and become glossy:
- break the paraffin candle into pieces.
- melt it in a water bath or in the microwave.
- Briefly dip the leaf into hot paraffin until it is evenly coated (it’s convenient to do this with a fork).
- Place on paper towel to dry.

Preservation in glue helps eliminate the fragility of dried leaves:
- dilute PVA glue in water in the ratio: 1 part glue to 4 parts water.
- Dip the leaves into the solution.
- Place on a flat surface and let dry.
Treatment with glycerin. This option is suitable for making volumetric compositions:
- mix glycerin and water (1:2).
- pour the solution into a ziplock bag.
- put the leaves in it and smooth them out.
- zip up the bag.
- put in a dark place for 10 – 14 days.
- Remove the leaves from the bag and dry on paper.
Skeletonization is a very unusual way of preparing leaves for original flat compositions:
- take fresh maple leaves
- make a solution of 1 liter of water and 12 tsp of soda
- bring the solution to a boil
- put the leaves in there and cook for 15-20 minutes
- rinse them with cold water
- Use an old toothbrush to scrape the softened greens from the leaf.
- rinse again
- dry under pressure for 2 days

What to make from maple leaves for school and kindergarten on the theme of autumn: photo
Maple leaves are often used to make crafts for school or kindergarten. By helping your child in this process, you will not only become closer to him, but you will also enjoy creativity.
- draw a tree trunk on paper.
- glue the leaves in the form of a crown.
- Below you can draw little animals.
- Let the child decorate the picture at his own discretion.

- Use a jigsaw to cut out a tree from thin plywood.
- Use sandpaper to smooth out rough edges.
- paint with stain and let dry.
- Glue the prepared leaves onto the tree branches.

Autumn candle:
- prepare two candles.
- melt one.
- take small maple leaves.
- Apply melted paraffin to one side of the leaf with a brush.
- glue the sheet to the second candle.
- Carefully dip it completely into the melted paraffin.
- let it harden.

Photo Frame:
- take an old photo frame and clean it of decor.
- if necessary, sand it with sandpaper.
- Starting from the bottom, glue the leaves overlapping onto the frame.
- try to maintain the color scheme of the leaves (dark shades below and light shades above).

- Cut out the base of the mask from cardboard.
- attach string ties to the ends.
- Cover the mask with maple leaves.

Bunch of grapes:
- Take several acorns and use an awl to make longitudinal through holes in them.
- thread the wire through them and bend the tip so that the acorns do not slip off.
- twist the wire tails together to form a bunch of grapes.
- Attach a maple leaf on top.
- paint the acorns blue or green.

Bunch of grapes
Crafts from maple parachute seeds for children
As children, many people loved to launch “helicopters” from maple seeds. Not everyone knows that this natural material can be used for various crafts. We offer some interesting ideas.
Applications or panels. You can use natural “parachutes” to cover the outline of your drawing, depicting:
- a mop of hair framing a woman's face
- lion's mane
- bird feathers
Since maple seeds are light, it is better to create your composition against a dark background.
- Prepare plasticine, a thin twig, and two pairs of seeds of different sizes.
- Using plasticine, secure larger seeds to the edge of the branch.
- Strengthen the small “parachutes” immediately below the large ones.
- Use a piece of plasticine to form a head with antennae and place it on the end of a branch.
- Make eyes from apple seeds.
- If desired, paint the “wings” with paint.

- Twist two round pieces from newspaper for the head and body.
- secure them by wrapping them with threads.
- Connect the head and body using a stick and glue.
- stretch a wire across the body to hold the wings.
- Cut out two semicircles from thick fabric - blanks for the wings.
- secure them to the wire with a stapler.
- Cover the wings on both sides with seeds.
- cut three pieces of wire for the tail.
- secure the fabric to them with a cone.
- Cover these blanks with “parachutes” too.
- Make paws from wire.
- attach the tail and legs to the body.
- Cover the entire bird with seeds.
- Make eyes from beans, and a beak from nut shells.
- you can put your bird on a branch.

Helicopter:
- using plasticine, connect a large walnut and an oblong small bump (the cockpit and tail of the helicopter).
- On top of the walnut with plasticine, install two maple wings - “screw blades”.
- At the end of the cone, attach a couple of small seeds - a “propeller”.
- place the helicopter on a wooden block.

How to make a bouquet from maple leaves?
The carved shape of the maple leaf is beautiful in itself. Therefore, a laconic bouquet of dried leaves placed in a vase will look bright and festive. You can also cut whole branches with leaves from the maple and place it in a transparent container.
And with a little effort, you can decorate your interior with more unusual maple compositions.
- Lubricate the leaves with clear varnish or melted paraffin.
- tie several pieces with wire.
- decorate with a string of beads or lurex ribbon.
- Make a loop out of the ribbon and hang it over the doorway.

Pink bouquet:
- Fold the maple leaf crosswise with the right side facing out.
- twist a tube out of it and secure with thread.
- Fold the second leaf in the same way across and wrap it around the already twisted bud, aligning their cuttings.
- Wrap the next leaves in the same way, moving down a little and tying the cuttings with threads.
- secure the rosette to the branch.
- wrap the “stem” with decorative paper.
- make several flowers and assemble a bouquet from them.

How to make a wreath from maple leaves?
It is customary to decorate the house with wreaths of maple leaves for Halloween. And it’s just nice to liven up the interior on gloomy autumn days. They are easy to make. Children will especially enjoy this activity. Prepare:
- Maple leaves
- wire
- threads
- flexible branches (willow or birch)
- acorns, rose hips, fesalis fruits
- beads or ribbons
Get started:
- twist a ring from several rods, securing it with wire.
- Attach maple leaves to the branches using thread or glue.
- Glue acorns, bright fruits, etc. between the leaves.
- wrap the wreath with bright beads.

Use your imagination and decorate your wreath with various natural materials:
- small pumpkins
- rowan
- cones
- spikelets
- dried flowers
- bird feathers
- coniferous branches
Or you can simply weave a wreath from maple leaves in the same way as from ordinary summer flowers. With such a wreath you can decorate not only your room, but also yourself for a holiday or an autumn photo shoot.
How to make a crown from maple leaves?
A crown made of maple leaves will be an unusual decoration for a child for a matinee. It won't take much time to make:
- take beautiful leaves of approximately the same size.
- cut off the thick ends of the petioles.
- Bend the first leaf inward by about a third parallel to the cutting.
- Bend the second leaf in the same way and “stitch” the previous leaf with its stem.
- repeat the process using the remaining leaves until you have a ribbon of the required length.
- roll the ring, securing the first cutting to the last leaf.
- decorate the crown by gluing rowan berries.

DIY maple leaf hedgehog
Using maple leaves, you can make a funny hedgehog. The leaves will act as a prickly coat. There are two ways to make a hedgehog.
- Draw the outline of a hedgehog on colored cardboard.
- Using PVA glue, glue the leaves onto the animal’s body, starting from the outline and moving towards the middle (the leaves should overlap slightly).
- Make a sun and flowers out of colored paper and decorate your work with them.

- Form an oval from salt dough or plasticine.
- on one side, flatten it a little, making the face of a hedgehog.
- Take small maple leaves and cut off the petioles, leaving about 3 cm.
- Stick the leaves into the back, pressing well.
- mold the hedgehog's paws.
- Make eyes and a nose from peppercorns.

DIY maple leaf plate
You can make a decorative plate for fruits or sweets from autumn leaves. Wide maple leaves are ideal for this craft. To make a plate, prepare:
- leaves
- inflatable ball
- PVA glue
How to do:
- inflate the balloon.
- Place it in a bowl for convenience.
- Lubricate the surface with glue.
- cut off the petioles of the leaves.
- Grease the leaves with PVA and attach them to the ball.
- Lay each next row with an overlap.
- Cover the ball halfway in this way.
- At the base of the plate, glue several layers of leaves to stabilize the future product.
- let dry.
- gently deflate the balloon.

The original piece of furniture is ready!
Crafts from pine cones and maple leaves
Cones are an excellent natural material for all kinds of compositions. And in combination with bright maple leaves, they can become the basis for interesting crafts.
- Prepare a large cone, plasticine and maple leaves.
- Make a swan's neck and head from plasticine and attach it to the bump - the body.
- Using plasticine, attach leaves - wings - to the sides of the cones.
- Make a tail from a small leaf.

- take the oblong fir cone.
- Form a head from salt dough or plasticine and attach it to the wide part of the cone.
- Attach two large maple leaves to a pine cone in the form of wings.
- Place smaller wings below.
- make antennae on your head from wire.
- don't forget to glue on the pea eyes.

New Year's wreath:
- Form a base ring from polystyrene foam or branches.
- Using glue and wire, attach the cones to the base, alternating them with maple leaves.
- cover the wreath with gold paint.

- Tie cones and leaves onto ribbons, alternating them with each other.
- form garlands from several such ribbons of different lengths, securing them to one branch.
- DIY sun made from maple leaves.

In gloomy, stormy weather, a hand-made sun made from leaves will warm you.
- Cut out a circle from thick cardboard.
- prepare yellow maple leaves and trim their tails.
- cover the edge of the cardboard circle with leaves
Thus. - make three rows.
- Glue a large maple leaf of a contrasting color into the center of the cardboard circle.
- Make eyes from beans or small leaves.

DIY sun made from maple leaves
- Roll the maple leaves into a tube.
- piercing the tubes in the middle, string them onto two wires.
- connect the ends of the wires to form a ring.
- tie a ribbon to the “sun” and hang it up.

DIY maple leaf vase
An autumn bouquet can be placed in a vase of maple leaves. The color range of this natural material is wide, and you can easily select the desired shade for the composition. Let's get started:
- take a smooth glass vase or plastic bottle.
- Make a liquid paste from flour and water.
- Apply a thin layer of cooled paste to the surface of the vessel.
- Wrap the vase in thin paper and press well.
- Also grease the paper with paste.
- Cover the vase with leaves (it is better to cut off the tails).
- Cover the top with PVA glue.
- garnish with rose hips or rowan berries.
- let dry for at least a day.
- Carefully remove the paper with leaves from the vase.
- For strength and shine, spray the product with hairspray.

Leaf Crafts

If you plan to create compositions from living plants, then do not remove the base from the vase. Then you can pour water into it and change the bouquets according to your mood.
Crafts made from maple and oak leaves
The combination of maple and oak leaves looks impressive in various autumn compositions:
- wreaths
- garlands
- bouquets
- candlesticks
- topiary

You can especially give free rein to your imagination in applications and panels.
The stained glass window made of leaves on the door looks very unusual and beautiful:
- just tape the leaves to the glass in any order.
- rub wax crayons onto paper, place leaves on top, cover with paper on top and iron with an iron. The wax will melt and stick to the leaves.
- It is better to glue such multi-colored leaves onto glass separately.
Crafts from chestnuts and maple leaves
While walking through the park, don’t forget to pick up chestnuts. You and your child can use them to make funny figures. For this you will need:
- chestnuts
- maple leaves
- plasticine
- take two chestnuts: a small one for the head and a larger one for the body.
- Make a neck out of plasticine and connect the chestnuts.
- Use an awl to make a hole in a large chestnut tree.
- Cut the stem from the leaf, leaving 1-2 cm.
- insert the leaf into the hole - you get a bird's tail.
- Make three holes in the top of a small chestnut-head.
- insert pieces of matches into them.
- paint the match heads with colored paint.
- Make the eyes, beak and legs of the bird from plasticine.

Caterpillar:
- take six chestnuts (preferably of different sizes).
- arrange them in a row by size in descending order.
- Connect the chestnuts together with pieces of plasticine.
- Use plasticine to sculpt the face of a caterpillar on the largest chestnut tree.
- Make horns from short matches.
- place the caterpillar on a bright maple leaf.

- pick two chestnuts of different sizes (large for the body, small for the head).
- connect them with plasticine.
- Make eight long legs from thin willow twigs.
- Form large eyes from plasticine and stick to a small chestnut - the head.
- cover the spider with a leaf.

Snail family:
- sculpt the body and head of the snail from plasticine.
- Place a chestnut shell on the body.
- make several snails of different sizes.
- arrange the entire “family” on bright maple leaves.

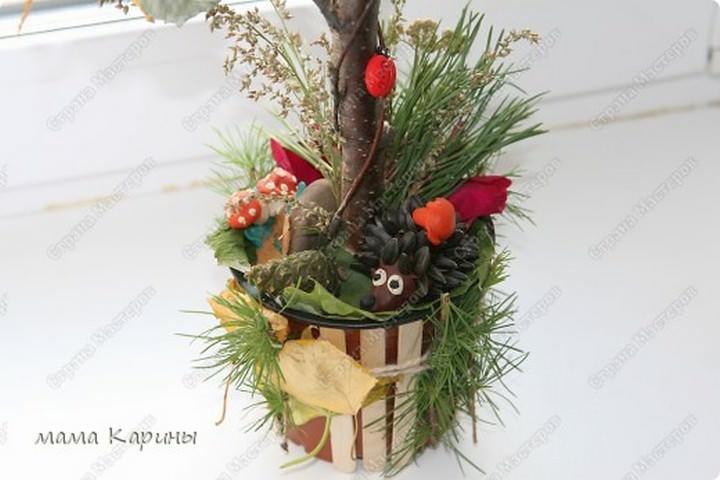
DIY maple leaf tree
A tree made from maple leaves will be an excellent decoration for your room. It can be made in different ways.
"Herringbone":
- Prepare maple leaves of different sizes.
- Fold each one inward twice.
- Using wire, attach the leaves to the stick, starting from the bottom of the Christmas tree.
- The largest leaves should be at the bottom and the smallest at the top.

- dry the leaves in any way.
- Find a beautiful branch and coat it with varnish.
- Attach dry leaves to the branch with thin wire.
- place the “maple” in a vase or nail it to a board.
- Make two balls from polystyrene foam or a wad of newspaper - large and small (to fit in the pot).
- place a small ball in a pot and make a hole in the foam (newspaper) for the barrel.
- Lubricate the hole with glue and insert a thick branch - a trunk - into it.
- Also make a hole in the large ball and, using glue, attach it to the trunk.
- paint the balls and barrel the color you want.
- Make a small hole in a large sphere with an awl, drop some glue in there and insert a rolled maple leaf (pre-treated in any way).
- secure the leaves over the entire surface of the ball in the same way.
- You can additionally decorate the crown of the tree with cones, rowan berries or pine needles.
- Cover the base of the trunk with moss or small leaves.
- The crown of the tree can be decorated with rosettes of leaves.

This topiary will look elegant in any interior.
Crafts from rowan and maple leaves
Bright rowan berries and the carved shape of maple leaves are a great idea for a beautiful interior! Add red rowan to any autumn composition - and it will look festive and elegant.
- choose a large, beautiful maple leaf.
- Lubricate it with PVA glue.
- Place rowan berries on it like a mosaic.
- let dry.

"The music of wind":
- fasten the two branches crosswise.
- string one by one onto a thin strong rope.
- rowan berries and maple leaves.
- make 7-8 such ribbons, each of which should end with a berry.
- Attach the garlands to the branches and hang them up.

Topiary:
- make the base for the topiary as described above.
- decorate the upper sphere with maple leaves and rowan berries (put a couple of leaves and a small rowan branch into a bundle and secure with thread).
- form the crown of a tree from 8-10 such bunches.

Video: Decor of autumn leaves
Summer is ending, but why? Unfortunately, no one has an answer to this question. We have a guess, but we're not sure it's to everyone's liking. We think that summer is ending so that autumn can come. Like this. What's good about autumn? Someone has a birthday (but not everyone, so it’s not suitable), someone will fly to the sea, but what should the rest do? Admire the autumn forest and do crafts? Perhaps today we will do just that.
Beauty from dry leaves
The beauty of the autumn forest has been described by many Russian writers and poets, but even without this, every person knows perfectly well that it is in autumn that the forest receives the freshest rain, the trees are full of yellow, red, fiery flowers and are pleasing to the eye, and sometimes pine cones fall on your head. Collect those that have already fallen down, take them home, and let's start creating wonderful crafts from tree leaves. 
Leaf and flower decorations
Of course, this is what children primarily like to do. In schools they are asked to make collages, and everyone strives to put beautiful pictures on a piece of paper that, to some extent, reflect their mood. Some people like bright colors, some like to post pictures using flowers, and some can even use twigs and roots. The scope for imagination is huge. Look at the photos below - you can use leaves to make wall paintings, lamps, and even funny little animals.

Leaf applications
The most common applications are on a sheet of paper. There is nothing difficult in creating them - you just need PVA glue and a little patience. Place the leaves on the sheet and glue one at a time. To create a spectacular background, you can use watercolor and in some places paraffin, this will create the effect of scuffs and uneven coloring. Often such leaves are given to relatives or friends for their birthdays, because making a card from autumn leaves is as easy as shelling pears, and a pleasure for the person.

DIY autumn leaves crafts
What else can you make from autumn leaves? They can be used to decorate a handmade lampshade or the body of a lamp. Hanging it on a thread, you can make a wonderful decoration for the wall - you get a real magic branch on which the leaves dangle in weightlessness.

How to paint tree leaves
We want to help you surprise your guests. To do this, let's reveal one secret - you can give the leaves a different color in just a few minutes. For this we need a bunch of fresh leaves and regular table soda. We fill the leaves in a container with soda and add a little water, let them brew, and after the leaves have lost all their green background, you can paint them with ordinary children's paints. The result will be the effect of airy multi-colored leaves.

Spectacular decorative elements made from leaves

Garland of autumn leaves


Leaves on the front door

Pillow with a picture


Autumn garland of tree leaves

Modular paintings with autumn forest


Wall decoration with autumn leaves

Applique of autumn leaves


Wreath of autumn leaves


Bouquet of autumn leaves

Autumn! There is so much warmth and beauty in this wonderful time of year! Countless variegated colors playing with magical shades in the sun, a variety of unique shapes and structures of fruits, grass, as well as tree leaves fluttering in the wind. Every day we look at this splendor and are inspired, enriched by magical energy, which further encourages us to do our own work. Someone paints pictures, someone composes poetry and stories, and someone does homework. From properly selected and careful natural materials you can create beautiful DIY crafts for the New Year 2018 and other holidays, decorations for room interiors in the form of vases, flowers, baskets, topiary, panels, boxes, etc. Also good are children's works for a thematic exhibition in kindergarten and school in the form of various animals, birds, fairy-tale characters, wreaths, appliques on the theme of autumn and much more. Schoolchildren in grades 1–4 are especially interested in such skills. After all, children of this age look at the world completely differently, they notice all the subtleties of the luxury of natural decoration, which adults, in turn, do not always pay attention to. So, let's plunge into the world of art and grace at least a little through our prepared article. In it you will find 9 ideas for easy and beautiful DIY leaf crafts. Informative master classes with photos and video lessons will guide you towards your own correct ideas and creations.
Bouquet of roses from maple leaves
You can make a very beautiful bouquet of roses from the leaves, which you can give to your family and friends. Such an autumn bouquet will delight and surprise them, because it looks very impressive, and most importantly, it is made by hand. To make it easier for you to understand how to make such a bouquet, we described the craft in our master class with step-by-step instructions.
You will need:
- Maple leaves of various sizes (one flower takes 7 - 10 pieces),
- A thread.
Progress:
- We take natural material and bend it in half so that the sharp ends do not interfere with us.
- We twist the leaf into a tube with our own hands, perpendicular to the tail.
- We wrap the resulting tube in a similar way 3 - 4 more times. This will give us the base of a rosebud.
- Next, we form a bud by applying new larger sheets to the workpiece, not forgetting to hide their sharp edges by folding it in half.
- After you have attached a sufficient number of elements, straighten the petals of our rose so that it becomes more voluminous.
- We secure our structure with a rope from below, where we still have the tails of the natural material used.
- So we make 3 - 5 roses and begin to collect the bouquet.
- We fasten all the roses together with a rope so that they create a harmonious composition made by ourselves.
- We attach maple leaves around the roses so that they seem to hug the flowers from the outside.
- You can also add various other decorations to our bouquet - twigs with berries, or some green twigs to add brightness and contrast. In general, the idea of a craft is quite interesting and simple, be sure to try to reproduce it at home.
Video: master class on creating a rose from maple leaves
Wall wreath made of autumn leaves
To decorate your home, you can make a very beautiful wreath of leaves with your own hands. This craft can be done even with a child of 3, 4, 5 years old. You can see how to create such a wreath in the description below with step-by-step instructions and a photo idea.

You will need:
- maple leaves,
- Plastic plate,
- Stationery knife,
- Orange ribbon, 2 cm wide,
- Burlap ribbon,
- Stapler.
Progress:
- In order to make a craft from leaves with your own hands quickly and beautifully, we need to take a plate and cut the bottom out of it with a knife. We now have the base for the wreath.
- We tear off the tails of the natural material used.
- We hold them with their sharp corners up and begin to fold the edges towards the center in the form of tubes, and secure them in this position with a stapler.
- We make about 23 such blanks.
- Using a stapler, we fasten the blanks to the rim of the plate; the leaves should be positioned evenly in a circle. We make 2 rows of these so that there are no gaps.
- We attach small, even elements on top to cover the corners.
- When all the component parts are attached, use a stapler to attach a burlap ribbon so that we get a beautiful spiral.
- On the reverse side, we cut off the extra corners so that the handmade craft has a neat appearance.
- To decorate, make a bow from an orange ribbon and attach it to the wreath in the part where you like it best. And we make a loop from the same ribbon on which we can hang our wreath.
Video: master class on making a wreath from autumn leaves
Application “Autumn tree”
You can make various applications with your own hands from the leaves. In order to make an autumn tree, we made a master class with detailed instructions. Even a 1st grade student can easily cope with such creative work. Let's see how to make a beautiful craft from bright natural materials yourself.
You will need:
- snow-white paper,
- dry leaves,
- PVA glue,
- brown felt-tip pen.
Progress:
- According to the photo idea we provided, you need to fold the paper material in half and draw the outline of the tree with a felt-tip pen.
- Then you will need to make a crown of dry autumn leaves with your own hands, gluing them with PVA glue. The crown should be made both from whole small elements and using the tear-off technique, i.e. from fragments of large natural material.
- Next, using a brown felt-tip pen, you can color the tree trunk, and you can also make it using paints. This original craft will perfectly transform a child’s room or become a worthy exhibit of a themed autumn exhibition at a school or kindergarten.
Video: master class on making your own applique
Autumn leaves beaten with a hammer
You can invite your child to make an original autumn craft. With his own hands he will be able to create an imprint of various plants on fabric, their leaves and flowers. This creative work is perfect for children 3, 4, 5, 6 years old. You can see how to make such a creative creation below in the description with detailed instructions.

You will need:
- light cotton fabric;
- plastic bag;
- small kitchen hammer.
Progress:
- To make this craft, you need to place the fabric on a flat and hard surface, and then make a composition of leaves and flowers on it.
- Cover the fabric with polyethylene.
- In order for the autumn plants to release their juice and color the fabric with it, you need to lightly beat your composition onto the polyethylene with a hammer.
- This printed fabric can be used to decorate napkins and also works as a DIY card design.
Leaf Lotto
Autumn is a time for exciting herbarium compilation. This is also a great way to introduce your child to the plant world. A leaf lotto can be an alternative to a regular herbarium, and your child can help you make such a craft with your own hands. This is a very educational game for children that will give them maximum pleasure and benefit.

You will need:
- thin cardboard, A4 format - 6 pieces,
- dry leaves of various trees and shrubs, dried flowers and herbs,
- fruits of trees and shrubs (optional),
- scissors,
- pencil.
Progress:
- Initially, you need to draw the cardboard, A4 format, into 6 identical parts.
- 3 lined parts will make up the lotto panel. It is on them that the child will place the cards. We will dedicate one panel to trees, the second to bushes, and the third to flowers and grass. Now glue the appropriate material to each segment of the panel.
- The remaining 3 pieces of cardboard should be cut into sections. There will be 18 of them, these will be cards for future crafts created by yourself.
- Glue one leaf, flower or blade of grass from each plant to each card. Our educational game is ready, and you can already get carried away with it with your child.
You can collect dried fruits and other natural materials in a small box. Alternatively, you can simply draw them on cards, but using natural material will probably be more interesting for the child. While playing, the child’s task will be to arrange cards with flowers, foliage, and fruits into certain sections that correspond to plants.
Autumn crown of leaves
Autumn foliage is very beautiful and colorful. You can use it to make a charming crown for your princess. And the main thing is that you can make such a craft with your own hands together with your child, because it is designed for ages 4, 5, 6, 7 years. Let's watch our master class with a step-by-step description and photo idea.

You will need:
- colorful autumn leaves,
- scissors,
- glue.
Progress:
- While walking in a park or square, collect the most beautiful autumn foliage. The more varied their colors and sizes, the more beautiful our crown will turn out.
- Cut off the edge of the stem and fold each natural element in half.
- Leg of one material through the second element.
- Continue attaching the remaining leaves in this manner until the size is large enough for the crown to be placed on your head.
- Fasten the edges of the crown and glue in front a decoration you created with your own hands from the same natural material as the craft itself.
Video: home decoration ideas, DIY hair from leaves
Maple leaf topiary
Despite the fact that topiary trees have recently become fashionable, they have managed to quickly gain popularity. You can make this tree with your own hands from various available materials: flowers, leaves, fruits, coffee beans, ribbons, paper. In order to make it, you will need very little free time, in addition, you will not need any special skills at all. It is worth noting that this charming craft can be a great gift for any holiday, as it brings joy and prosperity.

You will need:
- small flower pot,
- floral sponge (ordinary foam rubber can be used as an alternative),
- wooden stick,
- yellow leaves,
- rowan and other elements for wood decoration.
Progress:
- First of all, you need to secure the wooden stick in the pot with your own hands as firmly as possible, otherwise the tree will tilt or even fall along with the pot.
- At the very top of the stick, attach a ball made of sponge or foam rubber. All prepared elements should be evenly stuck into this ball: leaves, branches, rowan bunches.
- The soil and trunk of the tree can be decorated with grass, beads or artificial flowers and vegetation. An excellent addition would be a small twig that will represent a small bush. You can complement the decoration with ribbons, beads, artificial branches and flowers for decoration. Our DIY craft is ready! It will transform any corner in your home.
Craft “Owl” from leaves

To make a quick and beautiful children's craft from leaves with your own hands for school or kindergarten, you need to take a closer look at our idea provided in the photo. It is simple in its execution and does not require expensive supernatural material, great skills and craftsmanship. Even a child of 1st - 4th grade can easily cope with the creative task assigned to him. So, an owl in elementary reproduction.
To work you will need:
- bright yellow, red, orange and green leaves;
- office glue;
- scissors;
- snow-white album paper;
- colored paper;
- foil.
Manufacturing process:
- For our craft, you will need to take paper and make a rough sketch of a bird on it with a simple pencil.
- After this, you need to select the most suitable and unusual leaves from different trees that fit into the image of the owl presented by us. We lay out our natural material along the outlined lines with our own hands so that all the outlines and details are similar to the real thing. If necessary, use scissors to trim the edges of some of the component elements and secure everything with office glue.
- We cut out the owl's eyes and beak from foil and colored paper and attach it to the face, as in the photo. We have created such a simple and at the same time interesting craft, dear friends. Using this simple technique, you can create with your own hands many other animals, birds and even people; you just need to choose beautiful leaves.
Vase of autumn maple leaves

September and October are not only “golden autumn”, but also the time when it’s time to make crafts from dry leaves. For children, this activity turns into real entertainment. After all, using various gifts of autumn, you can create applications on various topics. Most often, children prefer crafts in the form of various animals - mice, squirrels, birds, deer, etc., as well as autumn pictures depicting yellowed trees, dry grass and the last sunny days. However, this is only a small part of what can be made from dry leaves.
Preparation of flowers and leaves for applications
Dried flowers and trees can be made not only in autumn, but also at any other time of the year. The main thing is to think about this in advance and “stock up” on the necessary natural materials. It is worth noting that you can start collecting flowers for crafts and applications in the summer, when they are completely green. Then you will have more opportunities to create exactly the image you want. Leaves must be collected from a wide variety of trees and bushes - birch, rowan, oak, viburnum, willow, ash, cherry, apple, maple and much more. By the way, maple fruits, the so-called helicopters, can also be useful for autumn crafts.
In order to be able to make from dry leaves, the material must be prepared in a certain way. So, if you have enough time, it is best to use the old method of drying sheets - put them between the pages of a thick book and leave them for several days or weeks. If you plan to make the craft on the same day that the materials are collected, then the easiest way to dry it is to iron the leaves placed between two newspaper pages. After this, they become dry, although a little brittle, so you need to handle this material carefully.

Preparing materials for work
The gifts of autumn are not the only thing you need to make interesting crafts from (dry) leaves. It is necessary to equip something convenient for children and also purchase a number of other materials that may be needed during the work. For example, cardboard, colored paper, glue, a simple pencil, scissors, thread, brushes, tape, colored felt-tip pens or markers. You may also need toothpicks or wire.
It is most convenient to glue the necessary elements using an electric hot gun. However, if it is expected that the child will do everything without the help of an adult, then it is safer to buy him regular PVA glue.
Bouquet of roses from maple leaves
If you want to make crafts from dry, but plastic, then a bouquet of roses can be an excellent option. First you need to make a center for the future flower. To do this, you need to fold a large beautiful leaf in half across the central vein and twist it into a tube. Then the remaining petals will be placed around the resulting center.

It is necessary to place the previously made core in the center of the sheet so that the front side of the future rose petal is inside. Then we bend the leaf outward from the middle. It is important that this bend extends 1.5-2 cm above the core. Next, the side edges of the folded sheet should be wrapped around the middle. Subsequent rose petals are made in the same way as the first. Remember that each maple leaf should be located opposite the previous one.
When the desired density of the rose flower is achieved, in order to prevent the bud from falling apart, it is necessary to tightly tighten all the leaves at the base with a thread. In the same way, you can make as many roses as you need for a beautiful bouquet. The finished flowers should be collected together and decorated with bright ones; you can also add a sprig of viburnum or rowan to the composition.
Birds made of leaves
Birds are another interesting craft option made from leaves (dry). For children, the process of making such a creation will be a real holiday. Using dry leaves of various trees, you can make any variety of birds. The simplest and at the same time interesting application is a bird sitting on a branch. To make it you will need two ash leaves of different sizes, one birch, two rowan and a small twig.
First, glue a branch to the cardboard on which the future bird will sit. We attach the body a little higher - a large ash leaf, and glue a birch leaf to it, turning the rounded end forward. A tail is made from two long leaves, and a wing is made from a small ash leaf. The eye and beak can be drawn with black paint, a marker, or cut out of cardboard and glued to the appropriate places.

Leaf frames
What child doesn’t dream of having his or her children’s room decorated with photographs or homemade pictures placed in an original frame? And if we are talking about a frame made by yourself, then placing it on your work table or bedside table is doubly pleasant. It is worth noting that making such a decorative element does not require any special skills; you only need cardboard, leaves, glue and a little time.
A cardboard template is the first thing you need to make such a craft from (dry) leaves. It will not be difficult for children to come up with the design of their own frame. To make it, you will need to cut out two squares, one of which must be left intact, and in the second, a hole must be made inside so that it corresponds to the area of the photograph or picture that is planned to be placed inside. Next, you need to glue these two blanks together, after placing a photo between them.
All that remains is to decorate the frame with dry leaves and other elements. To do this, they need to be dipped in hot water and, smeared with glue, attached to the cardboard. It is recommended to wrap the edges of the leaves on the opposite side of the frame. During work, it is important to carefully smooth out all elements, giving them the most even surface possible. When the craft is completed, you need to weigh it down with a stack of books for better gluing. The finished frame can be installed in any corner of the room, it all depends on the child’s wishes.

Helicopter - applique of autumn leaves
All the boys really enjoy making various vehicles. These can be cars made of plasticine, trains made of construction sets, airplanes made using the origami technique, ships made of colored paper, etc. However, there is one more craft that children may not be aware of. This is a helicopter made from dry leaves. To make it you will need leaves of various sizes and shapes.
In the center of the cardboard sheet you need to glue a large pear-shaped piece of paper, which will become the body of the helicopter. To make the front part of the base, you need to use scissors to give the sheet a rounded shape. Next, you should make a helicopter propeller and tail from long narrow leaves, gluing them to the appropriate places. One application can depict several helicopters of different sizes. Such children's crafts made from dry leaves will definitely interest any boy, and soon he will make a new vehicle, showing his own imagination.
Animals made from leaves
All from the same materials, but different in shape and size, you can get various charming crafts. Applique from dry leaves can be done in several ways - using whole sheets, cut out figures, or by laying them on top of each other in several layers.

Having collected a large collection of leaves, you can try to make an unusual exotic animal. However, the simplest figures are: mice, squirrels, turtles, moose, cats, and so on. So, to make a mouse, you need to stick an oblong leaf on cardboard - this will be the body, for the head you need to use a leaf that is as close in shape to a circle as possible, and the legs and ears should be made from very small maple fruits. In a similar way, you can depict any animal on cardboard, selecting leaves of appropriate shapes for certain parts of the body. For example, for the horns of an elk and the tail of a squirrel, for the tail of a cat and the ears of a donkey - rowan or willow, for the head of a mouse - birch, etc. The main thing is not to be afraid to show your imagination, and then everything will work out!
Leaves are the simplest autumn material from which you can make various crafts with your own hands. So is topiary, that is, an artificial tree that serves as a beautiful decoration. There are several options for how to make a tree from leaves with your own hands; more than one master class is devoted to this. Some crafts will be discussed in more detail.
This craft does not require a lot of expensive materials, and the main elements are literally lying on the ground. So, collect a lot of beautiful, not very large, bright leaves. To make the color scheme impressive, take lighter sheets - as practice shows, brown and crimson ones do not look so elegant in topiary.

You will also need dry twigs and berries.
This master class also assumes the presence of:
- Pot-vase;
- Wooden stick;
- Foam ball blank;
- Spray paints;
- Hot glue;
- Thermal gun;
- Masking tape.
For this craft you will need two foam balls at once. You insert one of them tightly into the flowerpot, or better yet, secure it with hot glue. You need to stick a wooden stick into this ball and make it so that it touches the bottom of the pot.

- Surface of a foam ball, seal the one in the pot with masking tape. Paint the pot itself and the stick-trunk with spray paint. For example, golden, after all, the theme of topiary is autumn. Masking tape is needed to prevent the foam from becoming stained. Also protect the surface where you are working from paint.
- Place the second foam ball to the other end of the stick. This will be the basis for the crown. Leaves and twigs need to be inserted into the top ball to form a crown.
A very important point - you can make topiary from dry leaves, but its aesthetics will be in doubt. No, dry leaves also have their own beauty, but this master class still suggests processing the leaves with your own hands.
Maple leaf topiary: leaf processing
You can process the leaves with your own hands so that there is no need for artificial ones. It’s no secret that many autumn crafts are made from artificial leaves.

The master class suggests the use of glycerin:
- You need to make a solution from glycerin. To do this, take 2 parts boiling water for 1 part glycerin. Bring everything to a boil over medium heat, and then cool.
- The solution must be poured into a heat-resistant container, cover with a lid and shake well.
- Dip the stems into the hot solution so that it covers them by at least 7-9 cm.
- Place the container with immersed plants where it is cool and there is no direct sunlight. You will know that the glycerin has been absorbed when droplets of moisture appear on the leaves.
As you can see, the master class is not complicated, but the process of absorbing glycerin lasts at least 10 days, or even three weeks. From time to time you will have to check how the plants are doing. Glycerin penetrates into some of them faster. Sometimes dense stems are laid out with scissors so that glycerin penetrates into them more quickly.
When everything is ready, the leaves can be taken out for crafts; they need to be wiped with a dry cloth. True, you will have to dry the leaves. Some people force things forward by removing the leaves hanging on a rope after a couple of days; others dry them for two weeks.
The leaves can be coated with waterproof colorless varnish. And after drying, you can definitely use it.
Roses from autumn leaves (video master class)
Topiary from leaves step by step: master class for beginners
Leaves prepared with your own hands can decorate a tree. The main task is not to disturb the harmony of the craft. And this needs to be done in such a way that the crown is rounded, the color transitions are natural, and the berries only emphasize the autumn mood of the topiary.
The master class continues as follows:
- Without additional decor, the topiary will be faded. Openwork ribbons and braid in the color of wood will do. The flowerpot can be decorated with beads and red buttons.
- Fix a couple of leaves on the trunk - only small and neat ones.
- Place cut yarn threads in a pot to match the crown. They will imitate an autumn carpet. You can also throw miniature cones and acorns there.
- At the foot of such a tree there may also be a small pumpkin, as another attribute of the autumn atmosphere.

Just as appetite comes while eating, so here inspiration can come while working. You can complicate the master class with your own hands by adding different decor - bugs, dried flowers, artificial moss, etc.

How to make topiary from rose leaves
A topiary of autumn leaves can turn into a bouquet of roses. How, you ask, and just as easy as the previous master class.

How to make such flowers? Once again, you will have to discard dry leaves; leaves treated with glycerin look more aesthetically pleasing.
But to make roses with your own hands you need:
- You need to fold the maple leaf in half so that the front side is on the outside.
- The leaf is rolled up, this will be the core of future roses.
- Around the first roll you need to line up row after row of petals. This time the front side should be on the inside.
- Bend half the leaf away from you. The bend line should be about a centimeter higher than the core roll.
- Once again we bend the sheet outward, without smoothing the fold line. The roll wraps on both sides.
- This is how all rose petals are made. Below, at the base of the flower, they are secured with threads. And this is how every rose is made.

If you decide to use dry leaves for the craft, then after work, spray them with hairspray. When rosebuds dry, they will not crumble or break. Just spray the buds of maple roses thoroughly, sparing no varnish.
The buds are attached to the base of the crown with glue using a heat gun. Such a tree must be made very carefully with your own hands so as not to deform the elements.
Crafts from roses are not only topiary. More than one master class is devoted to bouquets of flowers, jewelry, and additional decor for other works.
Topiary “Green Roses” made of maple leaves (video)
The master class loves experiments, work, get inspired, offer your own decor options. Such a tree can decorate the house all year round, being an excellent addition to the bookshelf with the lyrics of great poets. Stylish and original, modest and unpretentious. Good autumn results, and skillful capturing of natural beauty!
Topiary of autumn leaves (photo)