Napkin applications are a unique kind of creativity that will definitely appeal not only to children, but also to adults. Interestingly, it will be possible to create real masterpieces even without the use of scissors. In general, an application is called images that are made by gluing pieces of material onto the base. different color and invoices. It can be stones (including precious ones), fabric, sand, threads, shells and other options.
The most popular material for applications is paper. After all, it is she who is at hand for every master, absolutely safe even for the smallest creators, is inexpensive, but at the same time allows you to create real works of art. And it is most convenient to work with napkins. They are perfectly torn and kneaded into lumps, which fill the contours of the drawings of the future application.
Today on sale you can find napkins of various colors, which makes the creative process with them even more interesting and exciting. From multi-colored crumpled napkins, magical lumps are obtained from which it is very interesting to make the most different crafts. By the way, napkins are used to create paintings in other ways. In some cases, they do not crumple into small balls, but simply cut into pieces of the desired shape or twisted into flagella. Which option is better to choose, each master decides for himself. Often it depends on the desired pattern. So, with glomeruli and flagella, the craft is more voluminous.
By the way, I envy the current craftswomen with white envy - after all, they can easily find any information on the Internet. And I used to have my middle group I learned how to make applications from napkin balls for kids, went to a master class, manually wrote notes, and then other educators studied using my notebook ...
The discussed type of creativity has several advantages at once. Among them:
- development fine motor skills in the manufacture of applications from twisted napkins;
- great scope for creativity and creativity;
- the ability to work without scissors and other dangerous tools;
- development of tactile perception (if paper of different textures is used);
- the opportunity to start creating already with a 2-year-old baby.
Moreover, do not forget that the joint creation of any crafts unites children and their parents and helps family members to become even closer to each other.
Gallery: paper napkin applications (25 photos)


Master classes of applications from napkins
Make it bright today beautiful crafts from the material under discussion will be possible even for a child without the help of adults. After all, there are detailed step by step master classes, which will tell you how easy it is to turn colored napkins into your favorite cartoon characters, lush bouquets or mouth-watering fruits.
rowan branch
 The application “Rowan Branch” is obtained very beautiful and original. Interestingly, this napkin craft for children includes two techniques at once. The first part of the drawing is created from paper blanks., and the second - from lumps. Even a child over 5 years old will be able to cope with such an application. To create it, you will need the following materials and tools:
- sheet of paper (base);
- green or orange leaf napkins;
- red napkins for berries;
- color pencil;
- scissors
- glue.
First of all, a template is drawn on the basis - an image of a twig. It should be clear, so as not to get confused in the future, where to glue the various details of the craft. From green or orange napkins leaves are cut out and attached to that part of the picture where they should be located. Let such details be ribbed so that they resemble real leaves. By the way, at this stage, you can use napkins of two colors at once. For example, among the bulk of the orange leaves, stick a few green ones.
Berries are created from red napkins. Scissors are not required for this. You can simply tear off pieces from a napkin, form paper lumps from them and glue the parts in place of the intended bunch. The more berries there are on the craft, the more voluminous, realistic and interesting it will look. The formation of paper balls must be entrusted to the most junior masters. After all, this procedure perfectly develops fine motor skills.
Apple tree
 There are many options for applications from napkins for children, which allow you to create beautiful lush tree on a sheet of paper. And thematic master classes will help them in this. The most interesting thing is to work on an apple tree. To create it, you will need the following materials and tools:
- multi-colored napkins (green and red);
- a sheet of paper for the base;
- simple pencil;
- brown felt-tip pen or paints of the same color;
- scissors;
- glue.
To begin with, a tree outline is drawn on the basis. If such voluminous application from napkins is performed together with the child, then you can simply circle his open palm. The area just below the wrist will become the trunk, and the fingers will become branches. Further, the future tree is completely painted over with a brown felt-tip pen or paints. It is allowed to use a colored pencil of the corresponding shade for this purpose.
When the base is dry, you can begin to form the leaves. To do this, green napkins are cut into small squares, after which each resulting detail is twisted in the middle into a flagellum. Finished "bows" are glued to the crown area next to each other. Let there be enough of them so that the top of the appliqué is lush and voluminous.
It remains only to decorate the resulting apple tree with fruits. To do this, you need to make a few lumps from a red napkin. Its parts can be cut off with scissors or simply torn off with your hands. Let the apples be large and bright. Such fruits will add beauty and originality to crafts. Fruits are glued on top of the "crown" in any chosen places. As you can see, for such an application from paper balls and flagella, 2 techniques for forming parts from napkins are also used at once.
To make the finished tree even more unusual, you can hide an owl in its crown. This surprise will definitely please the smallest masters. To create a funny bird no need to study a special master class. You can simply draw it on paper or cut out a suitable picture from an old magazine.
Squirrel
 Making a squirrel from rolled napkins will be a little more difficult. This activity is more suitable for junior schoolchildren and older children. Can perform forgery together with adults to have a fun and exciting time with the whole family. And for those who decide to take on the creation of such an application, a thematic master class will help.
To make a bright beautiful squirrel using napkins, you will need to use the following materials and tools:
- white and orange napkins;
- a sheet of paper for the base;
- simple pencil;
- glue.
First you need to draw the outlines of the future squirrel on a white sheet of paper with a simple pencil. But this option is only suitable for artists with artistic talent. Everyone else can just print a suitable picture. For example, using a picture intended for coloring. They always have a clear bright outline and a snow-white base. If the squirrel in the picture is holding any object in its hands: a flower, a nut, a mushroom, then you will need to stock up on napkins of the appropriate colors to decorate them on the application. Or just color the corresponding part with colored felt-tip pens or pencils.
After that, you just need to tear off small pieces from the paper and roll them into tight balls. White details are suitable for decorating the lower part of the muzzle, tummy, tip of the tail and paws, and orange for the rest of the silhouette. It remains only to stick them in the appropriate areas of the picture. The larger the balls turn out, the more voluminous and “fluffy” the squirrel will end up being. The eyes and nose of the animal can be drawn with a black marker. What the result will be a protein depends only on the imagination and preferences of the masters themselves. By the way, such a red-haired beauty or any other character will be an excellent decoration for a homemade postcard. And if the napkin is cut into small squares, but not rolled into balls, but simply glued to the template in the middle, so that the tips stick up and form a fluffy squirrel fur, then this technique is called facing.
Natalia Gavrishko
Purpose master class: making crafts for the holiday of meeting spring, decorating the interior., the desire to please loved ones with a composition.
Target master class:
1. Create compositions in flat facing technique.
2. Learn to work in paper cutting technique.
3. Fix the ability to correctly position the composition of the craft.
4. Development of fine motor skills of hands, sense of taste, imagination, creative thinking.
5. Development of accuracy, creativity, aesthetic taste.
6. Cultivate interest in working with corrugated paper.
Required material:
The base is white paper.
Colored corrugated paper blue, light blue, green, white, light brown;
Scissors, pencil.
Facing paper - it's fairly new paper craft technique. But even despite her young age, this technology there are already a lot of fans. But paper crafts made in this technique, are very beautiful and unusual.
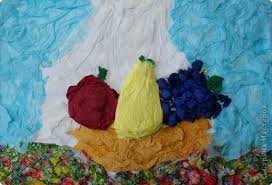
This wonderful carpet-picture the size of a Whatman sheet evokes admiration and surprise from everyone who sees them. It seems incredible that such complex compositions can be performed by children. It turns out that everything is possible. If you organize collective creativity correctly, then even preschoolers can cope with such work.
In order to complete the mosaic facing technique, colored corrugated paper is needed, or colored napkins, scissors, pencil and glue.
To make such applicationwe have gone through the following steps:
1. Draw a sketch applications« spring landscape» on paper.

2. From stripes corrugated paper cut into squares with a side of about 3 cm.
3. Squares must be turned into colored balls by rolling between the palms (children at this stage are the most the best helpers) . At the same time developing fine motor skills of children's hands.

4. Apply glue with a thin strip along the contour to a small area of the picture. We attach the parts to the adhesive base. Every next trimming glue next to the previous one. Try to bet end pieces tightly to each other so that there are no gaps.

5. Where it was necessary to emphasize the transition of the sky and air and give a more natural look, I used different shades of blue so that the composition did not merge.


6. Mosaic in facing technique can be done along the contour or made solid.


7. It is necessary to fill in the background around the details of the picture. It turned out a small fluffy rug.

Work on such a carpet can be turned into an interesting game. The children liked this activity very much, especially when they saw "fluffy" result. A big plus in this work is that we did it collectively. We worked as a group and completed a large mosaic the size of a piece of Whatman paper. The children even coped with the big picture; for this, each child was allocated his own area, which he filled out « trimming» . The places where the squares join are practically invisible due to the fluffiness. Working with paper develops fine motor skills, attention, accuracy, contributes to the emotional and aesthetic development of the child.

This is how it turned out applique from napkins in the technique of trimming.
The development of the child must begin as early as possible. You can interest the baby, incline him to creativity by inviting him to create an application together. There are many options for choosing the material from which the application will be made - textiles, natural materials (leaves, acorns, cereals, pebbles), paper of various types.
Table napkins in children's creativity
Pay attention to this type of application, such as the application of paper napkins. Very cute products are obtained from this affordable material.


In addition, the application of twisted napkins develops fine motor skills of the child's hands, stimulates artistic thinking, imagination.
In general, ordinary table napkins give a wide scope for creativity. A variety of colors, availability and ease of use of the material, combined with imagination, can ultimately give a truly magical result. There are a lot of options for children's creativity using paper napkins. These are various figurines, delicate compositions from openwork napkins, as well as a lot of options for napkin applications for children of all ages.


For the smallest children 2 - 2.5 years old, simple plots are suitable - a flower, beads. At this age, the main thing is to acquire the initial skills of working with the material. But older children - from 3 years old - are already quite capable of coping with more difficult work - a rowan branch, a snowman.
For older children, at the age of 4 - 5 years, images of insects, animals, more complex flower arrangements are suitable for creativity.
Application from napkins for children "Sheep"
For work you will need: a stencil drawing (you can draw it yourself or find a ready-made one), white cardboard - the base, beige cardboard for the muzzle, some black paper for the hooves, white napkins, ropes, ribbons for the legs, brown felt-tip pen, PVA glue.
Napkins must be cut into squares and rolled each into a ball. The smaller the squares, the more accurate the application will be. To glue the body of the animal, you will need a lot of paper balls, so it is better to prepare them in advance. Transfer the stencil of the sheep's body onto cardboard and cut along the contour. Spread the cardboard with glue, glue the legs and glue the balls of napkins on top. Cut out a head from beige cardboard, draw a mouth and eyes with a felt-tip pen or pencil. The head can not be cut out separately, but made of white cardboard, like the body, and then simply painted with colored pencils, felt-tip pens or paints. Cut out hooves from black paper. They must be double-sided, glued in such a way that textile legs can be glued into the middle. Sheep can be decorated with a ribbon around the neck, a bell, a flower behind the ear. You can attach a loop on top - it will turn out New Year's Christmas decorations. You can stick the finished application on a cardboard folded in half and get a greeting card, or you can initially perform the application on a single piece of A4 cardboard, decorate the picture with a frame.


Older preschoolers - 5-7 years old - will be interested in trying their hand at creating a full-fledged panel picture, where the entire space is filled with twisted pieces of colored napkins. A colorful underwater world, a still life, a landscape on the theme of autumn, winter - these are just a few ideas for creativity with children.


Napkin applications - simple, interesting and, most importantly, useful view creativity. Both the smallest and older children can make an application from paper napkins with their own hands. The main thing is that it is accessible and entertaining, and preparation will not require much time and financial costs.
Useful video compilation of materials on this topic
Beautiful flowers from paper napkins with your own hands.
Simple paper napkins give an amazing fantasy for creativity.
Handmade crafts serve as a wonderful decoration for home and office interiors, table setting.
Very often such affordable material is used to decorate festive events.
DIY napkin flowers for beginners: schemes, templates, photos
humble carnation
 fluffy dandelion
 bright aster
 Delicate poinsettia
  yellow peony
 Flowers for topiary from napkins: schemes, templates, photos

 The original way of making blanks for wood
 Using the proposed schemes for making flowers, you can create wonderful trees of happiness.
 European tree from ordinary napkins
 Tree of happiness from napkin decorations
 Video: Do-it-yourself napkin topiary
How to make flowers from napkins for volume figures?
To make a figure, 50 cm high, 30 by 10 cm wide, you will need:
- Napkins - 270 pcs.
- Glue - 3 small tubes of medium size
- Cardboard or carton box
- Scissors
- Medium Width Tape
- stapler
Getting Started:
- Using scissors, we make blanks in the shape of the desired number. In our example, this is the unit
- We glue all the parts with adhesive tape

 The basis for an unusual gift decoration
 - We mask the cardboard with napkins, fixing them with glue
- While the workpiece dries, we make flowers
- Fold the napkin in half twice
- We fasten the center with a stapler
- Cut out the circle
- Raise each petal up to form a flower
- We do not touch the bottom leaf, in the future, with its help, we will attach the flower to the base
- We prepare 250-270 flowers
 The next preparatory stage
 - Pasting our number
- It works really well if you use napkins of different colors.
 Here is such a beauty
 Volumetric flowers from napkins - origami
Doing everything clearly according to the scheme proposed below, it turns out very unusual and beautiful flower. The main advantage of which is that its manufacture does not require much experience and labor-intensive cutting.

 Using the ancient art of paper folding to make beautiful decorations
 Lotus flower from napkins
Necessary materials:
- Napkins green - 8 pieces (33/33 cm)
- Plain white - 24 pcs.
- Yellow - one 33/33 cm
Manufacturing process:
- We fold the factory napkin, without unfolding, into a triangle
- Bend the corners of the triangle from the top down

 1 step
 It will look like this
 - The resulting ponytails, wrap from the back side up
 2 step
 - Fold in half outside. The first base for the leaflet is ready
- We make eight such blanks

 3 step
 - Using a stapler, we connect the formed greenery
 4 step
 The green base is ready.
- To make flower petals, we make 24 leaves from a white napkin, in a similar way.
- We spread 3 rows of white petals on top of the green base.

 5 step
 - Add, for brightness, diagonally twisted yellow stamens

 6 step
 - If desired, you can modify the flower by folding a few yellow napkins in half, and then twisting them diagonally


Big tissue paper flower
Fluffy flowers are indispensable in the design of banquet tables and festive rooms. Any composition can be created by learning how to make this simple decor.
- We fold a single-layer white napkin with a small accordion. The smaller the step, the flower will be more voluminous

 Making folds carefully
 - We fold in half. At the ends we form triangles, using scissors

 We cut off the corner
 - We get a blank for the central part of the decoration

 We get a toothed fence
 - With a red napkin we do similar manipulations, only round the edges


 Duplicate all actions
 - We connect both blanks, as shown in the figure.
 We combine multi-colored napkins
 - Thread in the middle

 We fix
 - Raise the petals gently up
- We prepare in this way the required number of flowers of different colors

 Straightening the layers
 - The resulting lush flowers are added to the selected composition
 Beautiful decor from lush flower blanks
 Application from napkins flowers
A great opportunity to spend leisure time together with kids 4-5 years old, doing this simple work.
Ancillary material:
- Napkins - blue
- Cardboard - white and color
- Paper - green
- tassel
- Scissors
- Pencil
Progress:
- We cut wide strips from blue napkins, roll them into lumps
- We take white cardboard, draw bells on it
- We cut out the flowers, stick balls formed from napkins on them
- Draw a branch and leaves on green paper
- Cut out
- Glue alternately on yellow cardboard or thick paper: sepals, flowers, twig, leaves
 Bells made by children
 DIY poinsettia flower from napkins

 The best New Year's gift
 Very elegant and festive flower. It is one of the most popular New Year and Christmas decorations.
Necessary materials:
- Pink and green napkins
- Pieces of white napkin
- Some golden paint
- Scissors
Getting Started:
- Drawing on napkins
- from pink - 1 small and 2 medium flowers
- from green - 1 medium
- Cut out

 We make blanks
 - Round petals are slightly cut, in the form of a triangular shape
 Shaping the natural shape of the petals
 - Cut green blanks into:
- 2 leaves with two petals
- 1 single
 We divide the green base into separate leaves
 - We glue the flowers, shifting the petals among themselves, leaving no space
- First two medium sized pink flowers, then a small pink
- From small pieces of a white napkin we twist the stamens
- We cover them with golden paint
- We fix with glue in the center of the flower
- Glue green leaves on the underside of the flower
 Put it all together with glue
 - Beautiful New Year's flower is ready

 Napkin poinsettia
 DIY flowers from sweets and napkins
We prepare in advance:
- Round chocolates - 5-7 pcs.
- Several pieces of green and yellow napkins
- Toothpicks - 5-7 pcs.
- Scotch narrow
- A piece of plastic or cling film
- Scissors
- Plastic glass or any jar for a coaster
- nice thin ribbon
Step-by-step instruction:
- We wrap the candy with cling film to make a twisted tail.
- We fix the toothpick with tape to twisted polyethylene

 Packing sweets
 - A napkin folded four times, cut into the same size - 6 by 4 cm
- We twist each blank in the center
- We connect the formed halves with each other
- We get such a petal
 We form a yellow petal
 - We wrap the bud with a petal
- Attach it with tape

 Connecting to the base
 - We cut the green napkin into 4 parts, each of which we cut into 2 more parts
- We cut deeply and twist the tails, as shown in the example.

 sepals
 - We wrap the flower with ready-made sepals

 Delicate, barely opened buds
 - We paste over a plastic glass with yellow napkins
- Stuff it with styrofoam
 Vase for a bouquet
 - We crumble green napkins into wide "noodles", stick them on the foam

 Additional greenery for decoration
 - Decorate the glass with a bow

 candy bouquet
 How to fold a flower from a napkin on the table with your own hands?
A very simple napkin folding option used when setting the table:
- We close the unfolded napkin so that its two sides are connected in the central vertical line
- On both sides of the horizontal strip dividing the napkin in half, we make folds
- We get two even folds in the center of the form

 We decorate the table with flowers from napkins
 - Next, we form an accordion in the direction of the resulting folds
- We carefully squeeze the folds
- We take the center of the resulting “butterfly” shape with our fingers, turn it into triangles, in the opposite direction from the formed fold of the triangular side
- Unfolding the finished serving flower
 Ideal for serving
 Flowers from napkins - roses
A very simple option for making roses, for the subsequent formation of various compositions.
- We do it very carefully, using the proposed scheme below.
- We collect ready-made roses in a bouquet or topinary
 We make a bouquet of ready-made flowers
 - Having made many small roses from napkins, put them in a large vase. This will serve as a wonderful decor for the festive table.

 Beautiful decoration with a napkin rose
 Flowers from napkins in pots
Necessary materials:
- Plain napkins
- ordinary balloon
- Paste
- Scissors
- stapler
- circumcised plastic bottle or flower pot
Getting Started:
- Inflate a balloon of the desired size. It should fit the volume of the pot in which it will be located.
- I stick napkins on it, leaving only the tail

 The ball must be the size of the pot
 - While the ball dries, we make flowers
- Two standard napkins are stacked on top of each other, fastened in the center with a stapler
- We give, with the help of scissors, a round shape to the workpiece
- We make about 30 such templates
- We form flowers by lifting each layer up to the center

 For greater splendor, we make cuts along the edges of the form
  For the brightness of the composition, add multi-colored napkins
 - We proceed to pasting the dried ball with ready-made flowers
- Apply very tightly, add green napkins in between
- We put the colorful ball in the pot
- We decorate with a bow
 Volume composition in a pot
 Flowers from viscose napkins
- We start work with the manufacture of cardboard forms in the form of petals with a length of five, four, three centimeters

 Cardboard blanks
 - We transfer the templates to a viscose napkin
- Cut out of pink fabric: 7 large and 7 medium petals, one circle measuring 4 cm
- From pale pink viscose we make 7 small petals

 Viscose petals
 - Pour glue onto the wide base of a large petal
- Turn the petal inward


- We fix all seven large petals on a round pink base, using glue
 We distribute evenly
 - Add a row of middle petals
- We complete next to the pale blanks, placing them between the petals of the previous layer
 The main part of the future accessory
 - From a strip of a light pink napkin (2 by 8 cm) we form a core
- To do this, fold the strip in half
- We make cuts along the fold
- Gradually twist
 We make the strip the size of the desired core width
 We get such a core
 - For greater expressiveness, we make a border of bright pink color, from a strip of 2 by 8 cm, formed, as in the first case.

 The center of the flower
 - We fix the resulting shape in the center of the blank from the petals
- The perfect accessory is ready.
 Viscose additional element to the wardrobe
 Flowers from openwork paper napkins
By themselves openwork napkins very beautiful. Using the proposed schemes, you can get very original decor elements.
 Delicate pink bouquet for gift wrapping
  Yellow rose for a beautiful table setting
 You can fold the original napkins in a few minutes. And the decorations made with their help look very impressive.
Video: How to make beautiful flowers from paper napkins with your own hands?
Today I want to bring to your attention a very simple master class for children from 3 years old and older - an application of twisted napkins. This is the easiest job that you can do with your child using this technique. Application from twisted napkins is a rather exciting activity and, moreover, very useful for the development of children. This type of creativity contributes to the training of fine motor skills of children's hands, the development of color and tactile perception, stimulates the imagination, forms an interest in applications and in working with paper.
This application can be made on absolutely any drawing you like, the main thing is that the details of the drawing are not small and there is enough space for gluing balls from napkins.
For work we need:
1. Album sheet of A4 format or a finished outline drawing of a future application;
2. A sheet of thick A4 cardboard;
3. Napkins of different colors or corrugated paper;
4. PVA glue;
5. Scissors;
6. Wooden frame.

For applications from twisted napkins, ordinary multi-colored paper napkins are used, which are in almost every home or corrugated paper (you can buy it at stationery stores), but it is best to combine both, since corrugated paper has a much larger color scheme than napkins.
First, let's prepare the basis of the application: on an A4 landscape sheet - draw any large drawing, if possible, you can download a drawing for coloring from the Internet and print it on a printer. We'll take a picture of a butterfly. The drawing of our butterfly can be printed from here .
We paste a sheet with a pattern on a suitable size, pre-prepared thick cardboard. 

While the base dries, we prepare napkins and corrugated paper for work. 
We cut the napkins into equal small squares, then twist each square with our fingers into a ball. There should be quite a lot of these balls!

The resulting balls are glued to all parts of the picture with PVA glue. Glue balls of different colors on different parts of the butterfly wings. The antennae and torso can be painted over with a black felt-tip pen or pasted over with black corrugated paper balls.


The final decoration of the panel depends on the child's imagination: depending on the subject, the work can be decorated natural materials, threads, shells, shavings, pasta and so on. Separate details of the composition can be made of colored or velvet paper.


In our case, we also decided to cover the background around the butterfly with napkin balls. 
It turned out such a motley butterfly! If desired, the work can be placed in a regular wooden frame. 
I am sure that such a spectacular do-it-yourself painting will organically fit into the interior of any children's room or become original gift for relatives and friends. But the most important thing is that in the process of work, the kids will get a lot of fun and positive emotions, and this is the most important thing! Good luck to everyone and creative success!