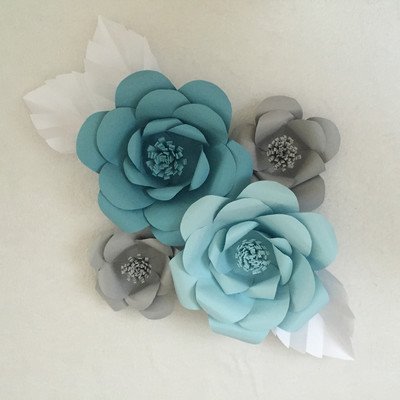
Our whole life is accompanied by a variety of celebrations and holidays that give us joy and fun, only for the sake of which it is worth living in our life. hard time). In any festive atmosphere, flowers must be present, and not only living ones. Recently, it has become very popular to decorate a hall or any other room where a banquet will be held with large paper flowers. Below are several options for paper flowers, in my opinion, very cute and original, which are perfect for decorating a festive interior. The flowers are quite large, measuring 11 cm in diameter. Are we watching a master class?


We are watching a photo master class on creating paper flowers to decorate the holiday. More information about all existing holidays, about their history and features of celebration in different countries of the world, you can find on the site http://female-happiness.com/. On the site "Women's Happiness" you will also find many interesting articles about beauty and health, fashion and style, feng shui and magic, travel and much more.
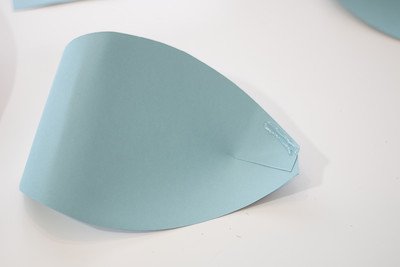
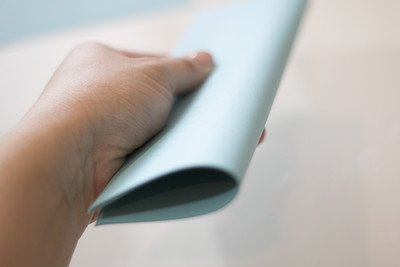
For work we need an office colored paper, A4 format, which can be purchased at any stationery store
We cut a sheet of paper to get a square. And then we add according to the photos 


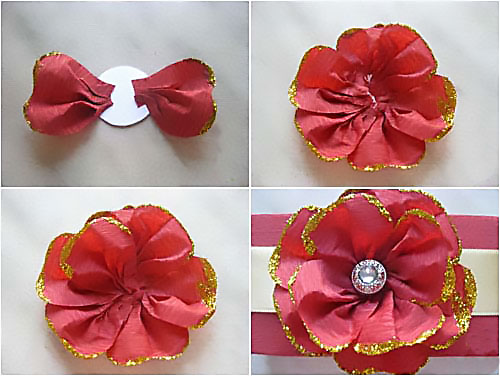
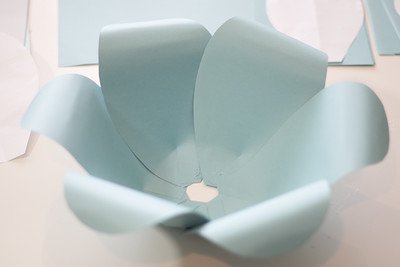
We cut, open and get just such a flower. This will be the basis for all the color options below.


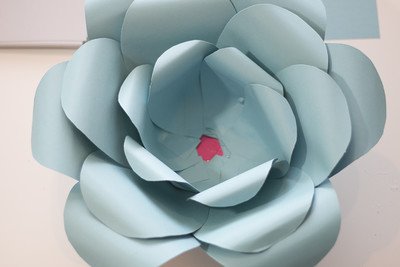
Add a fringe to the middle of the flower, cut a strip of colored paper folded in half


Instead of fringe, crumpled foil can be glued into the middle

You can add a rose of the same paper color or a different shade


Greetings, dear readers and visitors! I have repeatedly written that I love decorating gifts in the most unexpected ways. And today I suggest you make paper flowers with your own hands. Already twenty-odd methods, by the way.
Now, unfortunately, I rarely get to mass gift wrapping. Moreover, every year there are more and more acquaintances and friends who should be congratulated along with relatives. It's very joyful! I love giving presents. But if I choose them very carefully, then lately I pack them in organza bags, since I decide on detailed packaging only for single holidays (like a birthday).
However, my passion for different kind packaging beauty is difficult to win, so today I will train with you to make beautiful flowers according to step-by-step schemes.
DIY paper flowers: simple and with a twist
There will be a lot of master classes, get ready. Good news for all rose lovers: there will be 4 of them.
Aster
Guys, honestly, I'm not very strong in the names of colors. So if you see a clear discrepancy for you - write in the comments.
So, the first in line is the aster. For her, cut out five circles: two large, two medium and one very small. Fold each circle in half three times, then draw the edge as in the 4th photo. After unfolding the design, squeeze each petal to add volume. Fold all the circles into each other and decorate the middle.
Almost calendula
This flower is much more like a packing bow. Prepare for it a square of paper of the desired length and cut the edges according to step 2. You will need several such blanks. Lay them one on top of the other and squeeze in the center, tightening with wire or thread.
Now the most important thing is to straighten the petals so that you get a beautiful likeness of a flower. Accordingly, the more layers, the more petals and the more magnificent the flower in the end.
Tip: make several of these flowers different size and glue them on the packaging next to each other, then you get a beautiful likeness of a bouquet.

Calla
To create calla lilies, you can use both ordinary double-sided paper and foamed rubber (here I wrote what it is - in the section about the minion).
For calla, take a stamen (you can crumple it out of paper, go make it out of polymer clay) and a heart-shaped petal. Insert the stamen into the petal, fold the edges of the petal over the stamen, gluing them together. It remains only to unscrew the edges to get the maximum resemblance to calla lilies.
Such flowers are well suited for postcards, packaging, and as an independent gift in the form of a bouquet.

Bell
The master class for the bell is quite simple and understandable. Cut out the blank according to the first photo. Glue the edges of it, and gently straighten the ends. To make everything look natural, make the middle of several oblong stamens that will need to be glued inside the flower.
Of these bells, by the way, it will be great to decorate the packaging for March 8 or just a spring birthday.

lilies of the valley
Well, or something similar. For one flower, take a long rectangle and bend the edge of it, as in the photo. Cut the wide part so that you get a lot of small strips. Using scissors, twist the strips (to do this, you just need to run the sharp side of the scissors along these strips, slightly pressing the blade against them).
To prevent the flower from falling apart, take a rod on which you wind a green strip. Then, from above, begin to gently twist the “flower” part, previously smeared with glue. Apply layers tightly so that greenery does not show through from under them.
But it’s not at all difficult to make green leaves - for them, just fold a rectangle of green paper with an accordion and cut the edges with a “triangle”. When unfolded, you will get a lot of green leaves ready to be glued to the base.

Poppy
Now let's use corrugated paper. Cut out about ten teardrop-shaped petals from it. Stretch the wide part so that the blanks resemble mushrooms.
Take a thin wire and wind some paper around it - this will be the core. Wind the petals onto this core so that each slightly overlaps the previous one. When everything is ready, the structure can be pulled down below so that it does not fall apart.
The master class shows how this flower can be attached to a festive cap, but, believe me, gift box poppy will look great.

Red flower
What kind of species does he have? No associations came to mind. But this is not the point - to create it, you will need about ten petals (corrugated paper is used, by the way). Their shape is almost drop-shaped. but with a cut end.
Cut out a base circle from thick cardboard. Glue all the petals in layers to this circle, slightly crumpling (doubting? God, how right: _D) the bases, thus forming folds - then the flower will be more voluminous and “fluffy”. Decorate the center with some button or bead.
Such a flower, by the way, will look great from soft felt- so it will gain durability. And if you attach the base for the brooch at the back, you get two in one - a gift decoration and a gift itself.
Extravaganza of color
There are only two flowers, but due to the bright combinations, a very unusual effect is obtained. Take the crepe paper again, cut out a circle and fold it into a chrysalis shape. Cut a “skirt” to it, which you wrap around the chrysalis. Attach the petals on top, gluing them in a circle. Glue two wide leaves at the base.
The second flower is quite simple - cut the fringe and twist it into several layers. Flowers are very simple, they can make a very interesting gift composition.
Unseen flower
To prepare the basis for this flower, I advise you to look here - here the basis for the second Christmas tree is created in the same way. But then the differences begin - each of the corners must be wrapped with a thick wire or knitting needle so that a spiral is obtained.
You can leave this design alone, but I suggest you connect several (say, three) pieces using the existing spirals - the wow effect is provided. Then you can also experiment - combine elements with spirals into unprecedented designs.
Tip: going to a Japanese-style party? Then make such a flower of a very large size and take it with you - it will serve as an excellent decoration for the chandelier.

Peony
“Pio-, pio-, peonies are given by a new acquaintance ...” - the words from the song of the underground group “My Michelle” (I often listen to it lately, inspired). We will make from corrugated paper. You will need five sizes of petals, approximately five copies of each ( appearance as in the photo).
Stretch the petals so that you get a semblance of a wave (for both large and small ones). Then form a stamen from the same corrugated paper by folding the paper with further compaction. You can do this on a wire skewer, or you can do it without it.
Glue the petals onto the finished stamen, overlapping each subsequent previous one. Do not tighten the petal too much. At the end, it remains only to cut the green leaves and stick them around the peony.

4 in 1: dandelion, carnation, aster, chamomile
All these wonderful creations of nature are made according to the same principle - cutting the edge of the strip from which the flower will be made. The final shape of the flower also depends on the shape of the cut. Keep in mind that some require a core, while others do not.
Please note: despite the very simple design, the flowers are very realistic. If there is very little time for production, then this is an ideal option.
Experiment and discover your unprecedented plants - be sure to tell us what happened.

paper roses
Magic roses are one of my favorite flowers.
Rose with twisted edge
The main difficulty here is to carefully twist the edge of the corrugated paper, straightening the folds. Then make sure that the folds are even. Now twist the strip so that the layers fit snugly together. At the end, fasten with a thread, cut off the excess.

simple rosette
Need to make a plant in five minutes? Then this rose is for you! Just cut out a circle in which draw a spiral. Cut out a spiral like in the photo and twist the rose starting from the longest link of the spiral (the central part will serve as the base).

big rose
Even gigantic, if you follow just such dimensions. Heart petals are stretched and superimposed on each other in a circle with fixing with glue. Green petals are attached at the end. Of course, the flower does not have to be as big as in the photo - start from your preferences.
Twisted paper rose
Once I already described this way of creating a rose (here is the second one). The principle is exactly the same, but the dimensions of the triangles resulting from twisting must be the same along the entire length of the tape, otherwise there will be a not very neat flower.
Once she even made a Rosemary doll, which took part in the city exhibition. Her whole body was covered with roses, made just in this way (the roses were from ribbons, really).

Clover
I will only show you how to make the base for a four leaf clover. To do this, take a square of paper and fold it in half lengthwise and in half again. Bend the ends to the center. Cut out a heart from the resulting design. The result will be exactly what we wanted - a happy flower.

Nameless
As much as I puffed up, I could not give an intelligible name. As a result, Tovariz remained just a beautiful flower, reminiscent of kanzashi motifs (Japanese art of making jewelry from satin ribbons).
The beginning here is the same as in clover. But after bending the edges, it will be necessary to bend the ends so that the length of the bent part is equal to the length of the visible side in the middle. Then these parts are straightened and their edges are already bent so that the sides are even. They are again bent and glued so that three stamens are obtained. There should be three such petals.
Most of all, such a flower is suitable for decorating a gift in the Japanese style.

And again aster
This time, you already need to glue the petals around the edge until you reach the desired volume. Decorate the center as you wish, or simply fill it with as many petals as possible.

On this large flower review, I declare it closed. I hope you have found exactly the option that will help you decorate the best gift. See you soon, subscribe and share with your friends!
Sincerely, Anastasia Skoreva
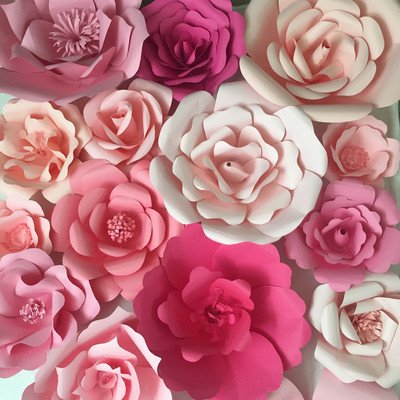
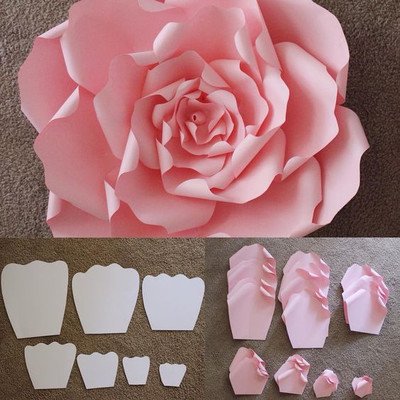
For these flowers, you can create petals in any size! Just make sure that each layer is smaller than the previous one. I used three layers in creating these colors, however, if you wish, you can always add a few more. In addition, you can also experiment with various types centers and leaves.
To create flowers, we need:
- Paper (thick)
- Pieces of cardboard to use as a base
- Scissors

First, let's create patterns for the petals. Then take the paper and fold it in half. I made the template so that the largest petal fits into half of the leaf, and the smallest petal fits into a quarter of the leaf. You will need 6 half sheets for the large petal, 6 half sheets for the medium petal, 3 quarters for the small petal, and 3 quarters for the flower center.

Cut out large petals according to the template.

At the base of the petal, cut out the base for bending, as shown in the photo:

Turn the petal over so that the widest part is at the bottom. Roll the petal away from you to create curls.

Now turn the petal back so that the base with two flaps is at the bottom. Glue the sash so that it overlaps the other. When making the outer petals, do not make too much angle, do not overlap the petals too much. As you advance, the petals should lie flatter.


Remember: for the largest petals, you need to do a lot of overlap, otherwise the flower will be too straight. Do this for all large petals.
Now we will attach more and more petals to each other to form the shape of a ball. Add glue to the edge of each petal and glue.

Continue adding petals to form a flower. Repeat all the steps above for medium and small petals.


Glue thick cardboard to the "bottom" of the flower to give firmness and a base to the flower. In this example, I just used this pink cardboard because it happened to have some kind of holdover.

To make the center of the flower, take the last quarter sheet and fold it in half. Now cut off the "brush". Make sure you cut from the side of the fold.

After you cut through 3 sheets, separate and unfold them.

After you finish rolling up the first sheet, attach it to the next sheet and continue rolling. Do this until you have rolled all 3 sheets together.

This is what the center of the flower should look like in the end. Now all you have to do is add glue to the bottom of the center and add it to your flower!

There's so much more you can do different colors, just change the petal's shape, size, color, and center.

I hope you enjoyed this master class. If you decide to try to make such flowers, then be sure to share a photo with us!


- Rate - Excellent Good Not bad Bad Awful
Be sure to read other interesting articles:
Large handmade paper flowers spectacular decor designed to create a festive interior. They are used to decorate photo zones at children's and adult events, as well as floor or wall decorations for weddings and stages. The manufacturing technology of such a decor is simple, and the materials are available.
There are many ways of festive interior decoration - these are balls, arches, topiaries, garlands, screens, lanterns, candles, natural and artificial flowers. Paper flowers have become very popular lately. Cardboard is used to make them. different kinds paper:
- white;
- color;
- craft;
- velvet;
- creped;
- corrugated;
- shagreen;
- silence;
- newspaper and magazine;
- music;
- paper napkins.

In addition, to create flowers from paper, you will need glue, wire, a stapler, adhesive tape, ribbons, beads and other decor, which additionally decorate flower blanks.
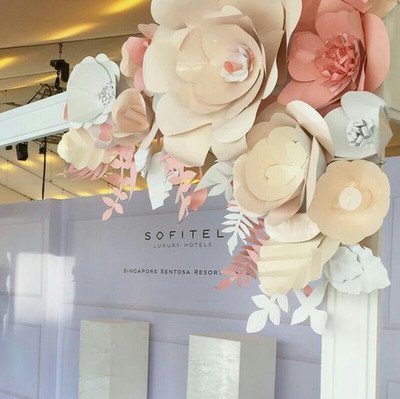
To effectively decorate the living room, voluminous and flat paper flowers are used. They are placed on the walls, ceiling, floor, curtains in separate elements, groups or in the form of garlands. If flowers are used to decorate a stage, they are placed along the ramp, in the background, decorate the backstage with them, or simply hang them above the stage. When using three-dimensional flowers to decorate a wedding hall or an outdoor ceremony, they are used to equip a photo zone, an arch, columns, tables and a path are decorated.
How to make a simple three-dimensional flower
For crafts, it is recommended to use sheets of silence, in their absence, ordinary table napkins are also suitable. This simple and docile material is also suitable for making ornamental onion buds, chrysanthemums and peonies. The technology for making dandelions is similar to how paper pompoms are made.
- Take some tissues suitable color or cut into square blanks of tissue paper, stack them, fasten them crosswise in the center using a stapler.
- Trim the edges of the future flower, giving it a rounded shape.
- Cut each petal into narrow strips, without cutting all the way through.
- Straighten the fringe of the petals, giving the workpiece volume.
- If the dandelion will be used as a floor decor, then it is supplemented with a stem. To make the stem, it is necessary to wrap a piece of thick wire with green corrugated sheets.

A glue gun will help attach it to the dandelion. If desired, dandelion can be supplemented with leaves by cutting them out of the same material and attaching them to the bottom of the stem. For stability, the stem itself is recommended to be fixed on a special stand.
Advice! Paper flowers made in this way can be hung on a hoop or assembled in the form of a garland and hung from the ceiling or wall. In addition, single blanks are randomly placed along the tracks and in the photo zone.
How to decorate a wall with flowers
Anyone will gain attractive appearance if you decorate it with charming flowers made of colored paper. To make a flower, it is necessary to cut a petal in the shape of an elongated heart from a sheet of A4 double-sided colored paper, bend it in half lengthwise. Prepare 7 more petals in the same way. Fold them in the shape of a flower and fix by gluing the folded halves onto a paper base. Using this manufacturing principle, you can make many blanks of various sizes.
Attention! The floral decor will look especially impressive if you use sheets of various shades and stick them on the base according to the gradient principle.
Using newspapers or sheet music, it's easy to make a huge wall decoration flower. To do this, it is necessary to make blanks of petals by folding individual sheets in the form of paper bags, and then, overlapping each other, glue them to the round base with a glue gun.
To create paper peonies, in addition to tissue paper, you can use corrugated and crepe sheets of suitable shades. To make large paper flowers, you will need 5 sheets of crepe paper measuring 50x80 cm and the same amount, but smaller.

- Fold the sheets into a pile and bend everything together with an accordion in 4-5 cm increments.
- Tie the workpiece folded into an accordion in the center with a rope so that one end remains long. With it, you can attach the finished flower to a wall, banner, curtain, or simply hang it from the ceiling.
- Give the ends of the workpiece a rounded shape, cutting off the excess with scissors.
- Spread the accordion and separate the paper layers, giving the flower volume. Fasten the edges of the petals together with a stapler.
- To make the flower center, you need to do the same, but taking smaller sheets. Place the finished blank of a small flower in the middle of a large one, fasten the edges of the petals with a stapler.
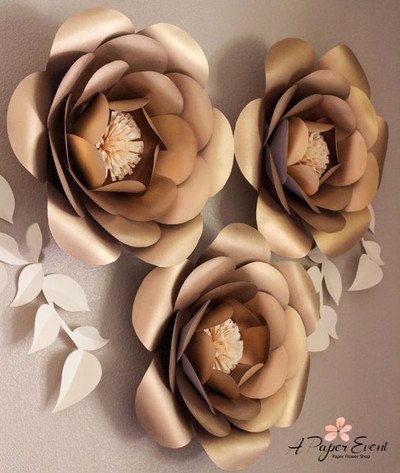
Spectacular flower buds are obtained from crafting sheets. The density and flexibility of this material allows you to give the petals a curved shape. To create flower blanks, individual petals are cut out of kraft paper, which are connected in a spiral with a glue gun. Then, with the help of special tools, volume and curved shape are given to the petals.
By choosing the right materials and using the techniques described above, you can make any paper flowers yourself, after practicing on simpler models.
How to make paper flowers: video
Photo gallery
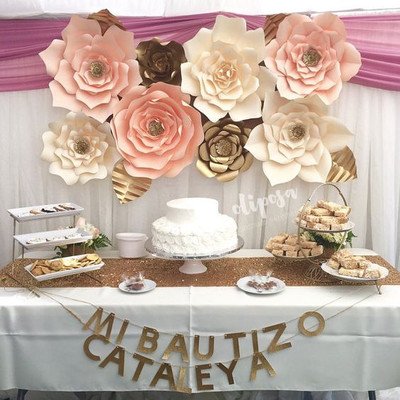
Any festive event will be filled with an atmosphere of celebration and significance in the presence of thematic decorative interior design.
Given that the decorations are created only for the celebration period, it is customary to make them from multi-colored paper or sanitary napkins.

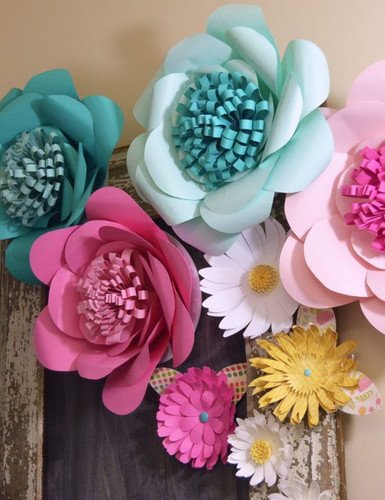
Volumetric details of the decor, combined with small and large flowers, will be the perfect decoration for a photo shoot. To help give birth to the idea of \u200b\u200bdecorating the hall, viewing photos of large paper flowers will help.

Festive events at home will have a special atmosphere if you independently decorate the interior of the room using large paper flowers.


Ideas for decorating a hall for a festive event
In the life of every family there are events with significant dates. It can be weddings, anniversaries, parties, presentations. They are held in spacious halls that can accommodate a large number of guests. In order for the design elements to harmoniously combine with the interior and the size of the room, you need to try.

Small flowers and applications are indispensable here. It is worth considering the geometric dimensions of the hall, height, the presence of dead zones, aisles, and the arrangement of tables. Be sure to provide a place where guests will take memorable pictures.

This place should have a special background shade and decor elements that match the theme of the event. The combination of huge flowers in human growth and several individual small bouquets is encouraged.

Making voluminous flowers
The idea of \u200b\u200bdecorating a hall can have several options. You can entrust the production of decorative elements and flowers to professional craftsmen. We will focus on the option self-manufacturing voluminous flowers.


The manufacturing technology of large volumetric flowers is completely identical to small ones. The difference is only in the consumption of raw materials. To create a rose, design sheets or a corrugated paper roll are used.

This paper has a lot of colors and shades, is easy to use and holds its shape well. With scissors, cut out a leaf in the shape of a falling drop of water. Now you need to carefully stretch the part along the width of the sheet. Thus, the petal will take a hemispherical shape.

Novice needlework creators should stop at making a blossoming aster. This flower is easy to make and encourages skill development.

The petals are superimposed on each other in layers and fastened with a thread. Now each petal is wrapped inside and gently straightened.


Sphere Composition
Similar decorative elements of various sizes and colors will add expressiveness to the design of the room. They can be hung over the area of the entire ceiling at different levels.

For making a sphere of small diameter, paper from a notepad for notes is well suited. They usually use sheets of different shades.

With scissors, cut out a circle of the appropriate size. Carefully stack in a pile, alternating shades of sheets. We sew with a thread along the diagonal of the circle. We divide the circumference into six equal sectors.

Now glue the sheets. To glue the first sheet with the second, glue is applied to the first and third sectors. To glue the second sheet with the third, apply glue to the second sector. So alternately glue to the last sheet.

We mask the fastening thread inside the sphere. To make a sphere bigger size A4 size decorative paper is used. The use of paper with a gradient is encouraged.


Making a place for a photo session
Guests and friends of any solemn event, in certain moment experience an irresistible desire to take a photograph as a keepsake for future generations. It doesn't matter where the event takes place. It can be a banquet hall, a living room in a cottage or apartment.

Depending on the specifics of the premises, the number of parishioners and the theme of the event, it is necessary to provide a section of the premises where the moment of truth will be captured. You should definitely take care to have a general background of space.

Asymmetrically located decor elements should not be bright, but only create the main color. It would be appropriate to combine large paper flowers from foamiran and small bouquets with a delicate tonality of the shade of the petals.

Making out a place for photographing in an apartment or cottage, you should follow other rules. A few out of place here would be huge paper flowers. The special atmosphere of the event will be created by garlands of small multi-colored paper flowers.

Decoration ideas for a children's holiday
Each child is pleased to participate in the design of the premises, on the occasion of celebrating their own birthday. This is a great opportunity to creatively express your thoughts, convey the idea of what is happening, create an atmosphere of celebration.


It is advisable to discuss and agree on the idea, style, materials for design with the child. The use of applications with characters from their popular children's fairy tales is encouraged. They can be made in bulk.

It is worth involving the child in the manufacture of simple details of the decor element. It can be flower petals, letters, numbers. Older children will be able to collect details into a single composition and glue spheres.

The shades of petals on paper chamomile or poppy flowers do not have to match the natural color of these plants.

Do not hold back the inspired ups and downs of the child's fantasy. Let it develop in the author's work. The atmosphere of the holiday can be transmitted by anyone accessible way After all, participation is key.

Huge crepe paper flowers
As an example, for the manufacture of a huge flower, we will choose an aster. The main thing is to learn the very technique of making a flower. Then you can interpret to invent new forms and styles of interior design.


The starting material for the manufacture of asters will be corrugated paper lilac color. We need a whole roll. We wrap the future stem of the flower with a dark green ribbon. Now we will make aster petals.

To do this, cut a roll of corrugated paper into small strips of various lengths. On the resulting strips indicate the length.

You should get rolls of different widths and lengths. Now the ends of these parts are superimposed on each other in layers with different length strips. The lower layers should consist of long tubes.

As you layer, the length of the strips will decrease accordingly. Now we connect the parts together firmly with a thread. Let's start making a button.

We use green decorative paper to make five petals. Cut out small oval leaves according to the template. We connect the leaves with a thread.

We sequentially connect all the details of the aster into a single element and fix it on the trunk. The petals are carefully straightened and aligned. Some can be slightly bent. The flower is ready.

Huge flowers will look beautiful on a solid stem. Stem wire is usually wrapped with green decorative tape.

Composing a composition of flower buds, it is desirable to observe the harmony of shades. They can have different sizes, but one shade should dominate.

As a home interior, you can use a screen. Decorated with plain paper roses, it will designate an individual living space. You can create the illusion of privacy.

DIY photo of large flowers