Corrugated paper number It will be a wonderful and original decoration if you are preparing for a holiday or want to surprise a loved one. Volumetric bright numbers will be useful to you not only for your birthday, but for your wedding anniversary and even for the New Year. With your own hands, you can arrange the most memorable party for your friends, and all you need for this is multi-colored sheets of corrugated paper, which you can buy at any art or stationery store.
Number for a year from corrugated paper
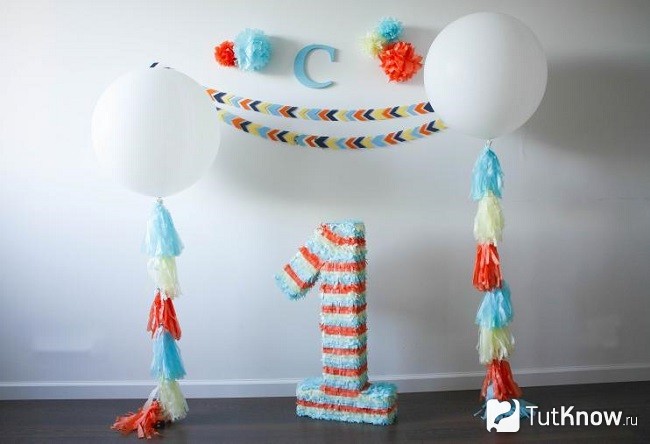
Number 1 made of corrugated paper will decorate your holiday, and will also be an excellent backdrop for family photos that will preserve the memory of this day for a long time. Pieces of corrugation are suitable for decorating a cardboard blank, and the finished craft can be attached to the wall.
In this case, we will be making a flat craft, so we will need thick cardboard, for example, you can take an old box of household appliances, draw the outline of the unit on the sheet and carefully cut it out.
It’s very easy to draw a unit using a pencil and a ruler, but if you’re in doubt, you can use a template that you print out and glue on cardboard, and then cut out with sharp scissors.
For crafts, you can use corrugation of one color or several, then the figure will turn out bright. Usually, a color is chosen so that it matches the holiday decor, and maybe even the birthday boy’s outfit.
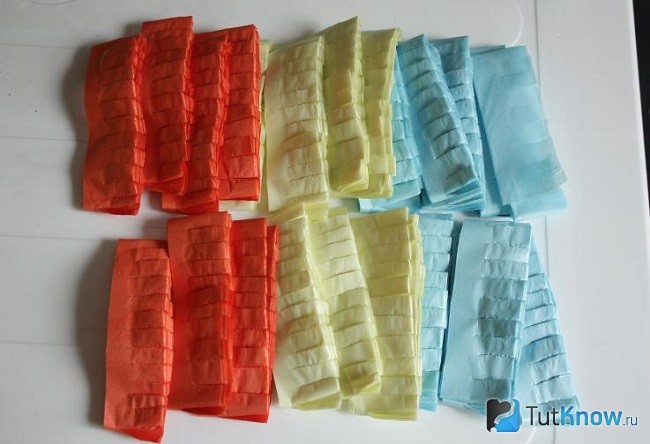
In this case, to perform DIY corrugated paper numbers We will use the trimming technique, so we need to cut the corrugation into small squares. The size of the square will depend on how “fluffy” you want to make the main holiday decoration. For example, we will have a square with a side of 5 cm. To begin with, it is better to cut the sheets into strips, then fold them together and cut them into squares.

For convenience, you need to pour PVA glue into a saucer, and take a pencil to work with, we will use the blunt end of a pencil. The cardboard base itself can also be previously covered with corrugated strips.
Now you can start decorating, in this case we will glue the paper squares only on one side, but in the case of a three-dimensional figure, you should also decorate the side strips. Trimming involves gluing only the middle of each square to the base. The elements are glued close to each other, which is why the decoration is fluffy.
We apply the blunt end of the pencil to the middle of the paper square, and wrap the ends around the pencil, so it will be more convenient to glue the center to the base. Afterwards, dip the center of the leaf in glue and attach it to the base. You need to hold it for a few seconds so that the glue is fixed, after which you can carefully remove the pencil, and glue the next square in the same way, as close as possible to the previous one, so that the tips of the squares stick up.
Gradually you need to decorate the entire surface of the cardboard template. If you want to hang the finished decoration on the wall, then you need to attach a loop on top. And to put it on the floor, you need to make a stand at the back so that the craft is stable.

Number 1 made of corrugated paper
Flat One year old figure made from corrugated paper using the trimming technique it turns out fluffy, but there is another way to decorate it. Again, first we need to cut out the cardboard template. You can use several layers of cardboard to make the template dense enough and not bend.
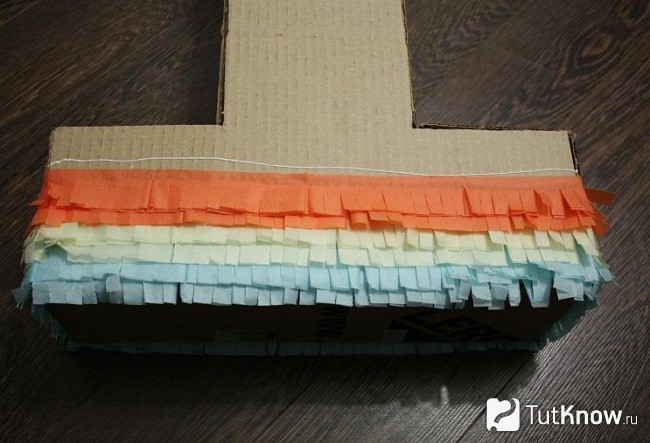
In Mexico, at almost all children's parties there is a piñata; it is a three-dimensional toy made from cardboard and decorated with paper stripes. Ours will be decorated using the same technique. DIY number 1 from corrugated paper.
Compared to trimming, decorating with paper strips is faster. When we cut out the template, it must be covered with corrugated strips. It is advisable to use paper of different colors to make the craft bright.

First, the corrugated sheets must be cut into strips about 5 cm wide, and then each strip must be cut perpendicularly to form “grass.” When you decorate the template, you need to start from the bottom. Only the part of the paper strip that is not cut by the “grass” should be coated with glue. Each subsequent strip must be glued so that the fringe hides the glued part of the previous strip.
This way, the entire surface of the template is glued, and when the glue dries, you can decorate a holiday for your baby. And if you are going to your goddaughter’s first birthday, then prepare one like this.

Volumetric figure made of corrugated paper
And if you know how to do it, then it will not be a problem for you to decorate a unique children’s party with your own hands. Volumetric figure made of corrugated paper requires preliminary preparation of a template, because we need to make a voluminous workpiece, which, moreover, must be strong enough.
The easiest option is to make the blank using cardboard; in this case, a large cardboard box from household appliances will come in handy. If you don’t have such a box at hand, ask for help at the nearest grocery store or supermarket; the sellers will probably not refuse to help you and will give you one box from the warehouse. It will need to be disassembled into flat sheets: the wide sides will be used for number templates, and the side strips can be cut out from the remaining cardboard.

To form the base you will also need paper tape, because only on paper tape can you then glue the corrugated flowers.
You need to cut out two identical blanks - numbers and wide stripes, with which we will decorate the side strips of the three-dimensional figure. Paper tape will help you form a three-dimensional workpiece; you should carefully glue the seams with it, and for greater strength you can paste it with tape in a circle.
You can make any number in this way, and use fluffy paper pompons or to decorate it.
In addition, the blank can be made from polystyrene foam, especially if you recently bought large household appliances and you have some foam left over from the packaging. This base will be quite strong. When the base is ready, you can begin the creative process, how to make a number from corrugated paper.

Corrugated paper number
Birthday number made from corrugated paper or napkins will turn out fluffy, bright, voluminous. Such a decoration will become the center of the entire holiday, and the room can also be decorated with voluminous pom-poms and balloons. In addition to numbers, you can make decorations in the form of a large ball, which is also decorated with small corrugated flowers. As you can see, such a simple material as corrugation gives enormous scope for creativity, in particular, it will help you decorate your home for the holiday, because your child’s birthday should be unforgettable. And if you are going to a friend’s party, prepare for her.

Numbers made from corrugated paper flowers sometimes they are also used to decorate holidays for adults. Of course, you shouldn’t remind the birthday girl of her age, but on your parents’ wedding anniversary you can give them a real surprise. In this case, you will need to make two numbers separately, using delicate shades of paper. You can use them to decorate the table, and individual flowers can be used to decorate gift wrapping.
Small flowers will help you decorate a voluminous workpiece. There are several possible options for how to make simple flowers like this, don’t worry, even a beginner can handle this job.

The volumetric base must be densely filled with miniature flowers so that the cardboard blank is not visible through them, so there are two rules for decorating. Firstly, the flowers should be fluffy and voluminous, and, secondly, they should be glued close to each other. To be sure that the craft will turn out beautiful, you can first paste the cardboard blank itself with paper to match the flowers.
First of all, we will look at the simplest option, how to make a fluffy flower to decorate a cardboard blank. To do this, we need, of course, the main material - corrugation, as well as additional tools - scissors and a stapler. We will need to cut many circles of the same diameter, so we can make a template on cardboard, for example, circle a glass and cut it out.

Corrugation is easy to cut, even if it is folded in several layers, so first we will cut the sheet into strips. Their width should be 0.5-1 cm larger than the diameter of the template circle. Then each strip should be folded several times so that the result is a multi-layered square. Each such paper square in the middle (the intersection of the diagonals) must be stapled together. Next, on this square we need to circle our blank circle and cut it along the contour, while the stapler staple should be located in the middle of the resulting circle. When the circle is ready, you need to lift layer by layer from the topmost one, and carefully press them down towards the center. We will get a fluffy flower that can be glued to the base.

How to make a number from corrugated paper
Volumetric number 1 for a year old made of corrugated paper can be decorated with fluffy “chrysanthemums”. To make them, the corrugation should also be cut into strips, then folded into several layers and cut with grass, without cutting to the end of the strip at one edge. The “grass” should be along the entire length of the strip, but the resulting fringe should be slightly twisted with your fingers to form needle-like petals. All that remains is to twist the strip into a tight roll and tie it several times with thread. You will get a flower, one side of which will be fluffy, and the other will be a dense roll that can be coated with glue and glued to the surface of the workpiece.

Using a corrugated strip, in which the stripes will run perpendicular to the length, you can twist a miniature rose. To do this, the paper must again be cut into strips, and one edge of each strip must be made wavy, stretching it with your fingers. The finished strip must be rolled into a tight roll and the edge secured with threads, tying the roll several times.
For your child's birthday, you want to decorate the children's room in a special way. We have collected ideas on how to make a number corresponding to the age of the birthday person.
savepic.ru
It is not necessary to order expensive decor from professional decorators; you can also make beautiful “things” for interior decoration with your own hands. If decorating with balloons is boring or doesn’t suit you for other reasons, pick up the scissors and go ahead! We make a number for the birthday boy with our own hands. It is enough to cut out a large template from thick cardboard and decorate it with corrugated paper, threads, photographs of the child or anything else that your imagination tells you. Try it!

www.babyroomblog.ru
Birthday number in the form of a panel. Find a suitable size fiberboard or piece of thick cardboard and cover it with beautiful fabric, cover it with paper, etc. The background should not merge with the number itself. It can be a contrasting color or in the same range, but lighter/darker than the main number.

Cover the blank with flowers and the number is ready! Yes, you will need a lot of flowers, yes, you need to sweat to cut out the blanks and glue them to the base. But! Hot melt adhesive will help you. Beauty requires... no, not sacrifice, but time spent!

This figure will be an excellent backdrop for a holiday photo shoot. After the birthday, it can simply hang on the wall as a decoration until the birthday boy grows up another year. Flowers can be made in any way (from paper, from fabric) or use ready-made ones. They can be the same color or matched in the same range, but with a slight difference in tone. Contrasting compositions look good. Experiment, take into account the general style of the holiday or the room where the decor will be located. If the number will be mounted on the wall, then only one side needs to be decorated.

www.babyroomblog.ru

If you cut paper flower blanks in a spiral, you will get cute roses. Make them in different sizes and colors and you will have a beautiful birthday number.

static.baza.farpost.ru
A three-dimensional figure blank can be cut out of polystyrene foam. Such a figure will stand independently on the flat surface of a table or chest of drawers. But you will need a lot more flowers!

To make flowers, you can use paper napkins, crepe paper, pastel paper, felt, tulle, tulle, etc.


www.babyroomblog.ru
If you use corrugated “plates” from sweets or cupcakes, you will get an elegant number with frills. Girls love ruffles, so you can decorate the workpiece with simple fringed stripes.


Cut circles out of fabric, melt them over a fire and assemble them “plate into plate.” Decorate the middle of the resulting flower with a bead. Decorate a large number blank with these flowers and the festive decoration is ready! This option is more suitable for girls. The fabric can be matched to the color of the birthday girl’s dress.
If you have patience and a lot of paper napkins, you can make a number using the trimming technique. In this case, the blank should be made of foam plastic so that the folded napkins are pushed in there and do not fall out. It turns out lush and beautiful.


www.babyroomblog.ru
You can't stop the handicraft mom! Sewing numbers from fabric is not difficult. You can decorate with ribbons, fabric flowers, and beads. Such numbers can be used as decorative pillows.
 livemaster.ru
Do you want to please the birthday boy and surprise the guests? Make a number in the “bow” of the hero of the occasion.

evgakids.com
Numbers can also be made from living floral materials (flowers, moss). The base in this case should be made of piaflor - a special floral sponge that can retain moisture and nourish the plants for a long time.

boom-party.ru
You can also decorate your birthday number with ready-made artificial flowers. It is convenient to glue flowers to the base using a heat gun.
If you are expecting a horde of sweet tooths or a crowd of relatives to visit “for tea”, you should stock up on edible numbers corresponding to the age of the birthday person. Cookies and cake will go great!
 snova-prazdnik.ru

77tortov.ru

parties-and-picnics.org

parties-and-picnics.org
There are also useful vitamins for birthdays; you can eat them right during the holiday with your guests. Read how to make a number from fruits and other goodies.
If your child is having a birthday, find out how to make three-dimensional numbers and letters from cardboard in order to decorate them with flowers from napkins, paper, and threads.
How to turn cardboard into the basis of three-dimensional letters and numbers?

Volumetric figures are decorated with a variety of materials, using corrugated paper, thread, and napkins. But the base is made from cardboard. If you want to make the number 1, then with your own hands you need to first make a blank for it.
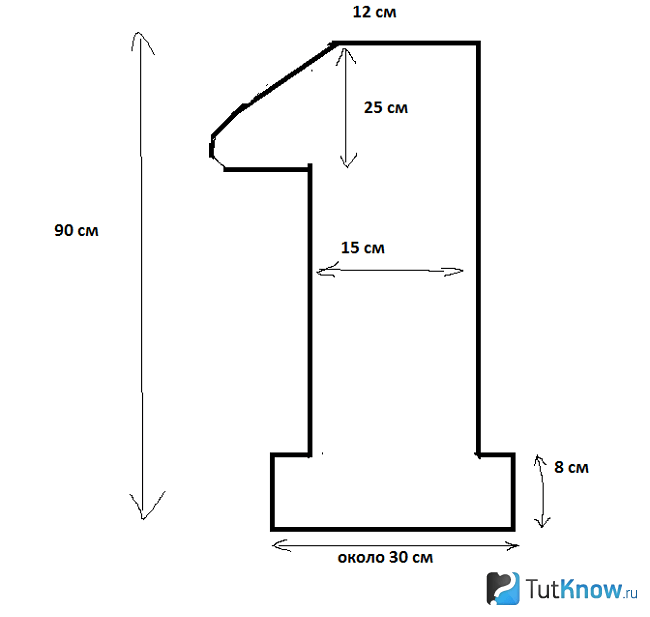
The diagram below shows the recommended dimensions for this number. You will need 2 of these parts - one for the front side, the other for the back side, cut them out of cardboard. Decide how thick the number will be; you need to cut a strip of cardboard that wide.
It is better to carry out further manipulations together. Start at the top by first attaching a strip of side panel to the front using masking tape.
Please note that where the number bends, the tape must be cut evenly so that it fits well in this place.
After you attach a strip of cardboard to the front side of the number, you also need to glue it to the second side of this number, which will be the back.
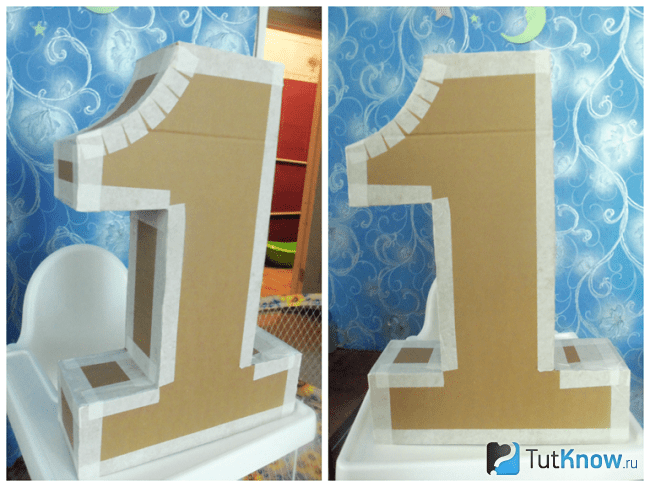
All that remains is to glue one edge of the strip to the second at the top, after which you can tell yourself that you were able to make the number 1 with your own hands.

Let's see how to make the base for the next number. To make the number 2 from cardboard, transfer the presented template onto it with your own hands. To do this, you can use checkered paper and then draw larger cells on the template, thus transferring the design.

You can also draw it by hand, repeating the lines and bends of a given number. As in the first case, for work you will need:
- digit pattern;
- cardboard;
- construction tape;
- scissors.

Now attach the other half of the number.

As you can see, for this it is not necessary to glue the tape over the entire surface; you can attach it in small pieces, fixing it perpendicular to the surface.
Surely, you have already understood the technology of how to make a three-dimensional figure from cardboard. Using the same principle, you will make all other numbers if the events being celebrated require it. Now check out the various options for decorating such numbers.
How to make fringe to decorate letters and numbers?
To do this, you can use different types of paper: corrugated, colored, we’ll take white paper. In another way it is also called papyrus, wrapping. When you buy shoes, they are often wrapped in this thin, translucent material.
To make a volumetric figure using this principle, you will need:
- Silk paper of different colors;
- scissors;
- PVA glue.

The long edges of these blanks need to be cut with fringe using scissors. To speed up this process, fold several strips at a time or roll each strip to create 4-5 layers.
Apply numbers from PVA cardboard to the bottom and glue a strip of prepared paper here. Since it is very thin, it is better to glue two tapes at once. If you use colored or corrugated paper instead, then attach it in one layer. The second goes a little higher, located above the first.

Combine colors to make the number most effective.
After you have fully decorated it, decorate a corner of the apartment in the same colors.
Paper for 3D letters and numbers
Look at interesting design options for numbers from it.

To realize such a masterpiece, take:
- colored paper;
- scissors;
- double-sided tape or glue gun;
- a compass or round object.

- Using a compass or circular template, draw a circle on the back of the colored paper.
- Cut a small piece from the outside, how long it will be, this will be the width of the flower petals.
- Starting from here, cut this circle in a spiral, moving from the edges to the center.
- When this part of the work is completed, take the outer edge of the flower in your hand and begin to twist it.
- Fix the middle with a drop of glue, and also attach a small circle to the back of the flower with this solution so that the structure does not unwind.
- Glue these blanks onto cardboard numbers, placing them sparsely or frequently.
- For this you need to cut out just one piece of cardboard, then decorate it. To do this, cut the paper into strips 5–6 cm wide, paste them over the edges of the number to simultaneously decorate the front and back sides.
- Now we begin to twist flowers from these strips. To make the edges more voluminous, fold the edge of the paper here by about 2 cm.
- Bend the corner, make a turn, then bend the workpiece, make a turn again, bend the flower again, and so on.

See how to make roses from paper, the master class will help you with this. Such a flower can be made not only to decorate volumetric figures; it is also suitable for other occasions. But then you will need to additionally create a stem.
To make roses from corrugated paper, take:
- sheet of cardboard;
- pencil;
- ruler;
- scissors;
- corrugated paper;
- toothpick;
- glue stick.
Then place this cardboard assistant on top of the folded sheets of corrugated paper, cut out along the contours.

Straighten the resulting part, starting from the left edge, screw it onto a toothpick with the sharp end cut off. In this case, wire is used for this; take this idea into account when you make a paper flower with a stem. Tie at the bottom with thread.
When making a blank from corrugated paper, twist the inner petals tightly and the outer petals more loosely.
After making several of these blanks, decorate the cardboard numbers with flowers.

The master class will also help you make other roses from corrugated paper.
- Cut a strip of paper 6 cm wide. Fold it like an accordion.
- Use scissors to make the top edge rounded. Expand this part. Start twisting it so that the wavy edges are on top.
- Tie the rose at the bottom with thread.
- To make the petals look more picturesque, twist each petal onto a toothpick.

To make an openwork flower, take:
- corrugated paper;
- scissors;
- threads

In this way, decorate the entire edge of the strip; these tucks are similar to those you make on dumplings, holding their sides together.

Now twist this ribbon, giving it the shape of a blossoming bud. Tie with thread to secure.

Here is another option, it is very simple to implement.
If you want a flower made of corrugated paper to have a double color, then cut a strip from white, and the second, which will be wider, from a ribbon of a darker color.
Place two strips on top of each other so that the narrow one is on top. Roll them along the width like an accordion. Take this prepared fabric, starting from the narrow edge, twist it, giving it the shape of a flower.

The following idea will require the following materials and supporting equipment:
- corrugated paper;
- cardboard;
- compass;
- scissors;
- glue.
Manufacturing instructions:
- Fold the cut paper strip crosswise several times to immediately cut out a certain number of identical petals.
- Draw a circle on cardboard and cut it out. Step back a little from the edge of this blank, glue the petals, placing each subsequent one on the edge of the previous one.
- Having completed the first outer row in this way, make a second inner one, if you want, then cover the middle of the flower with petals.

The last master class in this series will tell you how to make the number 1 using colored paper.
- You already know how to make a template. Now cover the cardboard with colored paper. You need to cut strips out of paper, their width will be equal to the radius of the flower.
- Fold the first strip of paper, starting from the small edge, like an accordion. Now apply a little glue to this edge, attach the second small edge to it to turn the strip into a circle.
- Cover its core with a small circle of the same or another colored paper.
- You can make large and small flowers, arrange them on the figure as in the photo.

It's time to switch to another type of material, maybe you're just now thinking about how to make the number 2 using yarn?
Knitting threads for decorating letters and numbers
They are used to decorate three-dimensional figures. You can use yarn of one or more colors. For this decoration you will only need:
- preparing numbers from cardboard;
- threads;
- PVA glue;
- brush.

When you're done with one color of yarn, glue the loose end to the cardboard. Next, attach the edge of the second ball of thread. Design the volumetric figure in a different color. When the number is completely covered with yarn, you can admire the beautiful results of your work.

In skillful hands, knitting threads will quickly turn into. You can make them using a fork, a semicircle of cardboard, or another method.
Step-by-step photos will also help you make pompoms from threads.

- As you can see, you first need to cut out two identical rings from cardboard. Place the thread inside.
- The yarn from the ball is wound around the rings, gradually filling them. Then cut along the outer circle, passing the scissors between the two cardboard blanks.
- Pull the thread and the fluffy pompom is ready.
- So make several in different sizes using different yarns.

Decoration of volumetric letters and numbers with ribbons
This material will also help solve the question of how to make volumetric figures.

To form the number 2 this way, take:
- red satin ribbon;
- white beads of various diameters;
- glue;
- scissors.
A glue gun will help fix beads of different diameters. They can also be sewn to fabric ribbons, but such work is more painstaking.
To implement the second variation you need:
- braid of the same width, but different colors;
- scissors;
- glue.

If you have enough free time and are patient, then you can make them, decorate the entire figure or just individual fragments.

If you want, use the already known master class to make such flowers or make them according to a different principle.

As you can see, you need to periodically bend the corners of the tape and secure them with a basting stitch. Once it is shaped like this, curl it to give the appearance of a rose. Secure the workpiece with thread and needle.
Zigzag braid is a ready-made flower base. It is enough to collect it on a thread, pull it, shape it into a circle, and secure it with a thread.

You can make not one circular row of such turns, but several. Each subsequent one will be slightly smaller in diameter than the previous one. Sew a button in the center and you can sew or glue the flower onto the number.

It can be not only flat, but also voluminous. For this you will need the same wavy braid. Cut two strips from it. Match them up as shown in the photo and stitch lengthwise to join. Now you will twist this ribbon so that it turns into a round flower. How to combine these two stripes can be seen in the next photo.

DIY roses and other flowers from napkins
For the next master class you will need:
- napkins;
- circle pattern;
- stapler;
- scissors.

Place several napkins, without unfolding them, one on top of the other. Place a circle on top. Cut out the napkins using this template.

In the center, these blanks need to be secured with a stapler. Lift the first layer and roll it up to resemble the inner, unopened rose bud. The second row of petals will be freer. Decorate the entire rose in this way.
Here's another idea. You need to take 8 napkins or papyrus paper and fold them like an accordion. Thicker multi-layer napkins are suitable for this method. You should end up with a voluminous rectangle. Trim the ends so they are rounded. Now begin to straighten the accordion-folded blanks, shaping them into a flower.

To make the number 1, you need to stick these roses over the entire surface. Look how beautiful flowers look in different sizes and colors.

- It will also allow you to create blanks for designing numbers. To do this, you need to cut the paper into squares, place a pencil in the center of each, and twist it.
- Without removing this square from the pencil, attach the blank to the cardboard base of the number, having previously coated this area with glue.
- The trim pieces need to be glued close to each other to create the effect of a single volumetric surface. Combining different paper colors would also be appropriate here.

Instead of glue, you can use plasticine. You need to lubricate the surface of the cardboard blank with it or roll a small ball out of plasticine, wrap each end with half a toothpick, insert such blanks into the plasticine balls. Then attach it to the cardboard base.
If you plan to hang the number on the wall, then you can make it from foam. In this case, the trim pieces are attached to a toothpick, then stuck into the foam. If the sheet of this material is not very thin, then you can make three-dimensional numbers and put them. They are more durable than thin foam.
How to make volumetric letters?
You will create them using the same principle. For this you will need:
- cardboard;
- pencil;
- scissors;
- paper towel tube;
- White paper;
- Hot melt glue.

Decide how wide the letter will be. Cut rings from a paper towel tube to this width.

Glue them onto one half of the letter, then glue the second half on top, pressing it slightly.

Cut sheets of white paper into strips, cover the sides of the letter with them, and then the entire letter.

You can paint these letters with acrylic paint or glue flowers made of paper or napkins, or decorate them with satin ribbons or threads. See how to make letters on cardboard by declaring them with fabric. You already know how to make a dense base. Glue strips of fabric onto it using PVA, and lace braid onto the outer corners.

From these letters you can form a word to arrange a photo shoot on your wedding day.

If you are celebrating the anniversary of this event, then place one or two numbers near the letters indicating how many years of marriage you are celebrating.
You can cover the letters with paper or wallpaper left over from the renovation.

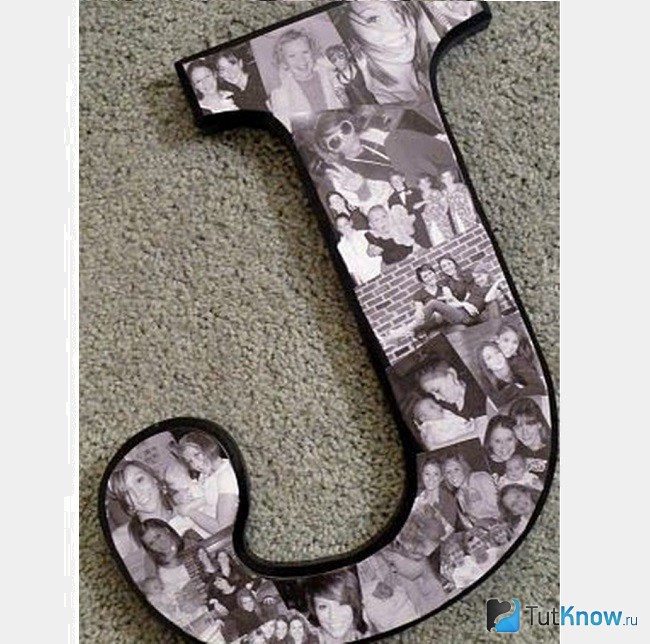
An original and at the same time touching decor would be to decorate such a letter with family photographs.
If the birthday person loves the forest or you want to decorate the room according to this theme, then glue birch bark and moss or maple leaves to the base.
![]()
Recently, large and small numbers made of cardboard, created specifically for children, have become popular: they are used for birthdays and other themed events. We have collected for you the best options for three-dimensional numbers made from paper with your own hands: diagrams and templates will help you quickly make the desired combination of a number series and use it in your idea.
What are the numbers for?
 As a rule, figures are made for . They look unusual and cause delight among all guests at home: the baby’s grandparents are especially touched, because the number not only decorates the room, but also eloquently indicates that the baby has become older. The numbers serve great background for thematic photographs: the baby can pose with numerous relatives or independently.
Number figures done at any event agency However, parents will save a lot by making such crafts with their own hands. Making them is extremely easy and does not take much time: good imagination and creative skills will help you create paper numbers that will look no worse than store-bought ones. How to do this and what you need for this in detail We'll tell you in the article.
Materials for manufacturing
 If there is a very small baby in the house, and you have not yet got hold of office supplies, we advise you to immediately go to a craft store. Create a note in your phone so you don’t forget the tools you need to purchase for a future craft:
- Cardboard
The size depends on the size of the number you are going to make. For a large number of numbers that are planned to be used as props for a photo shoot, it is better to prefer thick A4 cardboard. if you plan to make huge crafts, you will have to be creative and find large boxes of large household appliances. The easiest way to do this is to ask in the store: usually sellers are happy to give away unnecessary product packaging. - Scissors
Take comfortable scissors: when cutting cardboard, they should not rub the areas in contact with the skin.
If you don’t yet have a clear idea in your head of what your number should look like, take the colors that you like the most in the store. Otherwise, select the material according to your design.- Twine
Buy a couple of skeins of twine if the planned event will be held in a rustic style. - Construction stapler
You will need a stapler when working with thick cardboard. Without it, creating three-dimensional figures will become almost impossible. - Glue gun
Needed for fastening parts - Rulers, pencils, erasers
Materials are needed for constructing and marking numbers on sheets of cardboard. - Additional materials
Purchase additional materials as needed. These include: textiles, beads (beads), napkins and colored paper, knitting threads, tinsel.
Making a frame of volumetric numbers
 Volumetric numbers have a big advantage: baby can play with them and rearrange them to any place in the apartment. At the same time, a high-quality figure will last for more than one year.
Follow the instructions, if you want to make a three-dimensional figure:
- Decide on the sizes. Depending on this, choose the material: regular A4 size cardboard or a large refrigerator box.
- On a selected piece of cardboard draw number by hand or using a template. Templates are given below.
- Cut out the number. Use scissors or a utility knife for this. If you cut out only one figure, the craft will turn out flat: you can hang it on the wall or make festive skewers as the child ages.
- For a three-dimensional figure, prepare two identical numbers. In addition, cut out strips of cardboard that will serve as a layer between the templates. Band width define depending on the size of the number.
- Staple the two templates and inner strips using a staple gun, paper tape or a glue gun.
- Decorate the resulting frame depending on the idea and materials at your disposal.
Options for volumetric numbers from scrap materials
We have done extensive selection volumetric figures created by craftswomen especially for their kids. Some options are given with a description, so you there will be no difficulties with the execution of particularly complex figures.
Magnificent numbers are made from colored paper very easy, however, their creation often takes several days of painstaking work. If you want to make a neat craft, take the creation of decorative elements into your own hands. The child can render minimal assistance: feeding sheets, choosing colors or gluing decorative elements in the indicated place. detailed instructions for decorating letters with paper flowers is indicated in the photo tutorial.


 Button numbers
This figure will amount to a tidy sum if you are not a craftswoman with a collection of buttons. Glue the buttons onto cardboard or paper, dripping a little superglue into the middle. If thin cardboard is used and the figure does not exceed the size of an A4 sheet, the buttons can be sewn on with contrasting threads. This will give the craft special charm.

A figure with images of a baby or family is executed in three-dimensional and flat versions. For attaching photographs to paper need glue PVA or small scraps of tape.
 Fluffy number
Looking at such creations, it’s hard not to smile: they are soft, fluffy, I want to touch them. Imagine how nice it is for a baby to cuddle up to a three-dimensional figure?
Make it easier: select knitting threads in the desired colors. Next with follow the instructions:
- Wind the threads around the item in the desired size. This could be an ordinary mug or a flowerpot.
- Carefully remove the wrapping and fold it in half. Tie off the core.
- Cut the threads along the edges and fluff them up. The soft pompom is ready.

 Thread craft
Another craft option using knitting threads. Just wrap the frame as it shown on the picture. You can arrange the composition a single color or mix several contrasts. For a rustic party, use twine.

 Corrugated paper numbers
In this version fantasy there is somewhere to roam. A variety of colors and embellishment techniques will help you create a figure to suit your taste and needs. Here are the simplest frills, flowers, and the usual pasting: look carefully at the photo and get ideas from the finished works of young mothers.


 From napkins
Don’t think that numbers made from scrap materials will look ugly, because the master's work is afraid. Study the photos below: all volumetric figures were made by ordinary women. In the process, they only used number templates and napkins they found at home. Try it too: the result will exceed expectations!


The simplest option, requiring a minimum of effort and expense. Buy wrapping paper, matching the style of the event, and wrap the figure frame. Despite the simplicity, the result is very cute. Examples in the photo. 

 Purchased items
If you don’t have time to cut out flowers and think through the details, purchase ready in the store decorative elements. These could be flowers, beads or flower wrapping paper.
 Textile
This option is suitable for lovers of handicrafts. With the help of modern fabrics you can create amazing drawings and compositions on numbers made of ordinary cardboard and paper.
Making crafts with your own hands is not difficult. You just need a little time, patience and a couple of fresh thoughts. You can get them from the Internet, including from the article “Do-it-yourself volumetric figures from paper: diagrams and templates.”
The process of creating a three-dimensional figure for a holiday photo shoot can be roughly divided into two stages: making the base and decorating the finished structure.
Step 1 - making the base
To create a three-dimensional birthday number, you first need to make a base from cardboard, and then decorate it with corrugated paper, paper napkins, pom-poms or woolen threads. If you plan to make a large figure, then you need to stock up on boxes for large household appliances (refrigerator, gas stove, TV, etc.) in advance. The box needs to be divided into sheets and laid out on the floor. On a cardboard sheet, you need to draw the silhouette of the required number and cut it along the contour. The size of the figure depends on your desire and the size of the cardboard sheet.
We apply the cut out template to another sheet of cardboard and outline it along the contour, after which we also cut it out. As a result, we will get two numbers identical to each other. In addition to these two blanks, we will need strips of cardboard (the width of the strips will determine the thickness of the product), from which the side walls of the figure are made. After all the cardboard blanks have been made, you can begin assembling the three-dimensional figure, gluing the parts together with masking tape.
Also, the basis for the volumetric figure can be made from foam plastic. You can purchase foam sheets at any hardware store. If you want to make the number thicker, then two foam panels can be glued together using ceiling tile adhesive. True, this material is quite capricious to work with: when cut, the foam crumbles, and the granules stick to tools and hands.
Step 2 – decorating the numbers
Decorating numbers with paper flowers
You can make beautiful and lush flowers from papyrus or corrugated paper. To do this, fold a stack of 6 sheets of paper into a small accordion and cut it into three equal parts. We tie each accordion with a thread in the middle, round the ends and turn the paper inside out so that we get petals. When a sufficient number of flowers have been made, glue them to a number made of cardboard or foam plastic. 

Numbers decorated with flowers made from paper napkins look no less lush and festive. To create such a decor, you will need 100-150 packs of plain napkins, depending on the size of the number. We fold each napkin in half twice and fix the structure with a stapler in the middle. Cut out a circle from the resulting square. Then we lift all the layers of the circle up one by one, slightly flattening them with our fingers. The bottom layer of the circle should be left straightened, since with its help the flower will be attached to the cardboard base. 

The numbers, decorated with corrugated paper roses, look delicate and airy. Creating such decor is a rather labor-intensive process, but the result is worth it. To do this, cut the corrugated paper into long strips. The size of the future flower will depend on the width of the stripes. We slightly crumple the paper ribbon, after which we begin to twist it, slightly bending the edges to form petals. We twist the rest of the tape at the base of the resulting flower. In a similar way, we make the required number of roses, and then glue them to the cardboard using hot glue. 


Decorating numbers with paper using the cutting technique
Numbers decorated using the trimming technique look lush and elegant. To make such a decor, corrugated paper must be cut into squares of the same size. Insert a pencil into the middle of the square and wrap paper around it. Then dip the tip of the pencil in PVA glue and attach the paper to the cardboard blank. In this way, fill the entire surface of the volumetric figure and carefully straighten the decoration with your hands. Decor made from tulle or organza will look no less impressive. The material is also cut into squares and attached to the base using hot glue.

If a foam piece is used as a base, then no glue is used at all. In this case, we wrap the paper around a toothpick, which easily pierces the foam and leaves a trim in it. Using the cutting technique, it is very convenient to create various patterns inside a figure; to do this, it is enough to outline the pattern on the base and use different colors of paper along its outline.

Decoration of numbers with fringe
Corrugated paper fringe is perhaps the easiest and fastest way to decorate a three-dimensional figure. We cut the paper into long and wide strips. We fold each strip into a rectangle and cut it into a fringe, then straighten it and glue it to the base with double-sided tape. 

Decorating numbers with pompoms
First you need to make a lot of pompoms from woolen threads. To make them, you will need two rings of the same size, cut from thick cardboard. We place the rings on top of each other and wrap them with woolen threads until the hole in the ring is closed. Then we cut the threads with scissors along the edge, move the rings apart a little and tie the threads. Remove the cardboard blanks and shake the pompom. Using the same principle, we make the required number of pompoms. Glue the finished decor to the cardboard figure using hot glue. 

Decorating numbers with yarn
To work you will need a large skein of yarn and PVA glue. Apply a small amount of glue to the sides of the cardboard numbers and begin to tightly wrap the workpiece with woolen threads. First we wind the yarn across, and then along. 
Volumetric figures are suitable for both small and adult birthday people. The size of the number depends only on your desire and design idea. Large figures are used for a photo shoot, and small numbers are used to decorate the dining area and candy bar. To decorate a children's party, it is better to make a figure the size of a child or slightly taller than him.
The decor of a volumetric figure can be monochromatic or multi-colored. To make the figure look more voluminous, the front part should be decorated in light colors, and the sides in dark colors. For a girl’s birthday, the number can be decorated with paper flowers in pink, red, orange, lilac and purple. When creating a number for a boy's birthday, it is better to use blue, light blue, white and green, and instead of paper flowers, it is better to use decor in the form of fringe or pompoms.
Video on the topic
The ability to draw beautifully numbers necessary, in particular, for calligraphists and calendar-making specialists. But anyone can do this. Drawing numbers both by hand and using special segment stencils. The article describes how to make a template for numbers in a hi-tech style.