How Android Works
You can learn about the hidden features of software systems by understanding the principle of their work. In some cases, this is difficult to do, since the code of the system can be closed, but in the case of Android, we can study the entire system inside and out. In this article, I will not talk about all the nuances of Android and will focus only on how the OS starts up and what events take place between pressing the power button and the appearance of the desktop.
Along the way, I will explain what we can change in this chain of events and how custom firmware developers use these features to implement things such as tuning OS parameters, expanding application storage space, connecting swap, various customizations, and much more. All this information can be used to create your own firmware and implement various hacks and modifications.
Step one. U-BOOT and partition table
It all starts with the primary bootloader. After the power is turned on, the system executes the bootloader code stored in the device's permanent memory. Most often, its role is played by a modified version of the u-boot bootloader with built-in support for the fastboot protocol, but the manufacturer of the mobile chip or smartphone / tablet has the right to choose any other bootloader to his taste. For example, Rockchip uses its own non-fastboot bootloader, and they have to use proprietary tools to reprogram and manage it.
The fastboot protocol, in turn, is a bootloader management system from a PC that allows you to perform actions such as unlocking the bootloader, flashing a new kernel and recovery, installing firmware, and many others. The point of fastboot is to be able to restore the smartphone to its original state in a situation where all other means fail. Fastboot will remain in place even if, as a result of experiments, you erase all the contents of all sections of NAND memory from your smartphone, losing access to both Android and recovery.
Having received control, u-boot checks the partition table and transfers control to the kernel flashed into the partition named boot, after which the kernel extracts the RAM image from the same partition into memory and starts loading either Android or the recovery console. NAND memory in Android devices is divided into six conditionally mandatory sections:
- boot - contains the kernel and RAM disk, usually around 16 MB in size;
- recovery - recovery console, consists of a kernel, a set of console applications and a settings file, size 16 MB;
- system - contains Android, in modern devices it has a size of at least 1 GB;
- cache - designed to store cached data, also used to save the firmware during an OTA update and therefore has a size similar to the size of the system partition;
- userdata - contains settings, applications and user data, all remaining NAND memory space is allocated to it;
- misc - contains a flag that determines in which mode the system should boot: Android or recovery.
In Linux terminology, a RAM disk is a kind of virtual HDD, which exists only in RAM. At an early boot stage, the kernel extracts the contents of the disk from the image and mounts it as a root file system (rootfs).
In addition to them, there may also be other sections, however, the general markup is determined at the design stage of the smartphone and, in the case of u-boot, is sewn into the bootloader code. This means that: 1) the partition table cannot be killed, since it can always be restored using the fastboot oem format command; 2) to change the partition table, you will have to unlock and reflash the bootloader with new parameters. There are exceptions to this rule, however. For example, the bootloader of the same Rockchip stores partition information in the first block of NAND memory, so flashing the bootloader is not needed to change it.
Particularly interesting is the misc section. There is an assumption that it was originally created to store various settings regardless of the main system, but at the moment it is used for only one purpose: to tell the bootloader which partition to boot the system from - boot or recovery. This feature, in particular, uses the ROM Manager application to automatically reboot the system into recovery with automatic firmware installation. Based on it, the Ubuntu Touch dual boot mechanism is built, which flashes the Ubuntu bootloader
in recovery and allows you to control which system to boot next. Erase the misc partition - Android is loaded, filled with data - recovery is loaded ... that is, Ubuntu Touch.
Part of the bootloader code that defines the partition table:
static struct partition partitions = ( ( "-", 123 ), ( "xloader", 128 ), ( "bootloader", 256 ), /* "misc" partition is required for recovery */ ( "misc", 128 ), ( "-", 384), ( "efs", 16384 ), ( "recovery", 8*1024 ), ( "boot", 8*1024 ), ( "system", 512*1024 ), ( "cache" , 256*1024 ), ( "userdata", 0 ), ( 0, 0 ) );
Step two. boot partition
If the misc section does not have a boot to recovery flag, u-boot transfers control to the code located in the boot section. It is nothing but the Linux kernel; it is located at the beginning of the section, and immediately after it is a RAM disk image packed using cpio and gzip archivers, containing the directories necessary for Android to work, the init initialization system, and other tools. There is no file system on the boot partition, the kernel and RAM disk just follow each other. The content of the RAM disk is:
- data - directory for mounting the partition of the same name;
- dev - device files;
- proc - procfs is mounted here;
- sbin - a set of auxiliary utilities and daemons (adbd, for example);
- res - a set of images for the charger (see below);
- sys - sysfs is mounted here;
- system - directory for mounting the system partition;
- charger - an application for displaying the charging process;
- build.prop - system settings;
- init - initialization system;
- init.rc - settings of the initialization system;
- ueventd.rc - settings for the uventd daemon included in init.
This is, so to speak, the skeleton of the system: a set of directories for connecting file systems from NAND-memory partitions and an initialization system that will take care of the rest of the work on booting the system. The central element here is the init application and its init.rc config, which I'll cover in more detail later. In the meantime, I want to pay attention to the charger and ueventd.rc files, as well as the sbin, proc and sys directories.
The charger file is a small application whose only job is to display a battery icon. It has nothing to do with Android and is used when the device is connected to the charger in the off state. In this case, Android does not boot, and the system simply boots the kernel, connects the RAM disk, and starts the charger. The latter displays the battery icon, the image of which in all possible states is stored in regular PNG files inside the res directory.
The ueventd.rc file is a config that defines which device files in the sys directory should be created at the system boot stage. On Linux kernel-based systems, hardware is accessed through special files inside the dev directory, and the ueventd daemon, which is part of init, is responsible for creating them in Android. Normally, it works in automatic mode, accepting commands to create files from the kernel, but some files need to be created by yourself. They are listed in ueventd.rc.
The sbin directory in stock Android usually contains nothing but adbd, which is the ADB daemon that is responsible for debugging the system from the PC. It starts at an early stage of OS boot and allows you to identify possible problems at the stage of OS initialization. In custom firmware, you can find a bunch of other files in this directory, such as mke2fs, which may be required if partitions need to be reformatted to ext3/4. Also, modders often put a BusyBox there, with which you can call hundreds of Linux commands.
During the boot process, Android displays three different boot screens: the first one appears immediately after pressing the power button and is flashed into the Linux kernel, the second one is displayed during the early stages of initialization and is written to the /initlogo.rle file (almost not used today), the last one is launched using the bootanimation application and is contained in the /system/media/bootanimation.zip file.
The proc directory for Linux is standard, in the next boot steps init will connect procfs to it, a virtual file system that provides access to information about all the processes on the system. The system will connect sysfs to the sys directory, which opens access to information about the hardware and its settings. With sysfs, you can, for example, put the device to sleep or change the power-saving algorithm used.
The build.prop file is designed to store low-level Android settings. Later, the system will reset these settings and overwrite them with values from the system/build.prop file, which is not yet available.
Step two, alternative. recovery section
In the event that the recovery boot flag in the misc section is set or the user turned on the smartphone while holding down the volume down key, u-boot will transfer control to the code located at the beginning of the recovery section. Like the boot partition, it contains the kernel and a RAM disk, which is decompressed into memory and becomes the root of the file system. However, the contents of the RAM disk are somewhat different here.
Unlike the boot partition, which acts as a transitional link between different stages of booting the OS, the recovery partition is completely self-sufficient and contains a miniature operating system, which has nothing to do with Android. Recovery has its own core, its own set of applications (commands) and its own interface that allows the user to activate utility functions.
In a standard (stock) recovery, there are usually only three such functions: installing firmware signed with the key of the smartphone manufacturer, wipe and reboot. In modified third-party recovery, such as ClockworkMod and TWRP, there are much more functions. They can format file systems, install firmware signed with any keys (read: custom), mount file systems on other partitions (for OS debugging) and include script support that allows you to automate the firmware process and many other functions.
With the help of scripts, for example, you can make it so that after loading recovery automatically finds the necessary firmware on the memory card, installs them and reboots into Android. This feature is used by the ROM Manager, autoflasher tools, as well as the automatic update mechanism for CyanogenMod and other firmware.
Custom recovery also supports backup scripts located in the /system/addon.d/ directory. Before flashing, recovery checks for scripts and executes them before flashing. Thanks to such scripts, gapps do not disappear after installation new version firmware.
Step three. Initialization
So, having received control, the kernel connects the RAM disk and, after the initialization of all its subsystems and drivers, starts the init process, from which Android initialization begins. As I said, init has a configuration file init.rc, from which the process learns what exactly it must do to bring the system up. In modern smartphones, this config has an impressive length of several hundred lines and is also equipped with a trailer of several child configs that are connected to the main one using the import directive. Nevertheless, its format is quite simple and is essentially a set of commands divided into blocks.
Each block defines a loading stage or, in the language of Android developers, an action. Blocks are separated from each other by an on directive followed by an action name, such as on early-init or on post-fs. The block of commands will be executed only if the trigger of the same name fires. As it boots, init will fire the early-init, init, early-fs, fs, post-fs, early-boot, and boot triggers in turn, thus running the appropriate command blocks.
If the configuration file pulls several more configs listed at the beginning (and this is almost always the case), then the command blocks of the same name inside them will be merged with the main config, so that when the trigger fires, init will execute commands from the corresponding blocks of all files. This is done for the convenience of generating configuration files for several devices, when the main config contains commands common to all devices, and specific commands for each device are written to separate files.
The most notable of the additional configs is initrc.devicename.rc where the variable name is determined automatically based on the contents of the ro.hardware file. This is a platform-specific configuration file that contains device-specific command blocks. In addition to the commands responsible for tuning the kernel, it also contains something like this:
mount_all ./fstab.devicename
It means that init should now mount all the file systems listed in the ./fstab.devicename file, which has the following structure:
device_name (partition) mount_point file_system fs_options other options
It usually contains instructions for connecting file systems from internal NAND partitions to the /system (OS), /data (application settings) and /cache (cached data) directories. However, by modifying this file slightly, we can force init to boot the system from the memory stick. To do this, it is enough to split the memory card into three to four partitions: 1 GB / ext4, 2 GB / ext4, 1 GB / ext4 and the remaining fat32 space. Next, you need to determine the names of the partitions of the memory card in the / dev directory (for different devices they are different) and replace the original device names in the fstab file with them.
At the end of the boot block, init will most likely encounter the class_start default command, which will tell you to start all the services listed in the config that are related to the default class. Descriptions of services begin with a service directive followed by the name of the service and the command that must be executed to start it. Unlike the commands listed in blocks, services must run all the time, so throughout the life of the smartphone, init will hang in the background and monitor this.
Modern Android includes dozens of services, but two of them have a special status and determine the entire life cycle of the system.
Step four. Zygote and App_process
At a certain stage of loading, init will encounter a block like this at the end of the config:
service zygote /system/bin/app_process -Xzygote /system/bin --zygote --start-system-server class default socket zygote stream 660 root system onrestart write /sys/android_power/request_state wake onrestart write /sys/power/state on onrestart restart media onrestart restart netd
This is a description of the Zygote service, a key component of any Android system that is responsible for initialization, starting system services, starting and stopping user applications, and many other tasks. Zygote is launched using a small application /system/bin/app_process, which is very clearly visible in the above piece of config. The task of app_proccess is to start the Dalvik virtual machine, the code of which is located in the /system/lib/libandroid_runtime.so shared library, and then run Zygote on top of it.
When all this is done and Zygote is in control, it starts building the Java runtime environment by loading all of the framework's Java classes (currently over 2000). It then starts system_server, which includes most of the high-level (written in Java) system services, including the Window Manager, Status Bar, Package Manager, and, most importantly, the Activity Manager, which in the future will be responsible for receiving start and end signals applications.
After that, Zygote opens socket /dev/socket/zygote and goes to sleep, waiting for data. At this time, the previously launched Activity Manager broadcasts the Intent.CATEGORY_HOME intent to find the application responsible for creating the desktop, and gives its name to Zygote over the socket. The latter, in turn, forks and launches the application on top of virtual machine. Voila, we have a desktop found on the screen by Activity Manager and launched by Zygote, and a status bar launched by system_server as part of the Status Bar service. After tapping on the icon, the desktop will send an intent with the name of this application, it will be accepted by the Activity Manager and will pass the command to start the application to the Zygote daemon.
All this may seem a bit confusing, but the most important thing is to remember three simple things:
In many ways, Android is very different from other operating systems, and you can’t figure it out with a swoop. However, if you understand how everything works, the possibilities are simply endless. Unlike iOS and Windows phone, Google's operating system has a very flexible architecture that allows you to seriously change its behavior without having to write code. In most cases, it is enough to correct the necessary configs and scripts.
][ 05.14
Are you going to plunge into the world of Android? Here's a guide to getting you started effectively with your flashy new Android smartphone.
As of today, Android is the most widely used operating system in the world. As you know, this OS is developed and supported by Google. This web giant has done an excellent job of simplifying and overall excellence of the Android ecosystem. Due to its free and open source nature, this operating system is the preferred choice of many original equipment manufacturers (OEMs). Device manufacturers are given limited ability to customize the user interface and functionality of this software. However, the basic impressions of the Android experience remain pretty much the same. Therefore, I hope that the content of this article can be applied to most Android gadgets. So, let's begin.
Turn on your device
If you just took your smartphone out of a new, sealed box, then most likely its battery will be enough to turn it on. Or, if you received a smartphone from a relative as a used, carry-over item, make sure it has enough power to turn it on. So, start by inserting the SIM card inside the device, and then put it on charge and wait until the battery is fully charged.
Language selection
Your Android phone supports a wide range of languages. Select your preferred language on the welcome screen. However, the procedure may differ for different manufacturers, as I already said that device manufacturers have the right to make some changes to the OS. You can also change the phone's language in the Language and Input section of the Settings menu.
Connecting to a Wi-Fi network
In the era of cloud computing, an internet connection is an essential element in the complete setup of any smartphone. That is why the options for connecting the device to a Wi-Fi wireless network will appear on the screen. The phone will automatically search and display the available connections. To connect, tap the appropriate network. Although, you can skip this step and select mobile data for internet usage.
Adding a Google Account
Addendum account Google is one of the most important steps towards setting up an Android smartphone (or tablet). The system will ask you if you have a Google account. Tap the "Yes" button to sign in to your existing gmail account. Or click "No" to create a new one.
Once you connect your phone to Google, a whole host of new Android features open up. Now you can download apps from Google Play Store and use other services offered by the company.
You can sync your Android settings, contacts, photos, apps, and other content with your Google account. This will allow you to install applications from your computer without using your phone. Just visit the online Google Play Store on your computer while on the same gmail account. Browse the applications and click on the "Install" button on your desktop browser. The application will be automatically installed on your phone.
Check for updates
After adding your Google account, check for updates to the applications and firmware installed on your phone. Install all the latest updates before moving on to other phone settings. This will save you a lot of hassle in the future.
When new updates are released, your phone will also notify you. Or you can manually check for updates as follows: go to Settings > About phone (or About device) > Software update. Here you can check for and download updates for Android. You can also choose to automatically install all future updates.
Another important point in the update mechanism is checking for updates for applications in the Google Play Store online store. Open the Play Store, then go to the store menu, which is located in the upper left corner in the form of three lines, and go to My Apps. This will display a list of all your apps and the update status.
Import contacts and other information
If you have replaced your old smartphone with a new one, then you have probably backed up all your contacts, photos, calendars, etc. There are many third-party applications on the web that will help you transfer data from one smartphone to another. You can use the Wondershare MobileTrans program to do this quickly and efficiently. Google also has a Mac-only Android File Transfer program that helps you transfer files between your Mac and Android devices. Windows users can simply connect their phone to a computer via a USB cable and transfer photos, music, videos, etc. You can also import contacts from contact card files or .csv documents.
Installing required applications
Once the updates are installed and the content has been migrated, you can begin installing the required applications. Visit the Play Store to find and install apps such as media players, email apps, note-taking tools, real-time communication apps, social networking clients, cloud storage apps, web browsers, and more.
Settings
After successfully installing the app, it's time to customize and optimize the Android experience. Adjust the sound volume, including ringtones and other notification settings, set your favorite wallpaper, adjust the screen brightness and other user interface settings. You can also install keyboard apps to type in your own way.
Also set these google apps like Drive, Google+, Google search (including Google Now), Hangouts, Photos, Play Music, Play Newsstand, Play Games, Chrome, Gmail and Voice Search.
Improve Security
The Android operating system offers a range of security features that you can use to protect your device. To get started, lock your phone with the screen lock options. To do this, go to Settings> Security> Screen Lock (Screen Lock) and set a password or pattern to lock the phone screen. Use the Google Device Manager app - Android Device Manager so that if lost or stolen, you can track and find it. Back up your contacts, photos, apps, and other content regularly.
More security options are available in the Settings menu, in the Security section. Use them to improve the security of your mobile phone. In the new version (Lollipop), you can create multiple accounts so that each member of your family can customize the OS according to their personal preferences.
This is how my guide to getting started with a new Android device looks like. I hope this article has helped you get to know the Android operating system better. Share your experience and opinion with us in the comments section. Thank you for attention.
Suppose you are lucky and Santa Claus put a newfangled gadget under the Christmas tree. Smartphones, book readers and tablets on the Android operating system have been very popular lately. The Vestey.Hytech guide will help novice owners of "smart" devices unleash the potential of such a gift.
What is this? Android is a program with which you control your device. Its history began in 2005, when Google bought the developer company of the same name and began to develop the platform. In September 2008, the first stable version was released. android version- 1.0 (codenamed Apple Pie). Over the next four years, 14 "editions" of the OS came out. The release of the latest version to date - 4.1 / 4.2 (Jelly Bean) - took place in June 2012.
Android, which receives support from the world's largest search engine, quickly became the most popular mobile OS in the world. Its success was largely facilitated by the open source code and the policy of Google, which allows manufacturers to install Android for free on their products. "Robot" is preferred by such large companies as HTC, Samsung, Sony and Motorola.
According to statistics from the authoritative company IDC, 75% of smartphones that were shipped to stores in the fall around the world had this particular “axis” installed. On the closest Android pursuer - operating iOS system, which runs iPhone smartphones and iPad tablets - accounted for only 15%.
The Google platform has a lot of potential as it goes far beyond the "mobile" realm. Since it is based on the Linux kernel, it can be made to run on very different types of devices. In addition to smartphones, many tablets operate on Android, the Nexus Q media player, wrist watch, photo frames, smart cameras, entertainment systems in cars and other electronics.
Screen with settings (left) and application list:
Why is it needed and how to use it? Android, installed even on a simple "dialer", turns it into a full-fledged "smart" phone. With it, you can surf the Internet, watch movies or YouTube videos downloaded from the Web, read books, chat with friends on social networks, listen to music, take photos with the built-in camera and immediately publish them on Facebook or VKontakte - in a word, do almost everything is the same as on the computer.
Android is originally focused on Google's online services (hence the colloquial name for such phones - "Googlephones"). A smartphone with "reference" Android (that is, without interface add-ons and applications from the manufacturer) is preinstalled with a set of Gmail mail, a browser (in the future it will become Chrome by default), Google Calendar, Goggles voice and visual search, Google Talk chat and social networks Google+. News, weather, contacts, navigator - all this is also from Google.
It may seem strange, but you will not find a voice recorder, primitive games, or even a simple calculator in a smartphone from Google, but, fortunately, Samsung, Sony, HTC and other manufacturers do not forget about them in their devices. In general, over 700 thousand other programs from third-party developers can be selected independently through the Google Play online store. It has both paid and free apps.
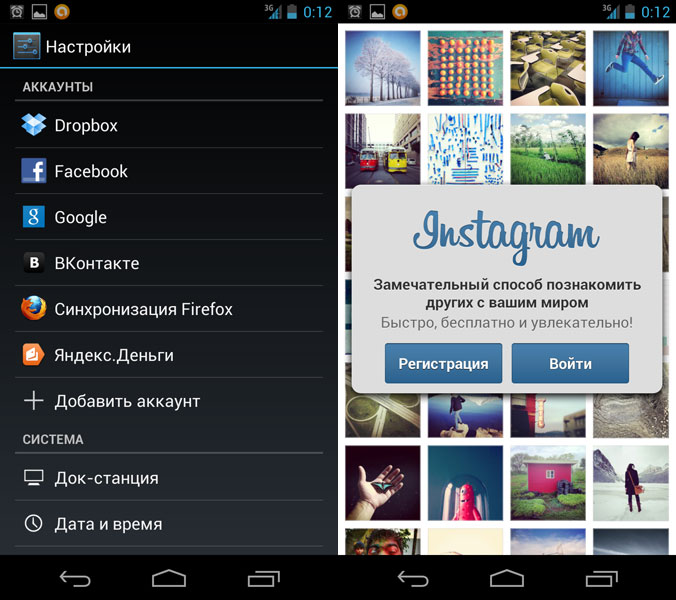
Account sync and Instagram photo app:
Android is easy to use. First you need to connect your device to the wireless Internet (3G or Wi-Fi) and create a Google account if you don't have one. After that, all the aforementioned Internet services will become available to you. Despite the fact that Android is "sharpened" for Google services, it can be synchronized with a variety of mail services, calendars, social networks, etc.
The next step may be to customize the desktop to your taste. Unlike iOS used by the iPhone, Android allows you to change the virtual keyboard (Swiftkey, Swype, 8pen), add widgets and shortcuts to the "home" screen, or completely modify the device's interface using third-party launchers (Go Launcher, Nova Launcher, etc.). .). Then you can start installing applications.
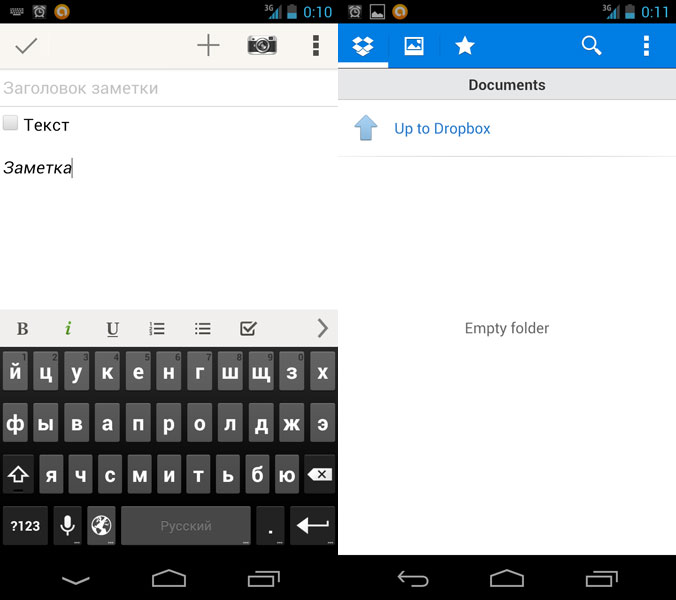
Evernote and Dropbox (right):
— Applications of popular social networks (VKontakte, Odnoklassniki, Facebook, Twitter, Google+), photo (Flickr, Instagram) and geoservices (Foursquare, Path) will help you stay in touch with friends and family.
- Productivity will increase Dropbox (allows you to upload files to the "cloud" and then access them from any computer or mobile device), Evernote (for creating and editing notes, there is a client for PC) and the Any.DO scheduler.
- If you urgently need to top up your phone or Internet balance, pay utility bills, buy a ticket or just transfer money. Dozens of applications from major payment systems and banks are at your service. Google Play, for example, has Yandex.Money, Webmoney, QIWI, Alfa-Bank, Russian Standard, TCS Bank or Home Credit Bank.
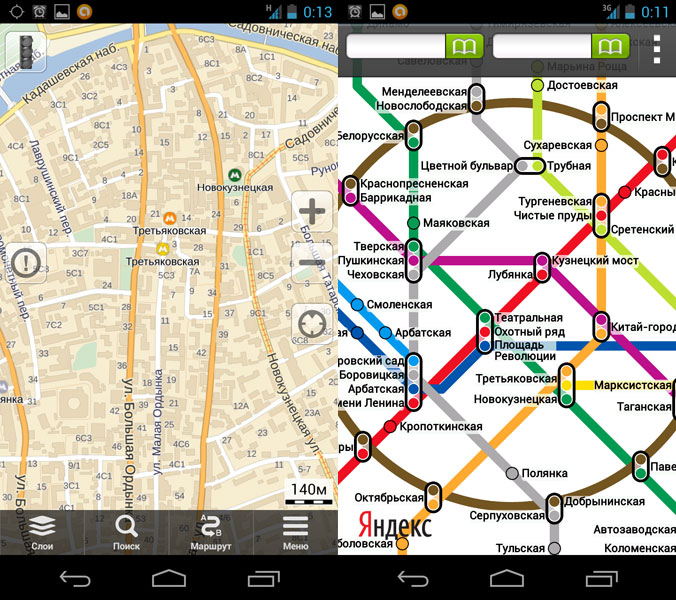
- Google Maps or Yandex.Maps will help you navigate the terrain or build a route for a car trip.
- Taxi will be called "Yandex.Taxi" or GetTaxi.
— Other useful programs for Android include Flipboard reader, Skype video service, Google Translate translator, Yandex.Metro, uTorrent torrent client
It will not be superfluous to familiarize yourself with thematic collections of applications. Previously, Vesti.Hitech published materials about best browsers for Android, antivirus, alternative lock screens, Twitter clients and task managers.
"Yandex.Maps" (left) and "Yandex.Metro":