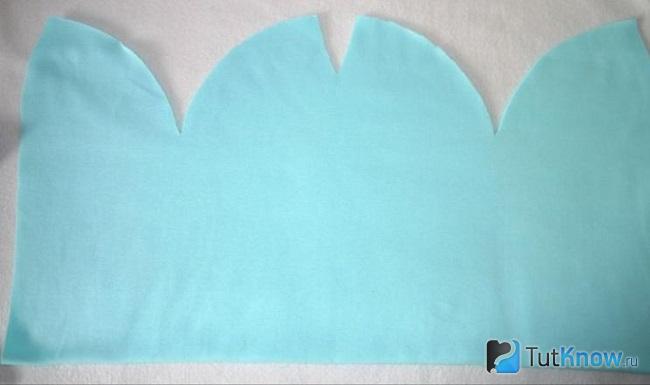
In order for a novice craftswoman to be able to make the simplest clothes with her own hands, it is not necessary to complete cutting and sewing courses. Dress patterns for beginners are as simple as “twice two”, and sewing according to such a pattern can be done very easily. The most important thing is to do it as follows: start cutting and sewing a dress only after carefully studying the pattern.
In contact with
In no case should you do the opposite: start work, and only then, in the process of cutting fabric and sewing, check with the pattern. Of course, this does not apply to experienced needlewomen who know how to make patterns themselves and do not need tips and instructions. This is for beginners only.. For those who are just starting to sew simple clothes with their own hands, they cannot do without a ready-made pattern, just like without hands.
The presence of a ready-made pattern greatly facilitates the process of sewing clothes with your own hands, especially if the novice seamstress has chosen a simple dress style. According to the finished pattern, even a schoolgirl will be happy to sew with her own hands without much difficulty. A beginner seamstress will do just fine on her own if she is attentive and takes sewing seriously.
Cutting and sewing the simplest clothes: where to start
Before you start sewing the simplest dress with your own hands, a novice craftswoman gotta pick a pattern. The pattern should be so simple that an inexperienced seamstress can easily cut and sew herself without the help of more experienced colleagues or professional tailoring workshops. Before sewing the simplest dress with your own hands, you need to prepare everything you need to make a dress. And then it will be easy to sew with your own hands, and the sewing process will bring incomparable pleasure. Those who want to sew simple clothes with their own hands will need:

Having prepared everything you need, you can start cutting fabric and sewing. Attention: when cutting fabric, in no case should one forget about the existence of allowances for seams. If you lose sight of this important point, confusion with sizes can occur. Those who sew for the first time on ready-made patterns should know that there is nothing complicated about this. The most critical step is cutting the fabric. Here, in no case, mistakes should not be made so as not to spoil the material. Another important step is sewing. When sewing, you need to be extremely careful. Particular attention should be paid to the seams on the wrong side of the product. They should look neat and in no case be evident to anyone.
Cutting and sewing with your own hands: a general description of the work
For that. in order to sew with her own hands any item of women's, men's or children's wardrobe, a novice craftswoman must certainly imagine in general terms the sequence of work. To sew a new dress yourself, you need:

What else needs to be done before you start sewing
Before sewing a dress on a sewing machine, usually done by hand. The basting is done with the simplest “forward needle” seam or its variation - the “back needle” seam. These are the simplest seams that are traditionally used for basting. You can decorate the finished dress with embroidery in the style of "satin stitch" or. This decor will look very impressive, especially if the dress is in ethnic style.
Sewing clothes on your own has a lot of advantages, compared to them, buying clothes in stores seems boring and uninteresting. Sewing elegant dresses and skirts with your own hands is a great way to master the basic skills of cutting and sewing. A handmade dress will always be one of a kind. You will not find another exactly the same dress from anyone, so making clothes on your own is, in addition, a great way to have fun with the whole family. Before you start cutting the fabric, you need to carefully study the pattern, examine all the symbols presented on the pattern. Only after that you can proceed to the main part of the work.
When sewing, you need to watch so that the machine seam is even, so that there are no coarse knots. If the style of the product involves the presence of pockets, it is necessary to cut out one or more pockets in advance and sew them on at the very end. The fabric for the dress depends on the season. Summer dresses are usually sewn from light, airy matter in bright colors, and a dress for winter and autumn, on the contrary, should be warm. Winter dresses are usually sewn from dense fabric. As for the color, it can be almost anything. The most popular this season are such colors as a variety of checks, peas, herringbone, abstract geometric ornament and floral pattern.
A beginner needlewoman is undoubtedly worth it. Before you take on such a serious large thing as a dress, you can practice on children's clothes. This will help you better understand the patterns and the conventions adopted in them.
Sewing a simple dress yourself is a great way to make a significant contribution to the family budget. One pattern can be used to make several dresses at once, slightly differing from each other in shade, color, style or decor.
Those who have firmly decided to learn how to sew on their own should certainly remember that in this matter, no way you can rush because skill comes with experience. In addition, a beginner dressmaker must have an artistic taste.
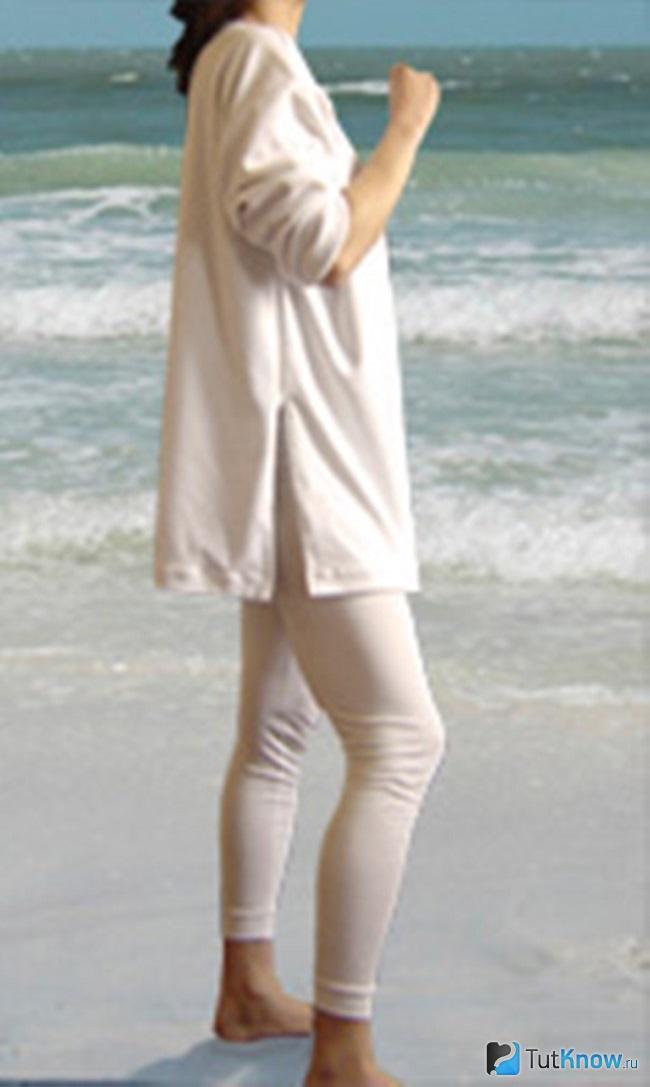
The easiest way is to sew a dress with a belt with your own hands. This dress can be worn both at home and on the beach. It is recommended to sew a dressing gown from natural fabrics (chintz or). As a fastener, you can use both a zipper and buttons. The color of the dress-robe should be bright, cheerful. Another option for a simple dress is a shirt dress. This dress looks spectacular on young girls, as well as on women of any age with a slender figure. However, it is recommended to refrain from wearing a shirt dress for those who doubt the merits of their figure and their good physical shape.
 There are a great many simple styles, the main thing is choose your. To make the right choice, a novice needlewoman must study more than a dozen patterns. But the result will undoubtedly justify the wildest expectations.
In our time, when you have to spend a lot on clothes, sewing yourself can significantly replenish the family budget. Having mastered the art of cutting and sewing, a novice craftswoman will soon be able to easily dress herself, her husband, children and relatives in original, stylish, beautiful clothes at no extra cost. Although everything can be bought in the store these days, many beautiful ladies traditionally like to make their own clothes because it is a great way to show their creativity.
An article for those who want to learn how to sew at home. You will learn what to make from old jeans, how to sew a hat-sock, culottes, scarves from T-shirts.
Hat-sock at home: a master class

It is very easy to create such a headdress. For this you need to have:
- knitted fabric;
- pattern;
- scissors;
- pins;
- threads;
- sewing machine.

This pattern is designed for head size 54-56. One panel is 28 cm high and 22–23 cm wide.
Pin the pattern to the fabric with pins, cut out the fabric, leaving a 1 cm seam allowance.

This model will help you learn how to sew from scratch on your own, you can repeat this master class at home. To do this, we continue the description of the work.
Remove the pins, immediately stick them into the needle pad so as not to drop or lose. Expand the fabric blank, it should turn out like this.
Now fold it in half, right sides inward, sew here using an overlock or a special line that is sewn around the edges of the product.

Sew the semi-circular seams on the top and bottom sides of the hat. Now fold it in half so that one of the parts becomes the lining of the headdress. Pin the details at the top with pins, sew using the same overcasting stitch.

Here's how to learn how to sew a beanie and cut it from scratch. You will get a stylish new thing, the production of which will take little time. Turn it right side out, put it on and you can go for a walk.

How to make a scarf with your own hands?
A knitted scarf is perfect for such a headdress. You will make it in 5 minutes. To do this, cut off the lower part from the T-shirt under the armhole, slightly squeeze this part from top to bottom to make drapery elements. After that, you can try on a new thing.

If you want your scarf to be fringed, then here's how: cut off part of the T-shirt from the armpits. At the bottom, chop it into strips 1 wide, 17–20 cm long. Tie each pair of the resulting ribbons with a knot. Then make the same knots in a checkerboard pattern, retreating down 7 cm.

By the way, you can decorate a T-shirt with such a fringe to give it a more original look.

As for how to make a similar snood scarf with your own hands, you can decorate it with beads. To do this, the cut out fragment of the T-shirt must first be cut from above and below into strips 2 cm wide, then put a bead on each, fix it from below with a knot.

If you like it when the scarf has a lot of fringe, then cut the blank into long strips. Then each of them needs to be slightly stretched, giving the desired shape. To make a snood scarf, you need to sew the sides of these blanks with your own hands. This seam will be on the back.

But these are not all ideas that will tell you how easy it is to learn how to sew at home using unnecessary T-shirts. To implement the following you will need:
- pot or pan lid;
- simple pencil;
- scissors;
- t-shirt.

The next scarf is no less original.

To make it, take:
- two T-shirts of different colors;
- a needle and thread;
- centimeter tape;
- scissors.

Cut the t-shirts along the red dotted lines. Cut out one of the sidewalls on both blanks to get two pieces. Fold each of them in half lengthwise and stitch along the long edge.
Now see how to make a braid. To do this, put the middle of the first part in the center of the second. By sticking your hand here, you will bring the loop of the first workpiece up. In the same way, create a braid further. It remains to sew the edges of the two blanks, this seam will be at the back.

You will get a beautiful snood scarf if you sew openwork sewing to the cut off strip of a T-shirt with your own hands.

Cut lots of stripes from different colors of T-shirts for another original scarf. You can tie it in several ways.
Here's how to learn how to sew clothes at home. The following ideas are also very easy to do, suitable for beginner dressmakers, and will allow them to fall in love with this type of needlework.
How to learn to sew a top, vest at home?
For beginner dressmakers, the following idea will also be easy to follow.

To sew a vest of this type, you will need:
- quite dense fabric;
- 2 large buttons;
- thread with a needle or overlock;
- scissors.
Divide the top segment into three equal parts to mark the location of the slots. Complete them. If the fabric is frayed, then overcast the armholes, and if it is a cloth like a drape, then you can leave the slots in their original form.
And the loop must be overcast so that it does not stretch. Sew on buttons, the second can be basted for decoration, the vest is ready.
Now about how to sew a top for the summer with a beautiful flower. For it you will need:
- knitted fabric;
- scissors;
- threads;
- sewing machine;
- tailor's needle.

The back and front, in this case, are two rectangles. To make a pattern according to your size, attach an unfolded newspaper to the back, determine the width and length of the future top in this part. In the same way, make a pattern for the front.
To make it more convenient to form a flower, do not sew the shelf and back on the sidewalls yet.
- For the straps, cut two strips 10 cm wide, 50 cm long. Connect each one lengthwise in half, right sides inward. Sew along the long edge, turn the straps on the face, sew them on the wrong side of the front.
- Process the upper part of the product by tucking it twice and sewing it on a typewriter. Here's how to sew the top with your own hands next.
- Start shaping the flower. Cut strips 10 cm wide. In total, you will need about 2 meters of such blanks.
- Fold them in half lengthwise, right side up, iron in that position. Start sewing the flower in a large circle, gradually moving towards the center. Make a frill out of the tape, fixing it in this position with pins. Then each circle is sewn on a sewing machine.

When you have completed it completely, process the top of the back, sew the straps here, stitch the sidewalls. Here's how to sew a top. For beginners, this work will not be difficult. The next one shouldn't be a problem either.
For her you will need:
- well-draped fabric;
- sewing machine;
- crayon;
- ruler;
- needle with thread;
- scissors.

From the fabric, cut out 2 squares with sides of 80 cm. Determine by your size where you need to sew on the right and left sides to separate the arms from the sides. Then you need to sew a top on the shoulders, after which the product can be worn.
If you have old jeans that are rather tired or frayed in some places, you can make a fashionable vest-top out of them. In the photo, it is marked in red how to cut out a new product.

It can be worn as an independent thing, put on over a T-shirt, turtleneck or make such a top the top of a sundress.

In this case, for the bottom, you need to cut a rectangle of cotton fabric, the width of which is one and a half times the volume of the hips. At the top, it is shirred and sewn to the bottom of the top.

If you already have a denim vest, you want to update and decorate it, then sew on lace in the collar area, but narrower ones? on the bottom and on the bar.

In general, for those who want to learn how to sew from scratch on their own, reworking old things is a very fertile topic. The process will be easy and interesting, so you can consider it in more detail.
What to do with old jeans?
If you want to sew an apron, and you have already used jeans for a year, use them.

The main part of the apron will be the top of the jeans. If you want to sew it with a breast, then rip it out of the trouser leg ripped on one side, unfolding that one. Such an apron is trimmed with braid or a strip of colored fabric, having gathered it. From the same material, open the ties at the waist and neck.
If you want to create a flirty apron, then make the bottom frill longer. Pass the belt through the loops to emphasize the waistline.

The breastless apron also looks great. It can be decorated with ruffles and a belt made of other fabrics.

In order not to separately sew on pockets and have a comfortable apron, use the back of the jeans. By the way, from the front and from the panels you can create a couple more aprons.

If you want to quickly turn white jeans into romantic ones with clouds, then take:
- bowl
- sponge
- acrylic paints for fabric;
- gloves.
Pour water into a bowl, add just a little blue acrylic paint, just a few drops, you should get a sky blue tint.
Put the jeans on the cellophane, dipping the sponge into the prepared solution, apply it to the fabric.
Now dilute the paint in a different proportion to get a picture of a slightly different shade. Apply this solution with a sponge to your jeans.

When the background is ready, take white acrylic paint, do not dilute it with water, draw the clouds themselves.

Now wait until the product dries, then iron it with a hot iron and you can put on beautiful jeans with clouds.

But back to the main topic. From old jeans you can sew a great organizer for small things.
Take the back of the pants with patch pockets, cut it off. If the organizer should be vertical, as in this case, then cut the back of the trousers in half, sew one to the other vertically. If you want the organizer to have several compartments, then sew pockets on the leg. Sew a belt from jeans along the edges of the product so that it does not stretch in different directions.
But the option with a vertical arrangement of pockets, for which you need to cut the back of the trousers to the knees, sew on additional pockets.

Of course, there are many options for what to do. From them you can make a bag, potholders, sitting on a chair and much more. For beginners, this is a great opportunity to learn an interesting craft.
When you get your hands full, you can create other things, such as pants.
How to sew culottes, leggings?
Leggings do not restrict movement, they are comfortable to play sports, work in the garden and just walk.
Slender ladies can wear a short top, a turtleneck with a vest under such trousers. Ladies with curvaceous shapes can be advised to put on a spacious shirt with cutouts on the sides that covers the hips. In such clothes they will be comfortable.
To sew leggings you will need:
- knitted fabric;
- threads;
- linen elastic;
- scissors and related small equipment.

The following is a universal pattern for several sizes, for:
- XL is yellow;
- L is represented by green;
- blue is M;
- and pink is S.

If you have a pattern, transfer the pattern to it. If not, tape two newspapers together and draw it here. You can draw squares on white paper or whatman paper. The side of the small squares is 2 cm, and the large ones are 10 cm.
On the left in the pattern is the back of the leggings, on the right? front. To learn how to sew at home, fold the knitted fabric in half with the right sides inward. Place a pattern on it, pin it around the edges with pins, cut it out, leaving 7 mm seam allowances on all sides. Overcast the edges of the parts.

Now sew the right half, then the left half on the sides on the wrong side, then sew front and back, and after? step seams. Fold the trousers down and hem here. Fold the top of the trousers, sew, then insert the elastic and you can wear fashionable leggings.
In another way, culottes are called skirt-pants. This is a versatile clothing that will be comfortable for women of different builds.
To sew culottes, recut the following pattern.

As you can see, it is given for several sizes at once, for 44–42 and 46. From above, you will lay the folds, stitch the step seams of the left and right halves of the trousers. Then sew a new thing on the sides and in the center back and front.
Sew a belt to the folds laid on top, bending it in half.
If you want to see how to quickly make a pattern and create culottes, watch the video below:
From the second, you will learn how to sew an off-the-shoulder top:
Tailoring a dress is a long process that requires sewing skills, patience and attention to detail. And if you are still a beginner and do not know how to sew a simple outfit for every day or a festive one for going out, our photo and video tutorials will help you learn how to approach this issue correctly.
We sew a simple beautiful outfit in stages
I propose to proceed to the lesson, which will help to understand the following question " how to sew a dress with your own hands"(for beginners, patterns and a step-by-step description of the whole process).
Straight black sheath dress for a girl
I would like to note that the most rated, so to speak, classic cocktail dress is a semi-adjacent attire (with a pencil skirt at the bottom). It is suitable for any occasion. During the day, you can wear it to the office, and by adding a wide belt, go to a party after work.
Material - preferably black, but you can choose a cage, velvet. But remember that velvet will make a more solemn option. Stylists advise having a removable element available (basque or stylish collar) that will help refresh the look. The peplum can be sewn separately from the same material, so no one will dare to reproach you for walking with a removable peplum, and buy a collar in a jewelry store.
In general, a little black dress must be in the wardrobe of every woman, and if you have not yet become the owner of such a designer creation, immediately drop everything and start creating it.
Popular articles:
Reinforce the lining with thermal cloth. Put on the neckline of the dress face to face. Sweep, grind. Unscrew the facing on the wrong side of the dress case, sweep clean, iron.
Hem the sleeves of the sheath dress. Hem the bottom of the sheath dress.
So, how to sew a sheath dress with your own hands (patterns for beginners).

Baste and stitch tucks. Iron them to the middle. Sweep tucks on the back, stitch, iron to the middle of the back.
Baste and stitch side seams. Sew a hidden zipper on the back. Cut out a facing for a neckline and an armhole 3 cm wide. Hem the bottom of the product.
Educational videos for fashion needlewomen
On YouTube, beginner needlewomen can find a huge number of video tutorials that show in detail the entire process of sewing things. For example, a series of lessons from the master, Olga Nikishicheva, fell in love with the viewers of the first channel, and we can look at them and get inspired. And there are a lot of such good masters, so feel free to choose exactly the one you like.
A simple long dress for overweight ladies at home
For a woman with magnificent forms, floor-length robes should be sewn individually according to the figure, because such a chic lady should be decorated with no less chic outfits.
Ladies often prefer bat models, but stylists advise choosing a "tulip", "case" or "pencil".
Beautiful jersey with three-quarter sleeves
Knitted apparel is sewn very easily, as it does not require undercuts. With a cowl collar and fringe, you can create a boho style outfit.
For pregnant women with a high waist
Future mothers during pregnancy have a lot of free time, which allows you to create, create, create.
How to sew a chic dress for yourself (step by step instructions)
Every fashionista dreams of sewing an exquisite dress on her own, as in the picture. It can be the same for mom and daughter, for example, in a flower in which you will be the most beautiful.
Lush wedding dress that is sewn quickly and easily
Not every bride can afford an expensive outfit for one day, so if you are serious, get ready for the fact that you will spend a lot of time, but the result will meet all your expectations.
It is worth remembering that it is desirable to use satin as the basis (it is satin that turns out to be truly chic). The decorating top can be made of neoprene, chiffon, guipure. If you have opted for a strapless off-the-shoulder model with a corset (required with a lining), the bottom should be sun or semi-sun.
Vintage retro style will allow you to use less material, while the Greek Empire style looks good on any figure.
How to create a simple and easy prom dress
Graduation party is one of the most long-awaited events for every girl, so you want to choose the most beautiful dress, but in the store you can not always find exactly the festive lace that you fantasized in your head.
Fashion evening with an open back
An elegant A-line (or A-line) flared to the bottom with an open back will allow the lady to be the center of attention at any event.
Elsa's outfit from Frozen for a teenage girl (12 years old)
After the release of the cartoon "Frozen", girls from all over the world literally fell in love with Elsa and her image with a train. Therefore, more and more often for a little daughter for the new year they sew it. For a children's New Year's party in the garden, it fits perfectly.
What interesting things can you think of for a teenage girl (12 years old)
A cloud of tulle for a child can be created literally in the evening.
Ballroom for dancing with your own hands
For a stylish "Barbie" who is fond of ballroom dancing, you can come up with a robe with a fluffy skirt with a petticoat. A fabric bow and elasticated gloves can be a stylish decoration that complements the look.
Figure Skating Robe
For performances, elastic thin materials are most often chosen that do not hinder movement and look good in motion. A flashlight, a bell with a shuttlecock are classics of the genre.
We create without using a pattern
In one evening, you can recreate an outfit by hand with one seam in a few minutes, even without a sewing machine. This science is not difficult to master, since it does not require skill and knowledge, but it is worth remembering the little nuances that save time.
Summer from scarves from true masters
Craftsmen can make a summer beach attire even with the help of ordinary thin scarves. You will be surprised how many interesting models you can create with simple scarves.
Hoodie for the hot season
Women's fashionable kimono with a one-piece sleeve is designed for sunny days. You literally don’t feel such a flyaway on yourself, and most importantly, such a one-piece product is sewn with several stitches.
Loose-fitting wrap
Such a product looks like a men's white robe, but on a female figure it looks special, and all thanks to the flying fabric.
Shirt + a little fantasy = chic outfit for going out
An ordinary shirt makes it possible to create more original attires when there is nothing at hand except the shirt of a loved one.
How to sew a dress with your own hands quickly and without a pattern (video)
Transformer - a unique creation for cunning ladies
T-shirt options
Who would have thought that from a simple knitted T-shirt you can come up with very fashionable dresses that will fit your figure beautifully and no one will dare to reproach you for the fact that your outfit is very cheap.
Each of the women, regardless of what season outside the window, can easily create her own image that will emphasize her uniqueness and originality. However, this will first require appropriate clothing. Of course, it can be purchased at any of the stores, but most ladies with a special taste give their preference to experienced tailors who can sew the most exotic outfits for them.
From white satin it is necessary to cut out:
- The central part of the front of the dress (Detail 1) - 1 child. with a fold
- Turning the central part of the front of the dress - 1 child. with a fold
From the black satin it is necessary to cut out:
- The side of the front of the dress (Detail 1a) - 2 children.
- Turning the barrel in front of the dress - 2 children.
- The side of the back of the dress (Detail 3) - 2 children.
- Outflow barrel of the back of the dress - 2 children.
- The middle part of the back of the dress (Detail 3) - 2 children.
- Turning the middle part of the back of the dress - 2 children.
- In addition, cut out a strip of red satin fabric.


It is worth noting that the number of experienced craftsmen today is not significantly large, so some women try to learn how to sew clothes for themselves on their own. But before you start sewing, you need to learn some rules of this art. To begin with, future needlewomen need to get acquainted in more detail with all the nuances of dress patterns for beginners. Simple do-it-yourself patterns will initially not always succeed. Therefore, the purpose of this article is to teach how to sew a dress with your own hands. For beginners, clothing patterns in the early stages will be a rather difficult process, but if you follow all the tips, then everything will turn out very quickly.
How simple patterns are created
There is nothing difficult in this process, just enough to make a little of your efforts and show your imagination. So, to create simple patterns, for beginners you will need to do the following:
- decide on the model, it should suit you;
- draw your attire on paper;
- take measurements;
- make a sample build;
- sew an outfit;
- come up with an original addition.
Building a pattern is the basics, the most understandable way for beginners, which you need to start by choosing a photo of the outfit you like. After that, the necessary measurements are taken and transferred to the drawing. When transferring dimensions, it is best to use graph paper. It has already been divided into divisions necessary for us. Simple patterns for beginners, simple do-it-yourself patterns do not need any complex calculations, but the most difficult thing in this process will be transferring all sizes to the material. To achieve the appropriate result, the following points must be considered:
- connection tolerances depend on material thickness;
- lines should be applied only on the wrong side of the fabric;
How to make a basic pattern for beginners
Beginners in tailoring are often faced with the fact that they do not know exactly where to start tailoring their outfit. First of all, you need to figure out how to build the foundation correctly. Building a pattern for the base of a dress, for beginners, is first of all creating a drawing of any part of clothing, with which it was possible to develop various wardrobe options. A simple dress pattern for beginners includes:
- the basis, which must consist of at least two parts;
- shelves having at least three armholes with two grooves;
- front shelves will be much deeper than the back;
To figure out how to build a dress pattern for beginners, take a small piece of paper and mark all the measurements taken earlier on it. They, in turn, will indicate the following:
- The length from the neck to the end of the outfit is the length of the garment itself.
- The width of the pattern is considered to be a half-girth plus 6-8 cm.
How to sew a dress with your own hands pattern and models
Sewing a dress with your own hands for many women is a rather painstaking task. To make this process not so difficult, it is necessary to keep in a notebook all the patterns and models that you previously selected from magazines. Thanks to this, you will be able to easily model clothes in the future. It is also worth learning to keep records of all measurements, this will help you get the hang of making comparisons and fitting outfit models properly. The lines of the drawing must have a clear image and be even.
To learn how to make patterns, for beginners, it is best to start this process by cutting a straight skirt. You may ask why with a skirt and not with any other outfit. Everything is simple. Such a model will give you the opportunity to make sure that skirt patterns for beginners, simple do-it-yourself patterns are a fairly easy process that any woman can master. In order to make a skirt pattern, you will need to make the following measurements of body parts:
- Half waist;
- Semi-girth of hips;
- Choose the appropriate dress length.
We sew a dress - a pattern for beginners
The pattern of a summer dress for beginners is basically the same as any other outfit. To understand how you can create simple patterns for summer dresses and sundresses, for beginner girls, first of all, you should learn how to create a pattern for future attire. To do this, first take measurements, the number of which is at least four. Next, put marks on graph paper.
To carve out a summer dress with your own hands, it will be enough for beginner craftswomen to know a little arithmetic. Knowledge in this area will be needed when making calculations of the desired depth of undercut on the chest. This calculation is carried out using a small piece of fabric and performing its internal layout. To correctly calculate the depth of the undercut, the material is applied to the chest, if it fits snugly, then the desired depth was found correctly. Next, it remains to freeze it. The calculation of the thigh opening is made directly from how narrowed your robe will be. Having taken all the measurements in an appropriate way, the dress with your own hands, sewing is easy and simple. However, all dimensions should be strictly adhered to when drawing up the sample.
How to make a pattern for a sheath dress
Most tailoring beginners are faced with the question: how to sew a sheath dress with your own hands? For beginners, the patterns of this garment will be a very painstaking and time-consuming process. The main key to success in this matter will be the creation of an appropriate foundation. If you learn how to perform this process in a competent way, this will allow you to ensure that the dresses you sew will sit clearly on the figure. It is necessary to start this business, as in all other cases of sewing from taking measurements. Thanks to them, you can accurately calculate your size. In particular, this process will play an important role if you want to use any of the ready-made patterns that are provided in many women's magazines that tell you how to sew a sheath dress with your own hands. For beginners, it is the choice of a finished pattern that will save a huge amount of your time and nerves. However, at the same time, it is worth transferring to the drawing from the magazine those measurements that were taken by you. As a result of this, you will be able to compare your measurements with standard ones, and adjust them accordingly. Often the error occurs in the semi-girth of the hips and waist. This happens because most European models have narrower sizes of outfits.
You can also use the re-shot pattern for sewing several types of dresses at once, making only small adjustments there. But you should also pay attention to the fact that if you still use the basic pattern that you developed yourself, then the measurements must be made in an accurate way. All measurements must be taken only when the person is in a standing position and nothing else. Thanks to this, you will be able to avoid errors. After very carefully, the measurements are transferred to graph paper, and it is necessary to indicate what each of the lines means. More difficult will be the process of finding the length and depth of the neck incision. For this, experienced tailors recommend using a round piece of cloth, which is applied to the chest. The center of the circle must exactly coincide with its top point. The tolerance that has formed in the circle should be stabbed with a pin - it is he who will be the width of the undercut. To find the depth, you need to measure the length of the chest from the point of its roundness to the center. If all measurements and calculations are performed correctly, then you will receive the initial form of the outfit.
How to make a pattern yourself
Exquisite outfit does not have to be purchased in some expensive store. For example, for a pattern of sundresses for beginners, simple do-it-yourself patterns will require only patience from the needlewoman. The result will not keep you waiting for a long time and will justify all your hopes if you follow all the necessary rules. Before starting any process, you first need to prepare the entire set of tools. In our case, this includes:
- centimeter;
- scissors;
- matter;
- several pins;
- pencil.
There are several options for how to sew a simple dress. Do-it-yourself for beginners, in most cases, this can seem like a rather time-consuming task. To facilitate it, it is recommended to use a re-shot model of the product you like. In this case, you do not need any special knowledge, because most modern magazines have an insert with various samples of outfits, which have a huge selection of sizes. Now let's look at a detailed guide to blouse patterns for beginners. Simple do-it-yourself patterns will be very easy to do by following these steps:
- Body measurements should be taken. At the same time, pay attention to the fact that the centimeter is not in a highly taut position or sags. If you miss one of these moments, data corruption can occur, as a result of which the outfit will not have the desired luxurious look.
- Find your size using the size chart.
- All obtained dimensions are transferred to graph paper.
- We apply graph paper to the material and outline with soap all the existing lines.
- We cut out the sketch on the fabric, not forgetting to leave a few centimeters for seam allowances.
How to cut a baby dress
All mothers want their daughters to look their best. Therefore, among them the question often arises: how to sew a children's dress with your own hands. For mommy beginners, the main thing is that their daughter is dressed in the most stunning outfits. Of course, the easiest way to solve this problem is to go and simply buy a robe, but you must admit that it will be much more pleasant to sew a chic outfit for your pet with your own hands.
Patterns of children's clothing for beginners, simple do-it-yourself patterns must necessarily have the desired proportionality. In this case, it is best to resort to the method of creating a drawing according to a sample. You should take any of your daughter's T-shirts, put it on a plain sheet of paper and trace around her outline. In the next step, you should mark the length of the finished outfit in the picture, but first take measurements from your child. Then cut out the pattern and fold it in half. The first part acts as a front shelf, and the second - a back shelf. Their main difference will be the depth of the neck and neckline. Accordingly, their depth is greater on the front than on the back. In this case, the cutouts of the front and back can have exactly the same dimensions. This will be possible if you are sewing an outfit that does not have sleeves. If the opposite is true and the sleeves should take place, then measurements should be taken in the right way. This must be done in the position of a bent arm, which in turn will allow the girl to freely raise and lower her arms. Also, do not forget that the bottom of the robe should have a slightly rounded shape. As a result of this, the outfit will look quite luxurious. Patterns of children's dresses for beginners, simple do-it-yourself patterns are often developed from a finished model.
How to create a sheath dress pattern
The feeling of unsurpassedness to a woman will be delivered only by the robe that will sit wonderfully on her. If suddenly you have a desire to sew a sheath dress with your own hands, a do-it-yourself pattern is made strictly according to the measurements taken. This clothing can be a non-standard solution to the problem associated with outfits that are used for everyday outings, because such a dress can easily be turned into a luxurious evening dress.
So, how to sew a long evening dress with your own hands. For beginners, photos of such robes can be found in any women's magazine, but this will not be enough. First of all, when sewing it, it is necessary to take the following measurements correctly:
- Half waist and hips;
- length of the back of the body;
- back width;
- shoulder length;
- dress length.
Having taken all these measurements exactly, you can be completely sure that your evening dress is unsurpassed.
How to sew a straight dress with your own hands, for beginners patterns
Straight dresses are a great option for those girls who want to have a luxurious look. You can easily pick up various jewelry for such a robe, which in turn will allow it to turn from ordinary everyday wear into a luxurious evening dress. So, how to sew a straight dress with your own hands? First you need to make a paper drawing. Also, when creating it, it should be borne in mind that all measurements are taken accordingly. In no case should there be any errors, otherwise the outfit will be tight. To get an excellent result, there is a step-by-step instruction on how to sew a simple straight dress with your own hands for beginners:
- It is necessary to draw a rectangular base, the main component of which is the length of the product itself.
- At the next stage, it is necessary to mark the armhole and add 1.5 centimeters upwards to it, connecting it to the center of the front.
- Next, you need to deepen the neck by at least four centimeters.
- After we carry out the calculation of cuts at the waist.
- And at the end, if the style requires, we cut the sleeves.
By learning how to sew, you will achieve that all your clothes will be exclusive. Most professional tailors advise beginners not to jump straight into sewing complex models, so as not to make many different mistakes. To begin with, you should try yourself in simple models. Even simple dress patterns for beginners will look elegant and unsurpassed.
It is easy and simple to sew the most ordinary dress with your own hands. For beginner tailors, this is a good way to hone your skills, because often a simple pattern does not contain any heavy details. Their main feature is that having chosen a ready-made outfit, you need to supplement it with separately embedded details. Also, beginners in tailoring are encouraged to create their own personal base. In the future, it will become an indispensable tool in the process of modeling clothes.
How to sew a dress with your own hands quickly and without a pattern
Professional tailors know how important the pattern making process is. It is considered one of the most labor-intensive in sewing. But according to some seamstresses, a simple dress pattern is an easy way for beginners to hone their sewing skills without a pattern.
Having decided to stop at this option, you should first familiarize yourself with all the nuances of how to sew a dress with your own hands quickly and without a pattern. The main point in this method is the initial preparation of the tissue. If it has a good density, then it will be enough just to spray water on it. If it has a slight thickness, then the best way to prepare it will be a damp sheet, in which it should be wrapped for a while. After it has been moistened, the fabric must be properly ironed. Next, a visual inspection is carried out for the bevel of the threads in the weave. If such a shift was nevertheless detected, the material is stripped again.
Also, without a pattern, you can sew any simple dress with your own hands. First, it is necessary to properly process the sections and seams of the fabric. It should be remembered that some models initially require the processing of slices, and only after that they begin to perform line work. For example, the pattern of such a garment as a poncho begins with hemming the entire square of the product, and then the armholes are attached.
We sew a dress with our own hands, patterns for beginners
If you want to look good, then your dress should be unique and luxurious. This can be achieved by attending tailoring classes. It is also necessary to attend various master classes that will tell you how to sew a dress on the floor with your own hands for beginners patterns. In the course of training, you will become aware of many more such options, thanks to which you will be able to hone your skills in practice. You just need to carefully study all the information provided in courses such as “we sew patterns for beginners ourselves” and display it in practical classes, or to be more precise, display all the necessary calculations on paper. To do this properly, you do not need to have any outstanding mathematical abilities at all, it is enough to know the principle of division and addition of numbers.
Nowadays, there is a lot of different information that will tell us in detail about how to sew a summer dress with your own hands for pattern beginners. The existing set of rules in this case also remains practically unchanged and the whole process is based on the correct sizing and cutting. A little different from the other guide, which tells how to sew a coat with your own hands for beginners patterns. In this case, only the material of the product and its preparation will change. However, the whole process also remains the same.
What should be the sketch
For a long time, all people have known that an outfit that has been tailor-made for you has a much better look than one purchased in a store. It is quite easy to explain this fact. The main feature of such a product is that the drawing is developed for the data of a certain figure. That is, the garment that was successfully sewn will never make you shackle yourself when walking.
In order for the drawing to be executed appropriately, of course, it is better to turn to a professional, but if you make a little effort, you can cope with this task on your own. First of all, it will be necessary to perform a base pattern. Its creation directly depends on how accurately the measurements will be taken. After, you need to determine what size you have according to your measurements. There are several special tables for this: Russian, American and European. These systems are basic and therefore it is better that such tables are always at hand, especially if you are engaged in tailoring according to ready-made patterns that you take from various women's magazines.
How to build a sample
There are some instructions that will provide an opportunity to understand and study tailoring in a fairly short time. A correctly built sample includes all dimensions that must be taken accordingly. At the same time, a clear fit of the garment on a person is ensured by the presence of grooves that have an appropriate location. To make your outfit look luxurious on you, you need to consider a number of rules:
- The back undercut of the back must necessarily end on the line of the chest;
- The front undercut ends a few centimeters lower;
- The shoulder cut ends in the same way as the front undercut.
Determine the line of the chest, you can use a centimeter. It should be applied to that part of the chest that protrudes the most. Also, at the time of measurement, the centimeter should not be too tight or too loose. When carrying out the rest of the body measurements, it is recommended to use a braid that is tied in the chest area. She, in turn, acts as a so-called landmark. From here we can draw the following conclusion: the step-by-step construction of the base pattern directly depends on the correct definition of the chest line.
There are separate and detailed articles on how to make the basis of a pattern for a dress, sleeve, skirt, trousers, shorts and other clothes. An experienced tailor of the atelier offers to build a pattern using his own simplified method, specially adapted for beginners. However, for beginners who decide to sew a skirt or trousers (especially a dress) with their own hands, it is important to know not only how to correctly make a pattern and tailoring technology, but also a lot of “little things” that are insignificant at first glance.
In this article, an experienced tailor will share some tips with you. You'll learn what beginner tailors need to know before you start pattern-making and cutting and sewing your own clothes.
Please note that the VKontakte group has many useful tips for beginner tailors. Sign up for a group. We constantly post various brief tips and links to useful articles.
Prepare a sketch of the future dress model

Tailoring, especially women's dresses, is a creative activity that requires not only the ability to make a pattern and sew on a sewing machine, but also the taste and imagination of the designer. You will need to draw a sketch of the future model of the dress, imagine what finishing elements and details will be on it, choose the color and quality of the fabric, the silhouette of the dress. And finally, draw it all on a piece of paper. However, it is not necessary to be able to draw beautifully in order to sketch a dress. You can use ready-made design solutions, supplement them or change them a little.
Do you like indoor or garden flowers? In the nursery "Green Gate" you can buy rooted cuttings and cuttings of various domestic and perennial garden flowers. We constantly update the collection of anthuriums and hibiscus. Flowers and plants are sent by mail.
For beginner tailors, the pattern often comes first. They carefully and scrupulously make their measurements in the calculations when constructing the pattern, trying not to be mistaken by a millimeter. But, most often the first result becomes unsuccessful, simply for the reason that there is not enough experience. Therefore, do not immediately try to sew clothes from expensive fabrics, first learn the basics, gain personal experience. Even a teacher at a cutting and sewing course will not be able to give you the full amount of knowledge, not to mention articles on the Internet. You will have to learn many tricks and subtleties on your own, sometimes at the cost of your own mistakes.
Take, for example, such an element as the silhouette of a dress. Everyone knows that the silhouette is adjacent, semi-adjacent and free. For the same size, beginners need to make three different patterns. For an experienced tailor, when modeling a dress, one, but proven, basic pattern is enough, and he can make additions and changes to it in small pieces directly on the fabric.
On our site there is an author's material, specially adapted and intended for beginners, on how to make the basis of a straight dress, as well as make changes for a fitted and free silhouette in the basic pattern.
What tools are needed to make a pattern

1. Ruler cutter. This is a special, transparent and wide ruler with convenient markings in inches and centimeters. Inches are used when constructing a pattern taken from foreign magazines.
2. Paper tape. It is no accident that we placed it in second place. It will definitely come in handy when adjusting the pattern, gluing additional sections of paper, laying folds on the pattern, etc. It is not necessary to buy with such a device, it is enough to buy a regular masking tape in a roll, 3 cm wide.
3. This tool is used to transfer your pattern or pattern from a magazine to paper. The gear wheel pierces two layers of paper with needles, accurately transferring the contours of the top sheet to the bottom one. With the help of a copy roller, you can quickly and accurately make a pattern.
4. An ordinary simple pencil, preferably soft. There is a marking on the shank of the pencil. A hard pencil is designed for thick paper, such as whatman paper. For thin graph paper, it is better to use grades M, 2M, TM.
5. You will often have to erase inaccurate or minor pencil lines, so choose a comfortable and high-quality eraser.
6. Many people think that beautiful and comfortable tailor's tape measures are better than a regular centimeter tape. In fact, even professionals use only a centimeter in their work. Do not buy too long a centimeter, for example 2 meters. An ordinary centimeter, 150 cm long, is the most convenient size.
7. Tailor's scissors are considered the main tool of the tailor. They should be sharp and comfortable. Each seamstress in the set should have at least three types of scissors: large for fabric; medium - for small jobs and small - for cutting threads while sewing on a sewing machine. Do not use tailor's scissors to cut paper. In the office supply store, you can buy inexpensive regular stationery scissors.
Experienced dressmakers use a special cutter to cut the fabric. Don't rush to get it. For beginners, scissors are enough at first.
8. A rectangular ruler is simply an indispensable tool when building a pattern, especially if graph paper is not used. This rectangle will also come in handy when aligning the bottom of a skirt or dress during fitting.
9. This form of a ruler must be in your set. With it, you will make smooth lines of armholes, necklines, etc. on the pattern.
10. And finally, graph paper. With it, you can easily make a pattern with your own hands, and then transfer its parts from the general drawing to separate sheets of thicker paper. It is sold in sheets and rolls. It is most convenient to use paper in a roll, but at first you can try to make a pattern on sheets of A3, A2 paper glued together.

If you are building a pattern yourself, then you will practically not need the terms used by designers, well, except for the main ones: back, shelf, round, armhole, etc. Another thing is when you use ready-made patterns from magazines. You can often find a lot of unfamiliar words there. We have a detailed article on our website that gives a detailed description of most of the terms and details of the patterns.
See the name of the details of the cut, cuts, terms
However, you should not focus too much on studying them, especially since they are most often explained in the drawing and are intuitively understandable even to an unprepared person. But it is imperative to understand what the different symbols on the finished pattern mean.
1. The arrow with the inscription "DN" or "Local" means the direction of the fractional thread of the fabric, taking into account which you need to lay out the pattern on the fabric.
2. "Fold fold" means that this part of the pattern must be laid out when cutting along the fold of the fabric, for example, the back.
3. So that the details of the parts of the product do not move when sewing, it is advisable to break them into sections and put marks. When sewing, these marks must be combined and thus you will avoid strong displacement or stretching of the seams. On the pattern, put short dashes (for example, a waist line, a chest line), and mark these marks with chalk on the fabric.
In this way, folds and tucks are marked, moreover, you can even indicate with an arrow their direction of laying.
4. If you have already had to sew clothes with your own hands, then you know that some parts of the clothes need to be “planted”, while others need to be stretched. For example, it is always advisable to cut out the sleeve collar a little more than the armhole, and to plant the upper part of the sleeve a little. On the other hand, the buttocks of the trousers (in some cases) need to be stretched on the contrary with a hot steam iron, etc.
You should pay attention to the marks on the pattern in the form of wavy lines or dotted lines with an asterisk. They indicate the area that needs to be planted or trimmed.
5. Professionals use patterns without allowances. But patterns for beginners are given with seam allowances. The contours of the finished pattern are indicated by a solid line, and the stitching line is dotted.

Unfortunately, in a short article it is impossible to give comprehensive information on how to make a pattern with your own hands, and even just a beginner to sew. To do this, you need to complete a 3-4 month course of study, at least. However, it is possible to give important directions for self-study. Part of the information can be found on our website, other websites, in books and video courses. Here is an example of how to take measurements.
Any pattern is built so that the fabric of the clothes does not tightly run around the figure, but has a little freedom. Therefore, when building, various allowances for freedom of fitting are used. Their value depends mainly on the size of the clothes and the features of your figure (completeness). Keep this in mind when building a pattern.
See fit allowances.
Do not blindly trust patterns from various magazines and online resources. You should always check them before cutting fabric. It is impossible to build a pattern that is perfect for any shape. Apparently, therefore, designers often give large allowances for freedom of fitting. And to check you need to learn how to make patterns with your own hands. Here is such a vicious circle.
When laying out the patterns on the fabric, the problem of shifting the details of the pattern often arises. You can use thin and sharp tailor's pins and pin the paper parts to the fabric. But, not necessarily. But you need to pin the paired parts of the fabric with pins. This will allow you to avoid their shifting when cutting.
Don't repeat these mistakes!

1. Do not walk when sewing. Do the work consistently and accurately, sweeping difficult areas by hand. After completing the sewing of some detail or a complex operation (grinding the side seam, etc.), it is necessary to perform wet heat treatment, carefully ironing or ironing the seams. See How to iron clothes properly.
Especially do not rush to complete the work. It is better to postpone hemming the bottom of a dress or skirt until the next day than to do it late at night.
2. Experienced seamstresses know that the most important step in tailoring is fitting. And the more they are made, the better the work will be done, the more accurately the clothes will fit on the figure. Be sure to do fittings when tailoring any clothes. Experts even have a special term for this first fitting and second fitting.
3. We have already said above that one should not trust patterns from magazines too much. They are made by experienced specialists, but even they cannot take into account all the deviations from the standard features of typical figures.
4. Do not think that making a pattern is something beyond your strength. In fact, everything is very simple. You just need to spend time and figure out a new business for you.
5. Don't be afraid to make a mistake, but save your money. First, make a skirt pattern from inexpensive fabric. Then you can try to sew and shorts, trousers. Well, then make a pattern and dresses, just sew it from an inexpensive, unpretentious fabric.
6. Not all fabrics, but many, require special wet-heat treatment before sewing. Fabrics containing cotton, wool, and sometimes synthetic fibers may shrink after washing. Consider this before cutting fabric.
7. Since the sewing machine becomes your main assistant, keep it in order. A faulty or unconfigured machine can ruin not only your mood, but also the thing for which you made a pattern with such difficulty and spent not only time, but also money.
Skirt pattern - pencil. Very simple construction, accessible for beginners. The video is in English, but you can choose subtitles in any other language. If you love to sew, be sure to subscribe to this video channel. You will learn a lot of useful things. The channel was created by professional tailors.