Decorating an apartment or a private house is a responsible job that must be performed by an artist or designer. But the services of specialists are not cheap, therefore, in order to save their money, many homeowners seek to bring beauty and comfort to their interior by manufacturing and installing various objects and paintings. You can make a panel on the wall with your own hands using various techniques, the most common of which is the assemblage technique. This technique can be used to make paintings or panels of any size and volume, the essence of the technique is to make a copy of the main object and glue it to the support platform, then the rest of the composition is assembled, and finishing painting is carried out. An assemblage wall panel will perfectly emphasize the individuality of the interior and will attract attention with its unusual texture.
Types of decorative panels
There are various materials that can be used as a base or decoration for a do-it-yourself wall panel using the assemblage technique. Such items can be classified into several types:
- Painting or panel on the wall using natural materials. In this case, various objects of plant origin are used, for example, tree branches, cereals or casts of fruits and berries. To create a panel from the listed materials, you will need artistic thinking or experience in painting, since before starting to assemble the picture, you will need to draw a layout of the future product based on it, and this is not for everyone;
- Volumetric assemblage of a panel of household items and elements of industry that have served their time. This technique is simpler, since all materials are large and their use does not require skills in painting, it is enough to roughly draw the arrangement of things on the panel or directly lay them out in the order in which they will be located in the final version. To create paintings, glass or plastic bottles, buttons, fabric, paper, old watch elements or any other object you like that can be glued to the base can be used. If the element has a round or cylindrical shape, and there is no way to securely fix it in the picture, or this requires a design solution, then you can make a copy of it using plaster or papier-mâché technique;
- Combined product using both types of materials. In this case, a composition is obtained that includes both objects of natural origin and products created by man.

The main advantage of decorative wall panels is that such a product is not manufactured on an industrial scale and, most often, the resulting picture exists in a single copy, as a work of art. Also a plus is the ability to create a composition for the overall ensemble of the architecture of the room or the building as a whole.
Panel sizes, filling options
As such, there are no specific strict standards governing the dimensions of a three-dimensional panel, the product can be of any shape, length and width, the only condition is that it is necessary to take into account the weight of the entire structure and calculate the load on the adhesive composition so that after fixing the picture on the wall, its elements do not break off from the base . Large parts must be fixed over the entire plane using especially strong glue and fixing varnish.
Often you can find a decorative panel with backlight, such a picture, in addition to the decorative function, is additionally a source of light in the room and, when the backlight is turned on, highlights a certain area on the wall and around it, which adds softness and sophistication to the entire interior.
Lighting can be placed outside the frame of the product or in the cavity of a figure, for example, a vase with holes. In this case, the light will penetrate through them and shine through certain areas. As a source, you can use incandescent lamps or LED strips, which have the advantage of not heating up, and therefore will not create a high temperature inside the picture.

The volume of the picture, in addition to the texture itself, is given by its coloring, which can be done either in black or white, or in a combination of different colors and shades. For example, the most common combination of a bronze background with gilded towers, this technique is considered closer to the aristocratic style and fits well into an interior filled with natural materials, pure wood or stone.
When using the assemblage technique to create a picture for a child's room, it is better to use colored paints that will make the child pay attention to the details of the panel and create a positive mood. You can often find a three-dimensional picture with a built-in clock of an unusual shape, for example, instead of the classic numbers, there are old toys of various shapes, similar to one or another indicator of time. Thus, it will be easier for the child to learn time zones, he will learn to determine the time and navigate in space.
Variants of the arrangement of objects on the panel
When planning any drawing, you need to accurately understand the size of the future structure and compare the scale with the main site. In the assemblage technique itself, non-standard solutions are used, when old things are used as a composition, which at first glance cannot be put into any drawing. However, when compiling the entire structure, a picture with a clear interior is formed. For example, if a fish is depicted on a panel, instead of an eye it may have an ordinary button, and the scales are made of coins. As a result, seemingly simple household items take on a completely different meaning in the conditions of one picture.
Also, when using the backlight, you can arrange it in such a way that in the off position the pattern is of the same type, and when the lighting is turned on, due to the shadow effect, a completely different composition forms on the opposite wall. In this case, beautiful panels can carry a hidden meaning contained in the drawing itself and the reflection of its shadow.
The process of making panels from wooden rings
The most widespread among decorative volumetric panels are paintings made from rings cut from tree trunks and dried branches.

Such a composition is easy to produce but, despite this, it looks like a finished composition with natural landscapes. This product must be manufactured according to the following algorithm:
- The choice of size and basis for the picture. As a platform, you can use a sheet of durable plywood or a polymer board, it is important to consider that the weight of the finished structure will not be small, so the size must correspond to the load on the surface;
- Determination of the concept of drawing and overall composition. Most often, materials are first selected, their shape is examined, what this or that branch looks like, and then they imagine what pattern can be recreated. For example, to simulate trees, ordinary branches are used, dried and processed with sandpaper;
- The figure is laid out on the panel, round rings can be laid out as tree foliage, while the trunk should be slightly thicker or of a comparable size. To comply with the three-dimensional pattern, the rings can be arranged in two or three layers;
- A background is superimposed on the base, which can be used as plain paper, previously soaked in water. After the sheet becomes limp, it must be squeezed out and, smeared with glue, placed over the entire surface. You can form mounds and slides from the resulting mass, after drying it will harden and acquire texture;
- Further, all the parts are alternately lubricated with adhesive and placed on the panel in the planned order. The adhesive may be different, depending on the weight of the element, for example, PVA or a polymer-based synthetic tube welded with a special gun. It is important to observe the solidification interval of the structure so that the parts do not “float” on the surface;
- After complete drying of all the details, it is necessary to paint the entire composition in one background color. As a base, you can choose black paint, which is applied one or two layers until all elements of the picture are the same. You can paint using an airbrush, or manually with a simple brush, while the movements should be soft so as not to allow the layers to overlap each other;
- The final step will be to cover the surface with furniture or automotive varnish based on acrylic or alkyd. The varnish forms a transparent film that will protect the picture from UV radiation, as well as dirt and dust. After the structure has completely dried, the platform is installed in a wooden frame or baguette and can be hung in the planned place.
Thus, having considered the process of making wall panels using the assemblage technique, we can conclude that do-it-yourself three-dimensional paintings will be an excellent addition to the interior of the apartment, as well as emphasize the individuality of the person living in it.
Video
KSKOU OO "Kromskaya special (correctional)
boarding school"
Master class on making a gift in grade 8
Technique: assemblage
Educator: N.I. Nosova
2015
Target: Development of the creative potential of each child by introducing them to applied art and spiritual and moral education.
Tasks: To introduce children to the folk traditions of celebrating the holiday of the Resurrection of Christ (Easter)
Formation of interest in Russian folk traditions.
Development of accuracy, artistic taste, creativity, motor skills of fingers.
Introduction to the origins of the cultural traditions of the Russian people.
Stroke:
1. Organizational moment.
Good afternoon guys! Hello dear guests!
Today we have another creative lesson, or rather a master class.
Look at each other, hold hands, smile, wish each other a good mood and creative success .... Are you ready?
2. Main body.
Tell me, please, what time of year is it?
Spring
Spring is the most joyful period of the year. Nature wakes up from winter sleep. Everything blooms, rejoices. And it is no coincidence that most of the rituals, ceremonies, and holidays fall at this time.
And the Christian ones? (Christmas, Epiphany, Trinity, Easter).
What Easter traditions do you know?
Bake Easter cakes, paint eggs
Right.Serving the festive table, the housewives covered it with the most beautiful tablecloth, there were various dishes on it, but the main symbols of Easter were Easter cake and painted eggs. Butthere is another ancient Christian tradition - to exchange colored eggs as a sign of love and fraternal unity of believers. According to legend, Saint Mary Magdalene presented the first Easter egg to the Roman emperor. Shortly after the resurrection of Christ, Mary Magdalene appeared in Rome. In those days, it was customary, when coming to the emperor, to bring him gifts. The wealthy brought jewelry, and the poor brought what they could. Therefore, Mary Magdalene, who had nothing but faith in Jesus, handed the emperor Tiberius a chicken egg with the words: "Christ is Risen!" The emperor, doubting what was said, noted that no one can rise from the dead, and this is just as hard to believe as that a white egg can turn red. Before he could finish these words, the egg began to turn from white to bright red. Colored eggs have always served as a symbol of the Resurrection of Jesus. Making exquisitely decorated Easter eggs was both a tradition and an old craft in Russia. Eggs were covered with intricate symbolic patterns, as well as nature scenes, genre scenes, temples and icons were painted on them.
These are krashenka eggs, and drapanki, and krapanki, and malevanki, and, of course, pysanky.
But besides all this, eggs are also decorated with various materials: these are ribbons, and beads, and beads, and sequins. As I already told you, decorating eggs is an art. I suggest you decorate the egg.
3. Practical part.
But before we start making an Easter egg, let's review the safety rules for working with scissors and glue.
What do we need to work?
Egg
Cardboard
Scissors
Glue moment (transparent)
Satin ribbon 0.6 mm
Decorations
Let's get to work. See flow sheet.
4. Bottom line.
All the guys worked very hard, well done. I suggest that you, following the Easter custom, exchange eggs.
Do you enjoy decorating eggs?
Do you like your friend's craft?
What do you remember from our lesson?
This concludes our lesson. And now let's decorate an impromptu Easter table with our eggs. Thank you for your participation, see you soon!
Routing
We take the tape and glue it on the top of the egg (3-4 meters of tape are needed for 1 piece)
We start wrapping our egg. Hold the workpiece tighter, it will slip out and pull the tape so that it fits snugly.

3. Having reached the top of the egg, we put the ribbon with a cross and continue to weave further, on the reverse side we do the same.

4. Thus we wrap the whole egg

5. After wrapping the whole egg, cut off the excess tape

6. And glue the end of the tape


Now you can show your imagination and decorate the eggs.


I decided not to do a standard master class, but to talk a little about a new, for most readers, art direction - assemblage.
So, Assemblage is a composition that has non-pictorial objects and materials. There are several types of this art, so many well-known creators of our time can find painted pictures, with “live” elements or, more simply, “found”. For example, a portrait of a person with a key can be painted on canvas, while the key will be real, and not written. Undoubtedly, such art belongs to POP ART and already has quite a few of its fans. 
(a picture assembled from small plastic trash).
Another type of Assemblage is collage needlework, I think that such a collage does not need to be explained. The collage style is more common and more popular than the previous type of assemblage. Such popularity is not accidental, because here you can use absolutely all the "found" items that can be perfectly combined in a single work, regardless of texture and materials. So, for example, the works presented below can be attributed to this technique.  This work is taken from one of the popular sites. The photo shows a panel with metal parts, and the wide frame itself is made of buckwheat. First, all the details are glued to the base, after which using balloon paint (you can also use regular paint, but then you need to shade it), the whole work is painted over in one color. The result is some very interesting work.
Here is another version in the assemblage style.  This is an ordinary plastic bucket made of children's toys, on which “found” parts were glued and covered with paint on top. Below is the most, in my opinion, the most successful creation in this style - a table lamp made from unnecessary children's toys. After their connection, everything is covered with white paint and, with an appropriate interior, this will complement the decor very well.
  By the way, everyone must have seen some objects that are decorated with pasta and painted on top - this is also an assemblage. By the way, in this style, paper parts specially made for some kind of panel can also be used. Absolutely all materials are acceptable for this, without any restrictions, perhaps this is precisely its charm.
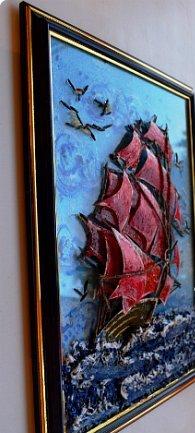
Subject: Master class with parents and children. Decorative panel "Scarlet Sails" in assemblage technique.
Target: to expand the knowledge of parents on the use of non-traditional techniques in the visual activity of children.
Tasks:
To convey to parents the importance of using the methods of non-traditional visual techniques in the development of figurative thinking, sensory perception, creativity of children;
Develop communicative forms of behavior that promote self-actualization and self-affirmation;
Location: primary school classroom
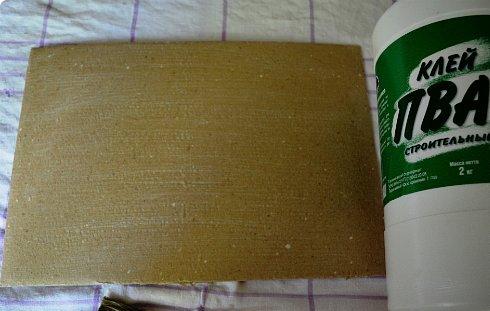
Equipment: 6 tables, 16 chairs, for each individual group - materials for the manufacture of decorative panels (PVA glue; brushes; photo frame; Titan glue; sand, putty, acrylic paint; color (gouache); cereals (millet, rice ): scissors; plastic bottle and box; varnish; plastic spoon for preparing a solution; picture from the Internet:; sandpaper; twine)
Master class progress
Hello dear guests, parents and children! I want to tell you a little story, listen carefully. There lived a lonely and proud man. He loved the sea, dreams and people. The sea lay before him like a road to a beautiful, mysterious world, full of adventures, deeds and miracles. The name of this person is the writer Alexander Grin. At the age of 18, the dream of distant lands brought him to Odessa. Here, for the first time, he led the sea, that sea, which then flooded the borders of his books with a dazzling light.
Reader. He lived among us, this storyteller is strange,
Who created a country where the shore is foggy
From the illustrious brigs flee at dawn
Tall people with a deceitful smile,
With eyes like the echo of the seas in January
With great malice, with great love
With salty as the sea, raging blood,
With an eternal, like the sun, a dream of good.
We are talking about the famous writer Alexander Grin. Who knows what work he wrote? (answers of the participants of the master class)
What do you think we will do today? (something to do with scarlet sails)
That's right, it will be the Scarlet Sails - a symbol of hope and true dreams.
Together we will make a decorative panel using the assemblage technique. Have you ever heard of this technique? This is a type of work of contemporary art, or an artifact, which is a three-dimensional composition composed of any utilitarian items or their parts and fragments and/or specially created objects and enclosed in the space of a box or box.
Why are we doing this work? (in order for each of us to understand the importance of introducing new non-traditional techniques into the visual activity of our children).
Right. What do you think scarlet sails identify? (hope, faith, dream)
Everyone has their own dream. What do people dream about? (answers)
So let each of us put a drop of dreams into these Scarlet sails. We will make with you not just a three-dimensional composition, we will fulfill a common dream.
So, a master class on making a decorative panel "Scarlet Sails" using the assemblage technique.
(Working with slides)
This is how the finished work looks like, in order for it to turn out as beautiful and neat for us, we need to act in a coordinated manner.
I did not just immediately divide you into groups, each of the groups will be responsible for its part of the work.
For work we need: PVA glue; brushes; picture frame; glue "Titan"; sand, putty, acrylic paint; color (gouache); cereals (millet, rice): scissors; plastic bottle and box; varnish; plastic spoon for preparing the solution; picture from internet:; skin; leg-split. Everything that we will use, you will see in the course of work.
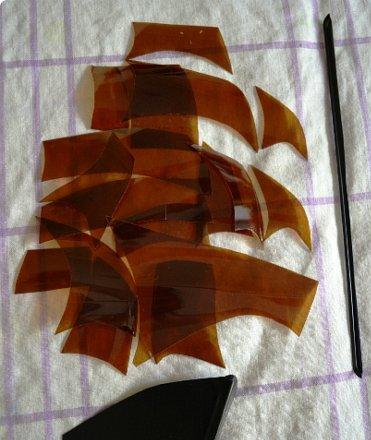
The first group prepares the sails and the hull of the ship from a plastic bottle and a box. On the table you will find templates for which you need to cut out the details. You also make the masts and the net. There are tips on the table, you can use them. Each step is detailed there. 


The second group is preparing the background of our future panel. Everyone will find instructions and materials on their desk.


The third group has the most important task: we will assemble the composition. To do this, I specially printed a drawing. We cover it with glass and we will work directly on the glass. We decorate the sailboat starting from the far mast. All elements are glued to "Titanium" (directly on the glass). We make out the bottom part of the work. Glue rice. We paint further the sails and the hull of the sailboat. We use acrylic paint. The sailboat is varnished. We prepare a mixture of sand, putty and PVA glue and cover all the rice. Let's dry a little.


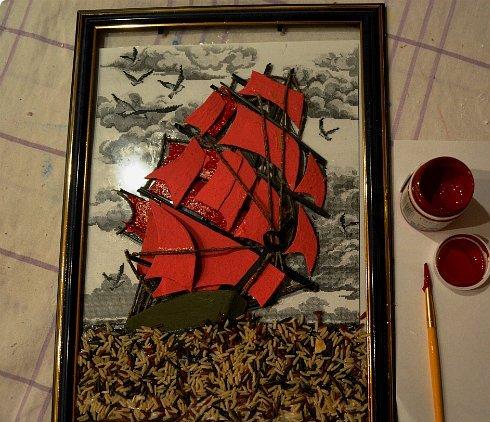


Now it's time to replace the background. Our decorative panel in the assemblage technique is ready. I hope that each of you let a little soul into this picture. Now this panel will delight you, your children, guests, taking its rightful place in our school.

I propose to summarize our master class. What was the most important, in your opinion? Maybe somewhere there were difficulties? What seemed the easiest? There are palms in front of you, your children made them. Choose the one that suits your mood. If you liked everything, it was interesting and you come again to such an event - choose a green palm, if it was difficult, but in principle you liked it - yellow, if you didn’t like it and you didn’t understand anything - red. Now let's take a magnet and make our tree. If you have any wishes or want to speak, you can do it right now. Thank you for participating! We will be glad to see you again!
Municipal budgetary educational institution
secondary school in the village of Norovka


Developed by:
Primary school teacher
Naumova T.V.