How to sew such wonderful gloves? Find out in the master class below.
How to make a pattern? If you are sewing gloves for medium-sized ladies’ hands, then an A4 sheet of paper is enough for the pattern. Fold the sheet in half. Place your hand on this sheet so that your thumb is on the fold side.
and trace it along the contour (I think many had fun with this in childhood). In this case, it is necessary that the fingers are not pressed against each other and are not spread apart. They should be in a free and natural position. In addition, everything is outlined except the thumb, which will be cut out separately. Next, mark on the fold point “A” - the upper base of the finger and point “B” - the lower base of the finger.
After this, you can cut out the pattern without unbending the leaf. Don't forget that you don't need to cut the fold. You just need to cut out the pattern along the outline and cut out an oval on ONE side of the pattern. The result should be this:
Next, draw an oval equal in height to “AB”, and in width to about half “AB”.
Cut out an oval.
Now the pattern can be transferred to the fabric. Don’t forget that we have a RIGHT hand and a LEFT hand, that is, we need to cut out two parts in a mirror image.
The thumb is cut out separately. The thumb pattern looks something like this:
The length of the “CFD” line should match the full length of the oval cut on the main pattern piece.
Further, since our fingers are not flat, but have a certain volume, then for the fingers we need to cut out an additional ribbon (or several ribbons) to sew them on the inner sides, where the fingers touch each other if they are pressed against each other. The width of the tape should be approximately 0.8 - 1.0 cm (in general, this depends on the thickness of the fingers and seam allowances, and is selected according to the situation)
Now, onto the actual sewing. If you are cool and very good at sewing very small details on a machine, then you can sew everything on a machine using some kind of knitted stitch. I personally am not capable of such virtuosity, so I sew gloves by hand using a “back needle” seam.
It’s convenient to start sewing with your little finger (although you can also start with your index finger). If you start sewing from the little finger, then you must first sew PART of the side seam of the glove.
I draw your attention to the fact that you should not sew the entire side seam at once if you later plan to somehow decorate the edge of the glove (for example, sew lace to it)
You can sew a single ribbon, or you can make separate ribbons (three in total for each glove) at the spaces between the fingers. It makes sense to make separate ribbons if your fingers are thin. In this case, it is advisable to bring the ends of the ribbons “to nothing” at the ends of the fingers so that the fingertips of the glove do not turn out thick. If the fingers are quite large or simply plump and even from base to tip, you can sew a single ribbon along the entire length from the little finger to the index finger.
Once you have sewn all four fingers together, you can begin sewing in the thumb. First, you need to fold the part in half with the wrong side out, aligning points “C” and “D” and sew the part along the “CE” line. Then I recommend basting the finger to the hole cut out for it, and only then carefully sewing the needle back with a seam.
After the thumb has been sewn in, you can decorate the bottom of the glove with lace, or decorate the glove itself in some other way. At the end, sew the side seam to the end and the glove is ready.
It is best to sew your first gloves from GOOD STRETCH fabric. When you become ace, you can sew from anything
Further. How to make a pattern? If you are sewing gloves for medium-sized ladies’ hands, then an A4 sheet of paper is enough for the pattern. Fold the sheet in half. Place your hand on this sheet so that your thumb is on the fold side

and trace it along the contour (I think many had fun with this in childhood). In this case, it is necessary that the fingers are not pressed against each other and are not spread apart. They should be in a free and natural position. In addition, everything is outlined except the thumb, which will be cut out separately. Next, mark on the fold point “A” - the upper base of the finger and point “B” - the lower base of the finger.

After this, you can cut out the pattern without unbending the leaf. Don't forget that you don't need to cut the fold. You just need to cut out the pattern along the outline and cut out an oval on ONE side of the pattern. The result should be this:


Cut out an oval.

Now the pattern can be transferred to the fabric. Don’t forget that we have a RIGHT hand and a LEFT hand, that is, we need to cut out two parts in a mirror image.
The thumb is cut out separately. The thumb pattern looks something like this:

The length of the “CFD” line should match the full length of the oval cut on the main pattern piece.
Further, since our fingers are not flat, but have a certain volume, then for the fingers we need to cut out an additional tape (or several tapes) to sew them on the inner sides, where the fingers touch each other if they are pressed against each other. The width of the tape should be approximately 0.8 - 1.0 cm (in general, this depends on the thickness of the fingers and seam allowances, and is selected according to the situation)
Now, onto the actual sewing. If you are cool and very good at sewing very small details on a machine, then you can sew everything on a machine using some kind of knitted stitch. I personally am not capable of such virtuosity, so I sew gloves by hand using a “back needle” seam.
It’s convenient to start sewing with your little finger (although you can also start with your index finger). If you start sewing from the little finger, then you must first sew PART of the side seam of the glove.

I draw your attention to the fact that you should not sew the entire side seam at once if you later plan to somehow decorate the edge of the glove (for example, sew lace to it)
You can sew a single ribbon, or you can make separate ribbons (three in total for each glove) at the spaces between the fingers. It makes sense to make separate ribbons if your fingers are thin. In this case, it is advisable to bring the ends of the ribbons “to nothing” at the ends of the fingers so that the fingertips of the glove do not turn out thick. If the fingers are quite large or simply plump and even from base to tip, you can sew a single ribbon along the entire length from the little finger to the index finger.


Once you have sewn all four fingers together, you can begin sewing in the thumb. First you need to fold the part in half with the wrong side out, aligning
points “C” and “D” sew the part along line “CE”. Then I recommend basting the finger to the hole cut out for it, and only then carefully sewing the needle back with a seam.
After the thumb has been sewn in, you can decorate the bottom of the glove with lace, or decorate the glove itself in some other way. At the end, sew the side seam to the end and the glove is ready.


In the last photo, I had to move the edge of the glove towards the hand, because photographing my own hands is very inconvenient, and the entire glove does not fit into the frame.
I hope that my instructions will help someone learn how to sew gloves
The fashion for such an accessory as fingerless gloves for an elegant dress appeared in the distant Middle Ages. At that time, only girls and ladies belonging to the upper class could afford it. Today everything has changed. Any young lady, even if she is in elementary school or goes to kindergarten, can flaunt in pretty gloves that are in harmony with her festive outfit. Let's try to figure out how to sew gloves for a girl to go with a dress.
Style options
Babies in ball gowns for children's parties look charming. A miniature handbag, jewelry and gloves will complete the look. You can purchase ready-made gloves or sew them yourself. Here are some options for styles:
- Mitts. This is one of the simplest, most popular and comfortable styles. The fingers remain open. The back of the hand and the arm up to the elbow or mid-forearm are covered. An option above the elbow is also possible, but it is not entirely comfortable, especially for a little fashionista. The product is held in place by a loop for the middle finger.
Important! The main advantage of mitts is their versatility. They look great with a chic ball gown or a more modest day dress.
- Gloves with completely closed fingers. Their length, as in the case of mitts, can be different. You can choose a model to the elbow or a short version.
Manufacturing materials
The most common fabric options when you need to sew gloves for a girl to go with a dress are:
- Guipure.
- Lycra.
- Chiffon.
- Brocade.
Naturally, each material has its own characteristics:
- The most comfortable products to wear are those made of elastic materials, such as lycra. These gloves fit your hand like a second skin, they fit your hand, so they are very comfortable.
Important! Despite the fact that lycra is an artificial material, it is highly breathable. Therefore, the girl will feel great, and accessories will not cause her discomfort.
- Inelastic fabrics, such as brocade, may be beautiful, but they will cause a lot of inconvenience for the young fashionista. In order for the accessory to fit well on your hand, you will need to insert elastic bands. The interval between the elastic bands is about 5 cm.
Important! The difficulty is that you need to select them so that the product does not slip off your hand and, at the same time, does not squeeze it.
- Currently, you can find chiffon, brocade or guipure with elastic thread on sale. These are the fabrics that should be used for sewing.
Decoration methods
You can decorate children's gloves in various ways. The most common and win-win option is decorative faux pearl buttons sewn in a row. You can use rhinestones, lace, satin bows.
Important! We must not forget that the finishing of the dress and gloves should be in harmony with each other. If, for example, you sewed a dress from rubber gloves with your own hands, then you need to select the appropriate accessories.
How to properly combine gloves with a dress?
Many questions arise here. Is it necessary for the accessory to be in the same color scheme as the dress? Or is a contrast possible? Are the lengths of gloves and dresses related to each other? Is it necessary for the texture of the materials to match?
Here's what to take into account:
- There is one rule: a short-sleeved dress goes well with long accessories. For an outfit with puffed sleeves, items up to the wrists or mid-forearm are appropriate.
- If the texture of the dress and accessories coincide, then such an ensemble looks especially elegant. But this is not at all necessary. Modern fashion is very democratic; there are few too strict rules in it.
- Another interesting option is to use gloves as an accent color. In this case, you need to support the color with some other accessory. This could be a handbag, belt or shoes.
Important! The main thing is to observe moderation. There should not be more than 3 colors in one image, otherwise it’s easy to slip into eye-catching variegation.
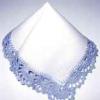
How to sew gloves from guipure? Pattern and master class
Let's consider the simplest option - mittens made of guipure with stretch.
To work you will need:
- Wide stretch lace. The length of one piece is equal to two palm circumferences plus a small seam allowance.
- Threads in the color of lace.
Operating procedure:
- Cut two blanks taking into account 0.5 cm seam allowances.
- Fold the workpiece in half.
- At the top, secure the seam over the thumb.
- Then leave an unstitched area for the thumb.
- Since the palm is wider than the hand, narrow the product under the thumb, the width of the hand.
- Adjust the width carefully.
- Sew the workpiece using a sewing machine using a zigzag seam or sew by hand.
- Secure the flaps of the fabric in the finger hole area.
Video material
Elegant do-it-yourself openwork guipure gloves are ready! After all, step-by-step instructions are easy for everyone. They are easy to sew and look just great on a girl’s hand. And with the help of practical tips from this article, you can also combine them correctly with an elegant dress.
Before you begin working with leather, it is best to make a test glove out of cotton or muslin.
You will need:
- soft skin
- pattern paper ()
- skin tone threads
- scissors ()
- pencil
- sewing machine
Step 1
Take a piece of paper and fold it in half. Place your hand on the folded edge of the paper so that your thumb remains outside the paper. Leave some space between your index finger and the edge of the paper. Spread your fingers slightly and circle your hand, leaving 3 mm above the fingertips and on the side of the little finger. When drawing between your fingers, start at the little finger and spread your fingers only to make dots in the narrowest places. It is important that the lines between the fingers are parallel.Step 2

Mark with points B and C the place where the thumb fits into the hand. Draw a vertical line from A (this is the point at the top of the space between the index and middle fingers) and horizontal lines from B and C. Draw an oval for the thumb hole.

Cut out the pattern.
Step 3

To make the pattern for the gusset, place your finger on the edge of the paper and trace each one (except the large one) with a pencil and cut out.
Idea: Use threads in contrasting colors to highlight the leather color of the gloves. For decoration, use small bows, embroidery or frills
Step 4

Connect the corresponding fingers to the gussets: index finger to middle finger, middle finger to ring finger, ring finger to little finger. Circle each pair of fingers. Label each finger.
Tip: when sewing gloves, choose thin and smooth leather. It should be elastic, but only in one direction - along the width of the glove, otherwise it will stretch greatly when worn.
Step 5

Before cutting, draw a curve at the bottom of each insert. Cut your patterns along this curve. Your three gussets will look something like this.
Step 6

Make a pattern for the thumb. Circle it around your finger. At the midpoint of the gap, draw the “wing/flap” to the right, then draw the pattern. At this stage you only draw half of the pattern. At the tip of the thumb, add some seam space since the thumb doesn't have a gusset. Fold the paper in half and draw the outline of half of the pattern you just drew.
Step 7
Do a test fitting first. Before you start working with leather, it's best to make a test glove out of cotton or muslin to make sure the pattern is correct. Use a contrasting color of thread so you can easily see where you are sewing and where you need to adjust the pattern. Once you get the pattern right, you can make as many leather gloves as you want without a test piece.Step 8

Pin the pattern piece to the back of the leather, placing the longest side of each gusset toward the back of the hand (where there is no thumb hole). Sew with a broken stitch, 3 mm from the edge. If you need to adjust the shape of your fingers, do it now.

Turn it inside out and try it on.
Step 9
Fold each piece of the thumb piece (right sides facing each other) in half lengthwise and sew. Leave the bottom open. Trim the corner so that the right side is facing out. Turn the thumb piece right side up.Step 10
Pin right sides to the glove, lining up the seam of the thumb piece with the seam of the index finger. Try on the glove to make sure it fits. Adjust if necessary. The "wings" of the thumb piece may need to be trimmed to fit well. Pin again and try on. Once everything is good, sew the thumb piece to the glove.Step 11
Sew the sides and hem the bottom of the gloves.Photo: Sweet Living (5), sergey titov, LenLis /Fotolia.com, Legion-Media, Crafty magazine 3/2015
Material prepared by Anna Soboleva
There are different types of gloves. But they all have two goals - to protect hands and to bring beauty. You can protect your hands from cold, sun, electricity during certain types of work, and from detergents during cleaning. Then, probably, it doesn’t matter at all what they look like, as long as they efficiently cope with the protective function assigned to them. But those gloves that are not intended for work must be beautiful. A pattern of gloves so that you can make them yourself and to an individual size will help you get a high-quality wardrobe accessory.
Sew for benefit and joy
The beauty of gloves is not only about style and fashion. They can also be beautiful for their special purpose, for example, a glove doll, the pattern of which is extremely simple, but allows you to create an amazing toy. Its peculiarity is that almost every finger of the hand becomes part of a fairy-tale character. Usually the head is attached to the index finger, the middle and thumb become hand-paws, the ring and little fingers most often do not participate in the game, but can create additional volume, for example, if the toy is a fat teddy bear. It’s not too difficult to sew, it’s a do-it-yourself glove doll. Patterns for it can be divided into two parts - the head of the toy and the glove itself. For such fun, you can “borrow” a head from a plastic toy or a rubber “squeaker”. But you can make a pattern like this:
- Place the right hand of the person who will play with the glove toy on a piece of thick paper, placing the thumb and index fingers separately, and joining the middle, ring and little fingers together.
- Trace the outline, it will turn out to be three-fingered.
- In the same way, follow the same contour around your left hand, aligning the middle finger of both hands.
- Make the outline of the index finger a little wider so that later, during the process of sewing the glove, you can insert a cardboard or plastic stop tube attached to the head of the toy. However, if the fabric for the glove is thick enough, for example, faux fur or thick drape, then this step can be omitted.
- Combine two contours by drawing common lines.
- Add a centimeter to the looseness of the fit, as dressmakers say, trace the outline of the glove again and cut out the pattern.
You can immediately cut out two halves of a glove from the fabric by folding it with the front side inward. You can sew the body with an overcast stitch over the edge - the seam will securely connect the parts and prevent the fabric from fraying.
The selected head is attached to the glove using glue and thread and a needle. If plastic or rubber can be pierced with a thick needle or awl, then the head can be sewn on, but still coated with glue for reliability. However, you can immediately draw the contours of the toy’s head on the pattern and cut everything out in one piece to sew it together.
Apply the necessary decor corresponding to the character to the body glove. The toy glove is ready.

For autumn coolness and joyful days
But still, a glove in the form of a toy is an accessory for playing with children, which will mainly be of interest to parents and kindergarten teachers. The vast majority of people need gloves to protect their hands from the cold. A glove pattern that will help you create exactly what is needed for the weather is much more difficult to construct than a toy pattern. An accessory that protects hands from the cold must be not only beautiful, but also comfortable, so designing it is a painstaking task, each finger must feel comfortable, and if four fingers can still be somehow arranged by drawing the outline of the hand, then for the thumb a separate cutting detail is needed. The pattern for leather gloves will be exactly the same as for gloves made of suitable fabric. The difference will be in the tailoring. It’s easier not to create a pattern, but to find a suitable palm size.

Individual glove pattern
It's easy to sew gloves with your own hands. Patterns are the main problem. Most often, if they catch your eye, they are standard and of a fairly large size. But it’s better if you sew a convenient accessory with your own hands, so that the pattern of the gloves is ideal for your own palms. Therefore, you should do this:
- Fold a piece of paper in half so that your palm fits on one side.
- Place your hand on the piece of paper so that the fold of the sheet is along the outer edge of the index finger.
- Close four fingers and put the thumb aside. Carefully draw a pencil perpendicular to the sheet and trace your palm.
- Mark the length of your fingers by making dots with a pencil.
- Draw the outline of the palm with fingers.
- Transfer the resulting drawing to the second half of the sheet strictly symmetrically (you can use the student’s method - through glass).
- Divide the outline of the index finger exactly in half, drawing a line down.

- Place your palm on the pattern, turning it slightly to the side and placing your thumb aside, mark the two intersection points of the line on the pattern and the thumb as shown in the figure below.

- Copy points symmetrically about the axis.
- Using the drawn points, construct an oval - a hole for the thumb.
As shown in the figure below, construct a dart to fit the thumb freely. The shading indicates the place that will need to be cut.

Thumb Pattern
In order for the glove pattern to be extremely comfortable, it is necessary to correctly construct the pattern for the thumb. It's done like this:
- The sheet of paper is folded in half again.
- You need to place your thumb on the sheet and outline its outline to the points along which the palm pattern was drawn.
- Move the contour of the finger to the symmetrical side.
- Unfold the sheet and draw a pattern for the thumb, taking into account that the seam will run along the inside and not the outside.

Every finger is in a house
In principle, the pattern is ready if you want to sew mittens. But in order to get a high-quality glove pattern, each finger should be placed in a separate “house”. To do this you need to make patterns. Trace each finger along the contour, alternately on one side and the other, placing it on the edge of the table with the inside facing the sheet. It is imperative to mark the lower connection points of the finger and palm from the back and from the side of the palm, since the bottom line of each pattern will be inclined, which is due to the anatomy. Don’t forget to indicate on each pattern which finger should be connected to which one, so as not to get confused during the assembly process.

The cuffs are so different
So, the glove pattern is ready. All that remains is to come up with and cut out the cuffs. They can be completely different. Thus, the pattern of men's gloves implies not too long straight cuffs. But women's gloves can have not only the cuffs you like, but also absolutely any length. It is clear that elegant guipure gloves can be almost shoulder-length. Then the glove pattern is supplemented with a hand pattern to the required length. When all the details are cut, you can sew this accessory.

Mitts - gloves without fingers
Mittens are most often used by those who, for some reason, are not very comfortable wearing gloves, and their fingers should be “free.” Or they can be a summer version of this accessory. And mitts are also loved by athletes, cyclists, for example. The pattern of fingerless gloves is based on the same principle as regular gloves. The only thing is that the length of the fingers depends on the wishes of the future owner. In mitts, the pattern of the thumb is important, while other fingers can do without special tracing of each detail. If fingers on the glove are not needed at all, then an interesting accessory is sewn, which only has a correctly constructed hole for the thumb. Next, the pattern for fingerless gloves is simply cut off at the level of the beginning of the first phalanx of the fingers.

For all occasions
A well-designed pattern of gloves for a specific hand will allow you to sew any protection and beauty for your hands - summer openwork, winter fur, elegant brocade, sports made of elastane - gloves will become a necessary accessory, and, moreover, fit perfectly on the palm. If you carefully design your own gloves, both sewing and wearing them will be a pleasure.