Today we will talk about such a nuance as tying handkerchiefs. A handkerchief is an indispensable attribute in our lives. After all, every person carries it in their bag or pocket. Typically, handkerchiefs are made of cotton, which provides good absorption and is hypoallergenic. However, recently many women have been trying to somehow decorate and modernize a handkerchief with their own hands.
Crocheting handkerchiefs: a simple knitting pattern
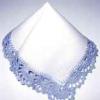
Handkerchiefs can be tied using a border made of thin cotton thread, which can make the handkerchief more beautiful and delicate. In order to trim an ordinary scarf with such a border, we will need thin cotton yarn, a hook with the required number and, of course, the ability to knit lace.
Even if you are new to this business, do not be discouraged. Having the necessary skills to knit the simplest lace, you can confidently begin to modernize and decorate your handkerchief. This way, you will not only be able to decorate a scarf, but also acquire the necessary skills that can be very useful to you in later life.
First you need to knit the first few rows with regular knitting, and then you can start knitting lace according to the required sizes.

Shuttle lace binding
It will be very beautiful if the border of the handkerchief in the knitting pattern is knitted with shuttle tatting lace with your own hands.
To sew a scarf in this way, you must first steam and iron the scarf. Then you need to pin the lace onto it evenly so that it extends slightly over the edges of the scarf.
Next, along all the lines of the inner edges of the lace, you need to pull out one thread from all sides of the fabric. Then break off the lace and trim the edges of the fabric above approximately 2.5 mm of the pulled threads. The extra 2.5 mm should be folded in half and the folded edges should be sewn with a buttonhole stitch using the thread used to weave the lace.
Only after all this can you take a thick piece of fabric, which must be even, pin a scarf on it and the finished lace on it. Next, you need to carefully sew the lace to the fabric of the scarf without pulling the thread. The binding is complete.

The border of the handkerchief can be made in another way (using a different knitting pattern).
First, process the edges of the scarf, then start knitting the lace and while knitting it, connect the lace to the fabric using picot. However, this method should only be used if you are absolutely sure that the sizes of the scarf and lace match.
How to tie a cambric scarf
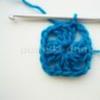
1. Prepare cotton threads, a thin hook, choose an openwork pattern for knitting. Please note that the thickness of the threads corresponds to the size of the hook. For cambric scarves, buy simple threads number sixty; decorate linen items with “beautiful” or “iris” balls. Use a straight steel hook of the first size.
2. Wash the scarf and iron it thoroughly. Choose a simple method - work without preliminary coating. When tying in the first row, carefully pierce the fabric with a crochet hook and crochet three stitches in one hole. Work one row according to this pattern, adding three loops in each corner of the scarf.
3. Then knit according to the following pattern: five air loops, one tight stitch punctured into the fourth loop of the initial row (hook the ball of yarn with a hook, pass it through two loops). Repeat the pattern until the end of the row, and add five loops in the corners.
4. Knit the third row in the same way as the previous one, but insert a tight column into the middle of the cell, which was formed from five air loops. Each time, widen the corners of the border so that the product is even. In the fourth and fifth rows, repeat the technique, securing the air piques in a checkerboard pattern.
5. An original method of crocheting finished braid. Measure around the perimeter of the handkerchief, buy the required length of tape with a thin edge. Tie it according to the chosen pattern, sew it to the scarf, not forgetting to carefully bend it at the corners.
6. You can combine tight and airy loops and single crochets in openwork. A handkerchief tied with colored threads looks original and unusual. An ordinary piece of fabric can turn into a real masterpiece in your hands, which is not only used for its intended purpose, but also proudly shown to your friends.
Video materials on the topic of the article
How to knit an openwork border:
How to crochet a tablecloth:
How to tie a napkin:
How to tie any fabric:
Do you think why sew a scarf yourself if the stores are full of them for every taste and color? The answer is very simple: a thing made with your own hands is much better than a purchased standard. After all, you put all your soul and imagination into it. You can sew exactly the scarf that you like yourself, rather than choosing from existing copies. So let's see together how to sew a scarf yourself!
Sew a neckerchief
To work, you need to prepare the fabric from which you will sew, scissors, threads according to color, and, preferably, a sewing machine, since manual work will take a long time.
- Don’t be afraid to sew, even if you have never done it before, believe me, sewing a neckerchief does not require any super knowledge and experience. The blank for the future scarf can be in sizes from 40X40 to 90X90. Here you choose for yourself, but remember that a beautiful scarf should only have the shape of a regular square.
- Lay out the selected fabric on a flat surface so that there are no wrinkles anywhere. Using soap or a simple pencil, mark the desired size of the future scarf. Don't forget to add an additional 1 cm from each edge; this is the hem allowance for the edge. Done? If yes, then we can now cut out our blank.
- We turn the fabric on each side by 1 centimeter left and baste. Please note that if the fabric frays, you need to fold the edge not once, but twice! Of course, if your home or friends have an overlock machine, you can use it to finish the edges.
- After you have stitched the basted edge, inspect it carefully for any defects or gaps. If you are satisfied with everything, then you can safely remove the basting thread.
- Having smoothed your masterpiece well with an iron, you can safely wear it, and definitely be proud of yourself. Now, you already know how to sew a neckerchief yourself!
Learning to sew handkerchiefs
We have already mastered a large handkerchief, so let’s sew together small handkerchiefs, they, of course, are never superfluous. It is better to choose fabric for them with a natural composition. Like last time, we will need the same materials and tools. All you need is the right fabric, scissors, thread and a little patience.
- We cut blanks of handkerchiefs, the size and shape of which you can choose yourself. Small square scarves are sewn for children, slightly larger ones for women, and men's scarves are the largest. Remember to always add an extra couple of centimeters to the hem.
- First, we bend the edge by 1 cm and sew a stitch on a typewriter. It is better to use a blind stitch foot.
- Then we fold the edge again and stitch it too, but now you can use a decorative stitch for variety.
We told you about the easiest way to process the edges of handkerchiefs. A special Moscow seam is also often used for this. The question of how to sew a handkerchief at home without outside help should no longer cause you any difficulty. It is worth noting that today handkerchiefs are not only an item of personal hygiene, but also a wonderful gift. After all, the product can be decorated with wonderful embroidery or applique!
A pocket square cannot be called a mandatory accessory for a man, but I have 7 reasons that will convince you not to leave this wardrobe item and will make you stand out among your colleagues and emphasize your elegance. You won't have any difficulties if you want to know how to fold a pocket square. I bring to your attention the 5 most popular options.
Reasons to wear a pocket square
- A pocket square adds variety in color and brings life to your look.
- A pocket square is the perfect complement to your tie.
- A pocket square instantly adds a touch of sophistication and elegance to your look.
- Using a pocket square allows you to both support the dress code and emphasize the informality of your outfit.
- This is perhaps the best "sophisticated" accessory that won't break the bank.
- Folding the same pocket square in different ways allows you to wear the same suit but still have a different look every day.
- After all, a pocket square is a piece that will allow you to create a personal style that is unique to you.
By the way, if you have not yet purchased a pocket square for yourself or as a gift, visit our online store Bowandtie Shop Gallery in . We always have men's scarves in stock and at affordable prices.
Method number 1 is classic, simple and elegant.
This method of folding a scarf is called “Presidential”. It is one of the easiest ways to fold a scarf. This method is best suited for formal meetings and is used with a classic black tie. Typically, a classic pocket square is made from silk or linen.
Method No. 1 “Presidential”
Instructions:
- Place the pocket square on any surface, with the flat side facing you.
- Fold the scarf exactly in half.
- Fold the bottom corner of the scarf, leaving a small space at the top (about 2-3 cm), depending on the depth of your pocket.
- Place the pocket square in your jacket pocket and straighten the fabric to avoid wrinkles. Attention! The scarf should not hang out of the pocket, folding in half.
Method number 2 – “With one corner”
Another popular way to fold a pocket square is “One Corner”. It fits any type of dress code. I recommend using a colored scarf, not white.
 Method No. 2 “With one corner”
 Instructions:
- Fold the scarf in half.
- Finally, place the pocket square in your jacket pocket.
Method #3 – Interesting & Difficult
If you want to stand out a little or add a less formal touch to your look, I recommend this method of folding a pocket square. Sometimes called "Two corners on top" It matches any scarf with a checkered pattern. In addition, you can use not only silk, but also scarves made from other fabrics. Personally, I choose scarves with patterns or “monograms”. It looks very unusual and at the same time fits a formal dress code.
 Method No. 3 “Two corners from above”
 Instructions:
- Place the pocket square on a flat, clean surface, with the angle facing you.
- Fold the left edge slightly beyond the center.
- Same thing on the opposite side.
- Finally, place the pocket square in your jacket pocket, carefully tucking out the top edges.
Method number 4 – “Crown”
This type of pocket square fold is sometimes called the “three corners up” or “crown” fold. Ideal for patterned and colored pocket squares. While this style would work better with formal wear, I think pairing it with a blazer or cardigan will make your look just as sophisticated.
 Method No. 4 “Crown”
 Instructions:
- Place the pocket square on a flat, clean surface, with the angle facing you.
- Take the bottom corner and pull it towards the top, placing it so that you get two corners or “mountains”.
- Take the left edge and pull it towards the top so that you have three corners or “mountains”.
- The remaining right corner must be folded exactly 90 degrees and, with effort, prevent the scarf from turning back.
- Place the pocket square in your jacket pocket.
Method No. 5 – “Donut” or informal method
This method of folding a pocket square is sometimes called the “Pumpkin” fold. It's perfect for a more casual outfit (if you want or). In my opinion it works best on a patterned scarf or as a square design. Suitable for a checkered shirt or a shirt with polka dots, with patterns (we also call such shirts “with cucumbers”). Folding a scarf this way is unlikely to go well with formal wear or a formal suit.
 Method No. 5 “Donut”
 Instructions:
- Place the pocket square on a flat surface.
- Now “pinch” the pocket square in the center and pull it up.
- Pull out the scarf as shown in picture No. 3.
- Next, turn the scarf upside down.
- Finally, place the pocket square in your pocket and fold up the loose ends. It will look quite uneven, but that's how it should be.
How to fold a pocket square: 3 ways - video
Finally
And finally. A pocket square for a stylish gentleman is a decorative accessory and cannot be used to wipe a girl's nose or tears. For these purposes, you need to have an ordinary cotton scarf, which is usually stored in the back pocket of your trousers or the inside pocket of your jacket.
How to sew a handkerchief and 3 ways to fold it
Friends, it's time to show off. Guess what this means? You need a pocket square on your chest.
There's nothing hotter than a man in a suit, and especially a man in a suit with handmade accessories. Of course, store shelves are full of different pocket squares, but why be lazy when you can show your personality by getting your hands a little dirty and making your own pocket square? Even if you have not taken cutting and sewing courses, you will easily master this lesson. It's simple. We'll help you fold small origami pieces of fabric to turn them into perfect pocket squares. Don't forget your thimble and let's get started.
- Cut a square from the fabric. In general, the sizes of pocket squares range from 25x25 cm to 43x43 cm. We recommend taking a larger size, that is, 43x43 cm.
- Create a fold by folding one side 0.5 cm and immediately ironing it. Then fold this side again and iron it to avoid wrinkled edges. Repeat this action on all four sides of your scarf.
- Sew the edges of the scarf using a sewing machine.
- Roll up your scarf and put it in your pocket. Looks good!
Try to cut a perfect square. You may need additional fabric if you don't get it right the first time. We cut out 43cm x 43cm squares, but any size from 25cm to 43cm will do.
To make a hem, fold the edge of the square and iron it. After that, fold it a second time and iron it again. Repeat this step for all four sides of the square.
Place the fabric under the sewing machine needle, lower the presser foot and begin sewing by quickly pressing the foot pedal, then switching the machine to backstitch. Then continue stitching across the square. When you reach the corner, leave the needle in the fabric, lift the foot and turn it 90 degrees. Lower the presser foot and continue sewing. Carefully trim the ends of the threads. 

Presidential fold
The presidential crease seems to tell us: “I am a player. I know I look like a bad guy, but feel free to stare at me, I don't mind." 
Fold the scarf vertically once. Match the top and bottom to create a smaller square. Place the handkerchief in your pocket as you did before. Ready. 
Two corners
This option is suitable for stylish guys who like to add details to their look. The handkerchief, folded in half, sticks out slightly, as if it wants to say “Hello” to us. 
Fold the square vertically once. Connect the top and bottom, making a smaller square. Rotate it 45 degrees to create a diamond shape. Bend the bottom corner, moving it slightly to the side. Connect the right and left corners and turn your scarf from the wrong side to the front side. Ready. 
Rolled up cloud
If you feel a strong desire to change your style and ditch the classics for the sake of impudence and impudence, this method of folding a scarf is for you. 
Fold the square vertically, connecting the top and bottom to create a square. Rotate the square 45 degrees so that the diamond is in front of you. Then connect the top corner to the bottom. 
Fold the corners down so that the different sides of the fold line meet in the middle and form a large crease at the top center. Then turn the corners inward. Ready. 
So many ways to fold a pocket square, but so few reasons to wear a suit. Maybe it's time for Unusual Fridays? 
Wear a suit and wow everyone with your pocket square!
Impressive, right? In addition, it is very relevant right now, in the fall. We have already purchased! You can purchase Aqua Reservation HERE.
Sewing lessons from Klepacheva Larisa.Seam "Moscow"
“I bought these cute handkerchiefs! More precisely, not handkerchiefs, but a coupon with handkerchiefs.
Let's cut the coupon and think about how best to process the edges of the handkerchiefs.
What is there to think about, - someone will say - Under the overlock and overcast.
Oh, I don't recommend it. Look how thin and sparse the fabric is, you can see every thread.
This means that the threads do not hold onto each other well, and the overcasting stitch will quickly fall off the edge along with the threads.
And you need a thin, narrow scar. Whether you sweep it or not, it’s unlikely to work out neatly. And you and I will cheat, we will do it Moscow seam
We bend the edge of the fabric by 3-5 mm (the less, the better) and stitch close to the fold (the closer, the better).
Just don’t try to cover it up, it won’t work. We cut the hem close to the stitching, leaving only 2-3mm.
We bend it again (the smaller the better) and make a second line, trying to fit into the first (the more precise, the better).
As a result, one line is visible on the front side, and two on the back, but these two are as one. This is so wonderful Moscow seam for elegant edge finishing. And the edges won’t fray, unlike store-bought scarves.
But, if we didn’t manage to hit the first one exactly, it’s okay, our nose won’t notice it. But if you want to sew a chiffon scarf with such a seam, then you will have to try.
There is another name for this seam - American. But I don't like it. What do Americans have to do with it?"
How to treat corners without chewing?
“What should I do if the machine “chews” a corner on thin fabrics?
If you have a thin and sharp needle, the hole in the needle plate is small, the teeth of the feed dog are adjusted, and the presser foot presses the fabric well, then you can carefully handle the corners on thin cotton fabrics such as cambric, but with silk fabrics it will be more difficult.
My way of processing is like this.
I never process all sides of a silk scarf or scarf in one go. I process each side separately.
I sew the first line of the Moscow seam on two opposite sides, cut off the excess fabric, then work on the other two sides.
I start the second line of the Moscow seam approximately 4 cm from the corner to the end of the side.
Then I return to the beginning of the line and from this place I sew the line in the other direction, i.e. I sew a stitch on the remaining piece of edge.
The order of processing on the sides is the same as with the first line, first two opposite sides, then two other opposite sides. It turns out that I process each side in two steps, but it turns out evenly and neatly.
I carefully hide the ends of the threads with a needle inside the seam.
Hem - hem
The easiest way to process the bottom of a product is to process it with a hem seam.
Fold the edge of the product inside out once, then again. The first time we bend it by 0.5 - 1 cm, the second time by 1 - 4 cm, the width of the hem depends on the type of product and the properties of the material.
Secure the hem using pins, hand stitches, or directly with a machine stitch.
Whether or not to temporarily secure hems with pins or hand stitches depends on your ability to handle the fabric.
It will not be possible to carefully iron a hem 5-10mm wide without experience. It is much faster to pin or sweep.
Better yet, learn to do without hand stitching. Buy fabrics for kitchen towels and practice. The benefit is double: you’ll gain a skill and new towels for the kitchen.
The line is laid near the fold itself.
Kitchen towel fabric is rewarding and very easy to work with. So while I was writing a post and cutting up the towels.
By the way, do you know that in Russian the word will cut b matters shorten. Indeed, my towels have become shorter by as much as 4 cm.
Therefore, never forget to leave extra fabric for hemming.
Processing the ruffle with a zigzag stitch
We bend the edge of the ruffle to the wrong side by 5 mm and lay a stitch so that the right needle stroke hits the right of the fold, and the left one hits the fabric.

We process both sides of the ruffle; by stretching the oblique cut, the edges acquire a beautiful wave-like shape.

Next, carefully use scissors to cut the hem of the fabric close to the stitching.

We adjust the ruffle with the formation of gathers.

I made the gathers without auxiliary stitches, simply feeding the ruffle under the foot with some slack and putting in small folds. If it’s so difficult for you, you can pre-lay auxiliary lines to form gathers.
The width and length of the ruffle when cutting depends on the type of material and the length of the area where the ruffle is being sewn. Thin fabrics require more gathers, thick fabrics require less. The length of the ruffles cut along the bias may be less than the length of the ruffles cut along the transverse thread. And so on. Therefore, it is unrealistic to say unambiguously how much fabric will be needed for the ruffle. One can only guess based on the following data.
The length of the ruffle should be 1.5 - 2 - 3 times greater than the length of the stitching area.
Attaching a hidden zipper
When the first “Burda Moden” magazines appeared in our country, I was delighted. Of course, the magazine not only contains high-quality patterns for all sizes, but also sewing technology. But after carefully reading the technology, I was disappointed.
The technology in the magazine is presented in a formulaic manner without taking into account the specific features of the model; the processing methods offered are far from the most rational.
For example, sewing in a hidden zipper. Burda presents a very inconvenient option. There is a much simpler and more effective way. We'll talk about it today.
The main difference between the method under consideration and the Burdov method is that the seam in which the fastener will be located must be sewn down before attaching the zipper. The unstitched area for the zipper should be 2 cm shorter than the length of the zipper.

The seam allowances along the edges of the fastener can be strengthened with adhesive if the fabric is loose, thin or stretchy.

Draw the lines of the fastener edges on the product as a continuation of the seam line. You can iron the folds of the fastener.

Open the zipper, place the zipper right side on the front side of the product, placing the edge of the links on one side of the zipper along the marked line of the edge of the zipper. Pin with tailor's pins.

Sew one side of the zipper with two lines. The first line secures the outer edge of the tape and runs at a distance of 2-3 mm from the edge of the fastener tape and along the entire length of the tape.

We perform the second line using a special single-horn foot. At the beginning of the stitching, use your fingernail to mark the zipper links and place the stitch strictly next to the links.

It is advisable to sew the stitch without backtack so that you can back it up a little at the end if necessary. The stitching line should be a continuation of the stitching seam and, accordingly, should end where the stitching seam begins
After stitching one side, close the zipper. Align the folded edges on the fastener area of the product and pin the other side of the fastener with pins.

Open the zipper. Sew first the outer side of the fastener tape.

Place a second stitch next to the links using a single-foot (same as for the first side of the zipper, see above).
Tie the remaining ends of the zipper stitching threads into a knot and secure. At the end of the fastener, tack by hand.
The knot is ready, you can iron it