Who are Smeshariki and what they mean in the lives of little fellow citizens, we think there is no need to explain. Yes, indeed, these are long-loved and still relevant heroes for our kids, and if this is so, then we need to take advantage of it. You ask how!? It’s not enough for our children to sit at the computer or TV playing games and watching cartoons; they also need to acquire more life skills: working with materials, abstract thinking, and the ability to work with their hands. All this can be realized if you glue together several figures from animated films - Smeshariki.
So, we will talk about smeshariki, or rather how to glue them from paper, in our article.
Unfortunately, our review does not cover master classes on all the cartoon characters, but we think that if you get a little creative, use paint or Photoshop, this can be fixed...
Nyusha. Many people sigh for her, and she for the prince.

Krosh. The most exciting and restless hero. It is he who adds energy and enthusiasm to the cartoon

Losyash. Local intellectual. He knows a lot, but this is not always applicable in a parking lot.

Pin. Mechanic from God. This is someone who can make everything out of nothing.

There is no need to talk in detail about the process of making paper figures. Everything is clear here. Initially, you need to print the hero on paper, preferably on a color printer. Next, we cut out adjacent elements along the contours with scissors and glue.
At a more conscious age, it is impossible to tear a child away from the TV or computer screens if their favorite cartoons are on. The presence of bright, interesting, colorful, funny cartoons in our time forces parents to increasingly come up with various activities and entertainment for their children, just so that they do not sit for hours in front of the TV. One of the most popular children's cartoons is Smeshariki. Funny characters always make kids laugh out loud, so why not combine business with pleasure and make paper Smeshariki yourself? This is a great activity for kids and parents to do together.
In this master class we will tell you how to make such funny crafts with your own hands, and provide diagrams for forming little ones.
We will create our cartoon characters from colored paper or cardboard. You will also need scissors and a simple pencil.

We make Malysharikov with laughter
First, let's get acquainted with the heroes of our cartoon:
- Krosh;
- Nyushenka;
- Hedgehog;
- Lamb;
- Losyash;
- Auntie Sovunya;
- Kar Karych;
- Kopatych.
We decide on our favorite characters and get to work.

The ideal option would be printed blank images of our heroes. Well, if you can’t print them, you can simply transfer them onto paper to make templates. And with the help of them we cut them out of cardboard. The auxiliary parts, highlighted in black, also need to be cut out.
The cut piece must be glued. We form a square; there are special letters on the auxiliary parts that will help you fold the parts in the right direction.
Do not apply too much glue, the cardboard material may get wet and then it will tear.
We add the final touches to our character, glue on legs, arms, horns. Draw the face of his favorite character with your baby together. So our Barash is ready.
To make it easier for you to come up with a fun game with your baby, let's look at the rest of the cartoon characters.

Meet Krosh. We make it in the same way as the previous one. The baby will be happy to make a fun-loving adventurer.

Sweet Nyushenka looks like this:

The inventor of Pin can also keep you company:

As you can see, making such cute characters is not difficult at all. Such an exciting job will bring a lot of laughter and pleasure to you and your children. And this despite the fact that the costs are minimal.
Spend a little time with your baby and grateful smiles and laughter will follow.
Video on the topic of the article
To make the work easier, we provide a selection of videos on this topic.
Smeshariki are the favorite cartoon characters of modern children. A distinctive feature of this cartoon is its excellent humor, which will appeal to adults too. And since parents can watch this animated series together with their children, then making a beautiful craft with their own hands will not be difficult for them together. From this article you will learn how to make Smesharik from paper. Such time together will be a great reason to get even closer and have a great evening.
How to make a smesharik from paper and CDs
Since all Smeshariki are round in shape, you can experiment a lot with the base for their body. Children and their parents create these characters from fruits and vegetables, from balls of yarn, from balloons and even from CDs. In order to make such a craft, you need to have a couple of CDs, colored paper and a glue stick.
First, think about the composition: how your Smesharik will stand, what it will be in his hands, then cut out the arms and legs of the hero, then the details of the image. Place all the parts on the disk and glue them. You can complicate the craft and add other materials besides paper: make Nyusha’s nose out of a button and glue an artificial flower onto her head, and glue a voluminous pompom onto Sovunya’s hat. Experiment!
Smeshariki masks
Another idea for paper crafts for Smeshariki lovers is masks that you will not only enjoy making, but also have fun playing with them later. In order to please your child with such a mask, you need to save the picture that will be located below and simply print it on a color printer. Then cut out the mask you like, glue it onto thick cardboard and glue a thin elastic band to it. Ready! Now you can set up a whole theater where you can transform into any hero. If you don’t have a color printer, it doesn’t matter! Just redraw the mask onto a white sheet of thick paper and repeat the procedure with an elastic band!

How to make a Smesharik from paper with your own hands: applications of heroes
In order to create a funny application in the shape of Smesharik with your child, you also need to print out the templates below on a color printer. It is best to stick them on thick paper or cardboard using a glue stick. When working with PVA glue, the design may become smudged.

This kind of work develops thinking, as it is reminiscent of putting together puzzles. Be with your child while creating the work and help him find the right element!
And here are a few more templates for other Smeshariki! Create together!

Come up with your own interesting ideas for creating paper Smeshariki crafts! Try to create voluminous works, give your child complete freedom in this exciting form of creativity.
Today we will tell you how you can make Smeshariki from paper in several versions. The first method will be devoted to making a hero out of paper with the possibility of involving even the smallest children in the process, and the other will be for older children, because it will be a little more difficult.
Collecting all Smeshariki from paper: method 1
To make Smesharik in the simplest way, you need the following materials:- Thick pages from newspapers or magazines
- Colored paper and colored cardboard
- Scissors
- Felt pens or gouache
Step-by-step instruction:
- We crumple thick sheets of paper (pages from newspapers or magazines) into a ball (as tightly as possible so that the craft does not break).
- We carefully wrap the resulting ball with a regular square sheet of colored paper (the color must match the color of the character that your child wants to make). Or you can simply decorate this ball with gouache.
- Next, from thick sheets of paper, but of a smaller size, we make four more small lumps in a similar way - these will be the paws of our Smesharik.
- We carefully glue the resulting four small lumps (legs) to the main large ball - the body.
- From colored cardboard we cut out the remaining necessary details (ears, horns, beak, etc.) and glue them to the figure.
- Eyes, mouth and nose can be cut out of cardboard and glued to create a beautiful hero’s face. Alternatively, these parts of the face can simply be drawn directly on Smesharik’s body using paints or felt-tip pens. It all depends on your desire and the desire of the child.
Now the figurine is ready! Everything is very simple. You will get a round Smesharik.

Method 2.
For variety, you can also make square Smeshariki for younger children. To do this, you need to print the diagrams and cut out the parts. Then the figurine is assembled according to the instructions.
Method 3.
Now we’ll tell you some of the most difficult ways to make Smeshariki from paper. And here older guys will be your assistants. So let's get started.
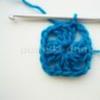
Now we will teach you how to make Smeshariki using the modular origami technique. When using modular origami, several sheets of paper are required to fold the figure. Each sheet is folded into a module, and then all the modules are connected to each other. Such products will require much more patience and time from you.
If you decide to make Smeshariki this way, you will need the following:- Several sheets of thick colored paper
- Scissors
- First of all, we make the modules:
- To do this, divide a sheet of thick colored A4 paper into 16 equal parts and cut them out;
- fold each of the resulting rectangles in half;
- bend the edges towards the middle and turn the product over;
- lift the edges sticking out from under the triangle upward and bend the corners inward;
- bend the triangle in half.
- Add all other modules using the above method.
- We insert the resulting modules into each other. At the same time, we get a three-dimensional figure of Smesharik. We make a circle of 24 modules and increase the rows (approximately 12 rows need to be made).
- After this labor-intensive work is completed, we add ears, paws, spines, horns, hats and other details that your hero needs. The eyes can be cut out of cardboard and glued to the figure.
All is ready!

I would like to tell you about another, difficult, but interesting way of making Smeshariki from papier-mâché. This is a very labor-intensive process. And it needs to be done by adults. A very difficult, not cheap, but quite interesting method! And it's worth it!
For this method we will need:- Balloon
- Newspapers
- PVA glue
- Scotch
- Egg Tray
- Facade putty
- Tile adhesive
- Wire
- Hot water
- Cold water
- Drill
- Mixer whisk
- Paints
- Tassels
- We inflate the balloon of the size we need.
- We tear the newspaper into small pieces, soak them in water and cover the ball with one layer. Then we take PVA glue and water in a 1:1 ratio and also soak pieces of newspaper in the solution. We glue the second layer in PVA, while leveling it with a brush and expelling the air. We do this for about five or six layers. Dry until completely dry.
- When our design is dry, we burst the ball and fill the inside of the newspaper ball we received with paper. Or you can fill it up, your imagination and possibilities. For example, dried egg racks into small pieces.
- We twist the arms and legs, as well as the snout, from the newspaper and glue it all to the ball with tape.
- Now we are preparing the mass with which we will strengthen our ball:
Take an egg tray and tear it into small pieces, pour hot water over it to boil quickly. Place it on the gas stove and wait for it to boil. Boil for about 20 minutes. Remove from heat.
We take a device for whipping: a drill and a whisk from a mixer. Let's start whisking. First from the very bottom, lifting all the pieces, and then simply in a circular motion until you get a porridge-like mass. And put it on the fire again for about 10 minutes. Remove and beat again. When the mass becomes homogeneous, then leave it to cool.
- Take cold water and dilute the putty according to the instructions on the bag. If you use a five-liter bucket, then you need to pour about 1/4 of the bucket with cold water. We spread the putty. The solution should look like thick sour cream.
- Squeeze the mixture we cooked from the water. Add the squeezed mass to the putty and mix thoroughly. The result is a mass for sculpting our Smesharik. It is advisable to use this solution as soon as possible, because after a while it starts to dry out.
- First, apply a layer of approximately 1-2 mm to the ball. Give it time to dry. When this layer is completely dry, apply a second one - this one is more dense. We do this to increase the strength of our creation.
- We make a ponytail, hair from wire, and attach it all. We form the ears and cover it all with our mixture, sculpting and giving it the correct shape. Don't forget about the hooves on the arms and legs. Leave until completely dry.
- We dilute the tile adhesive to the consistency of thick sour cream. And we coat our Smesharik with it.
- After drying, the painting process begins. There are simply no limits to your imagination here...

The resulting Smesharik can decorate a children's room and even a playground in the yard.
This process is very labor-intensive, but we hope that its outcome will bring everyone a good mood and a lot of positivity.
We introduced you to ways of making wonderful cartoon characters Smeshariki with your own hands. Choose the one that suits you and go for it!
Good luck! And may everything work out for you!
Video on the topic of the article
Find out how to make Smeshariki from paper, plasticine, disks and show this process to your children. And sew a backpack for your child in the shape of your favorite cartoon character.
How to make Smeshariki from paper?
This very accessible material will help you make interesting crafts with your children. If you want, make all the heroes so that your child has a complete collection. But first, let's remember what name each Smesharik has. Here are the characters from three age groups. Teenagers include:
- Nyusha;
- Hedgehog;
- Krosh;
- Barash.
- Losyash.
- Sovunya;
- Kar Karych;
- Kopatych.

We will make them in the form of cubes. To do this, let's take:
- colored cardboard;
- pencil;
- scissors.
- If you have the opportunity to print the presented image on a color printer, do so. If not, then transfer it to paper, which will become templates. And use it to cut out blanks from cardboard.
- The auxiliary places that also need to be cut out are indicated in black.
- Having rolled up the square, you apply glue to them, matching the same letters, first create the base of the hero.
- Then all that remains is to glue the horns on the top, down the legs, and on the sides of the arms. Let the child draw a face for the hero and stick it on his face.
It is made from cardboard or lilac paper according to the same principle as the previous hero. The next one will be Krosh - a cheerful and optimistic rabbit, a lover of adventure. We cut it out of cardboard or blue paper. With the help of parents, using glue, the child will quickly assemble this cartoon character.

Of course, you can’t do without the romantic Nyusha. We cut it out of pink cardboard, onto which we need to apply some details with red paint.

As always, Pin will invent something like that, and it doesn’t matter that he speaks with an accent, the kids understand him perfectly.

They will be able to create their own using the following material. Adults will only show you how to make Smeshariki.
DIY Smeshariki - plasticine figures
For children this activity will be interesting and exciting. But here's what you need to prepare first:
- plasticine;
- plastic knife;
- modeling mat;
- a soft cloth to dry your hands.

For Kopatych, the economical, good-natured bear, you will need plasticine in the following colors:
- orange;
- yellow;
- white;
- black.

The main color of this hedgehog is red. From this plasticine make his body, legs, arms, ears. After the whites for the eyes are created from white plasticine, let the child roll thin sausages from the black mass and frame the character’s eyes with them to turn them into glasses. From black plasticine you need to make the pupils, nose, and needles of the hedgehog.

For the following plasticine figurine you will need the following materials:
- purple;
- white;
- black;
- Red.

Let the children sculpt a dreamy Sheep from pink plasticine.
- First, the base of the round body and head is created, then you need to make many small balls from the same plasticine.
- They are attached to the back of the animal, while at the same time flattening it a little with a finger, then the lamb will dress in its fluffy fur coat.
- To make horns, you need to roll 2 small sausages from black plasticine, attach them to the head, and bend them.
- From the same plasticine it is necessary to make hooves that are attached to the bottom of the arms and legs.
- All that remains is to sculpt the nose, thin lips, piercing eyes and rejoice at what wonderful figures are made from plasticine.

How to make other Smeshariki can be seen in the next photo.

Smesharik from CD
This is also easy to do. So that funny Nyusha will soon live in your home, take:
- old SD;
- colored paper;
- double-sided tape or glue.
The crumb is created from blue, white and red paper. Make it like in the photo. The child will be delighted and will ask to make other cartoon characters from the disks.
After Smesharik Krosh and Nyusha have chosen a place in your apartment, create their friends. Let the Hedgehog also live here.

You can create them using the same technique or differently.

If you want to close the central hole in the disk, then see how to make the following crafts. Take:
- CD disks;
- glue;
- plastic bottle caps;
- hacksaw for metal.
- For each character at the beginning we act almost the same. Place the disk on colored paper of the desired color, outline it, and cut it out.
- Now you need to make eyes for each character. The hedgehog's are framed by glasses, Nyusha's are slightly squinted, and the rest are wide open.
- Having created the facial features, move on to the hairstyle and ears, which are also different for Smeshariki. But they have the same stand.
- Using a hacksaw, cut a hole in it into which you could insert a disk with the image of the character.
How to sew funny animals with your own hands?

Children will certainly love such toys; with them they will fall asleep better and wake up easier. Even those mothers who do not have a sewing machine will certainly succeed. After all, such toys can be created without it, sewn by hand.
Here is a list of what was used:
- fleece in different colors;
- scissors;
- filler;
- threads

- Its body consists of 6 parts; they need to be sewn sequentially, grinding the side of one with the side of another workpiece. Then you need to sweep the sides of the first and last. You will get a circle. You need to fill it with padding polyester through the top hole.
- For each ear you need to cut out 2 parts in a mirror image. Sew them in pairs, sew them on your hands to the hare’s head, at the same time sewing up the hole remaining here.
- The tail is made in the shape of a flower; it will require two identical parts. They are ground off, leaving a small area not yet closed to put a little padding polyester there. Sew up this hole, at the same time attaching the tail in place.
- Each arm and leg are made of identical pieces, carved in a mirror image. They are also sewn together in pairs, stuffed with padding polyester, and then attached in place.
- Based on the drawing, cut out the whites of the eyes from white felt; glue eyes for toys or small circles-pupils of black color onto them. Sew them onto the character's face.
- Make the nose out of pink fabric by cutting out a circle from it. Having gathered its edges with a thread, put a little filler inside, tighten the thread, and sew it onto the muzzle. Make the teeth from white felt, attach them with blue thread, and at the same time embroider the rabbit's mouth.
How to sew a backpack in the shape of Smesharik?
It will also be dedicated to this topic.
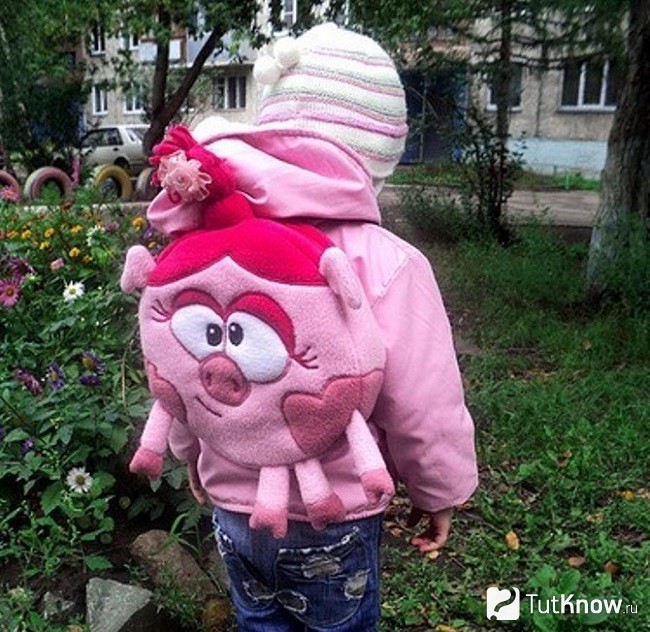
Children will be happy to carry their things to kindergarten in such a shoulder bag. To sew a backpack in the shape of Nyusha’s Smesharik, take:
- light pink, hot pink, pink fleece;
- white fleece;
- some black fabric;
- 2 meters of belt tape;
- calico;
- adjusters for straps - 2 pcs.;
- polyethylene foam;
- holofiber filler;
- snake lock;
- threads;
- scissors.
To ensure that the backpack keeps its shape, use polyethylene foam. In this case, we took a foil one, which can be bought at a hardware store.

Print out the patterns for the muzzle, legs, arms, and ears.

We make the base of the backpack from pink fleece. You will need a circle with a diameter of 25 cm, which you can draw using a compass or, for example, place a large plate like this on a piece of canvas folded in half to cut out two circles.

You will need two more such blanks from foamed polyethylene; cut them according to the same template, but also do not forget to leave allowances for the seams.

Two more circles need to be drawn on a piece of calico and cut out. Now, without seam allowances, cut out blanks for Smesharik’s eyes from white fleece, make eyelids and hair from dark pink, and make her nose from pink.

Complete the look with pink hearts and black pupils.

Here's how to sew the backpack next. Fold together a circle of fleece, polyethylene, calico, stitch them along the edge to connect.

Now sew the facial features here one by one. First the whites of the eyes and nose.

Then eyelids and hearts on the cheeks.

Next you need to attach the hair and pupils, make the nostrils on the nose using a zigzag stitch.

Use the same stitch to make Nyusha’s eyelashes and mouth. From calico, polyethylene foam, light pink fleece, cut out a strip measuring 54x6 cm, cut it out, do not forget to add it to the seams.

Mark with chalk where the hearts will be located and sew a strip of these three materials. Use a zigzag stitch to attach the hearts here.

Now take calico, polyethylene foam and dark pink fleece. From each material you need to cut a rectangle measuring 25x2.5 cm, cut it out, adding seam allowances.

You will need two of these pieces, each one needs to be stitched along the edges to connect all three layers.

Sew a zipper to the blanks.

Now you need to cut out Nyusha’s arms, legs and ears from light and pink fabric. Sew the pieces in pairs to create double body parts.

Fill them with filler; you should put more holofiber closer to the hooves, and less on the other side.

Cut a strip measuring 20x13 cm from dark pink fleece. Fold it in half, sew on one side, fold the edges inward, and attach this future braid to the part with the lock. Sew with a zigzag stitch in a circle.

The pattern helped you sew a backpack. She also allowed us to make the body parts the way they should be for this fairy-tale character. Place them on Nyusha’s body and head and sew them on.
On the reverse side, this single-color circle must also be sewn to a strip with a lock and to a single-color one so that the two halves of the backpack are connected.

Turn the backpack inside out, this is what you get from the front and back.

Remember, Nyusha’s hairstyle is a braid. It needs to be stuffed with holofiber, stitched in two places with thread, the tip cut into thin strips, and an elastic band tied here.

To make the lining, the calico should be folded in half and the edge should be made semicircular on the other side.

Insert this lining into the backpack, sew it to the top of the arms.

This is how wonderful the shoulder bag turned out.

For a boy, you can sew it according to the same principle, but using the image of another character, for example, Tiny. The presented pattern will help with this.

Here's how to sew a backpack with your own hands so that your child can carry his personal belongings and toys, using the image of his favorite cartoon characters.
Smeshariki made from tires
Smeshariki made from tires will decorate a dacha or the courtyard of a city house. For these crafts you will need:
- wheel tires;
- acrylic paints;
- plywood;
- drill;
- self-tapping screws;
- tassels.
Their paws, ears, and hairstyle for Nyusha are also made from plywood, then they are attached to rubber using self-tapping screws.

You can cut out the limbs of animals from the conveyor belt, also paint it, and attach it to the base.

If you want to show children how to make Smeshariki from plasticine, then let them watch the following story. It shows how to make Krosh.
A young video blogger will tell his peers how to make it from disks.