Appearing in 2010, unusual dolls Monster High (School of Monsters) competed with such familiar dolls as Barbie.
These characters were created based on popular horror movies and monster stories. Monster High students are the children of monsters such as Dracula, Gorgon Medusa, mummy, werewolf, sea monster, yeti, ghost, Frankenstein's monster and so on.
Despite their origin and specific appearance, Monster High characters are kind, beautiful and fashionable guys. The bodies of the dolls are articulated, have 11 points of articulation, which gives the dolls greater mobility. Each doll in this series is a unique character with its own skin color, mold, unique style and legend.
And the Samoshveyka website offers to replenish the wardrobe of the Gulia Yelps doll (daughter of a zombie) and sew it for her.
In order to sew such a sundress for a doll, you will need:
- cotton fabric
- needle
- thread
- braid or lace
- as well as a small piece of Velcro.

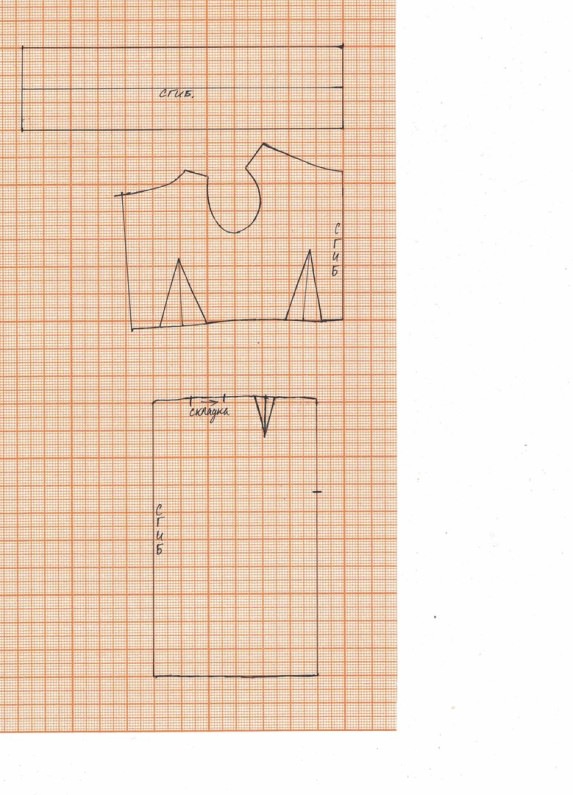
Using the pattern, we cut out the details of the top (bodice) of the future sundress. For the skirt, we cut out two rectangles measuring 6 x 24 cm and 7 x 14 cm. We leave allowances for the seams of about 5 mm.
Sundress bodice
We sew the darts, we process the edges of the parts with an overcast seam so that the fabric does not crumble. We sew the parts together and bend the side edges.

We hem the top of the sundress bodice.

Sundress skirt
Ours consists of two rectangles that are assembled along the top edge. We tuck one long edge of a rectangle measuring 6 x 24 cm, sew on a braid or lace. This will be the bottom of the skirt. We process the edges with an overcast seam.
We gather the upper edge of the skirt into the assembly and sew it to a rectangle measuring 7 x 14 cm.

On the upper cut of the rectangle 7 x 14 cm, we lay small folds or make an assembly. We sweep the cut.

We sew the bodice to the upper cut of the sundress skirt.


Dress for the doll is almost ready. But we still need to come up with a clasp. To do this, we cut off the Velcro tape, and in a simple way - Velcro and sew it to the bodice, like this (on one side of the fastener we sew the tape on the front side, on the other side - on the wrong side):

If you don't have Velcro, don't worry! Sew on buttons and loops.
As a result, we got a wonderful sundress for the Monster High doll (Monster School). Which one then ? Share your ideas with us!
How to sew a pink sundress for Barbie with your own hands?


Master class type: photo master class.
sewing type: manually, mannequin (not according to the pattern).
Materials and tools
- knitted piece with a pattern;
- tailor's pins;
- sewn-on buttons;
- large beads;
- thread and needle;
- pencil;
- scissors;
Note: Due to the fact that Barbie doll or Barbie-type dolls are very small, it is best to sew clothes for them by hand, not by machine. Small or medium beads are suitable for decorating a skirt. The thread is matched to the product. The threads are pink to the pink knitwear, when the beads are sewn on, then we take black threads, in the color of the beads.
We sew a dress for a Barbie doll with our own hands
For the master class, a pink knitted T-shirt is used.

For convenience, we cut the T-shirt into pieces. To work, we need the first part, which is with a pattern. Turn over and attach the doll to the drawing. We set the boundaries of the future sundress with a pencil.

We remove the doll to the side and finish drawing.

Cut out our sketch with scissors. You will need 2 parts to work. We apply the first part to the knitted piece, fix it with tailor's pins, circle it with a pencil.

Cut out. It turned out 2 parts for work (the front part with a picture and the second part without a picture).

Lay them side by side, right side up. We fasten with tailor's pins and sew on the sides.

We bend the bottom edge of the sundress. We are sewing.

We turn out the sundress. We take large beads and sew to the bottom of the sundress.

It looks like this.

We make a cut on the back of the dress.

Cut off a small flap of knitted fabric (preferably the bottom of the T-shirt, where there is a stitched edge). We make a hem and pin it with pins to a sundress, cut off the excess.

We sew the parts to each other.

Cut off a piece of fabric. On the other hand, we make a hem. We fix on tailor's pins.
Surely, many mothers are familiar with such a situation when their daughter asks to buy outfits for her doll. And since any girl has a Barbie at home, in most cases she needs clothes. Then a bunch of questions arise, namely: how many things do you need to sew? How can I choose outfits so that my daughter likes it? How to guess the size? How much will Barbie clothes cost? These questions will not arise if the doll's things are done at home. What is required for this and how the work is done can be found in this article. And so that your daughter is not bored while you are sewing or knitting costumes for Barbie, you can ask her to draw sketches for future outfits.
To sew clothes for this doll, you will have to get to know her in detail. Barbie is a girl with unbending and bending arms and legs.
Her height is about 25-30 cm, and her hair is mostly white, about 5-6 centimeters long. Neck girth - 2 cm; chest girth - 11 cm; waist circumference - 7.5 cm; hip circumference - 12 cm.
Back length - 5 cm; arm length - 12 cm; brush girth - 3.5 cm; leg length - 16 cm; wrist circumference - 2 cm, foot length - 2 cm.
DIY clothes for Barbie
It is known that clothes can be both sewn and knitted, knitted and crocheted - therefore, models and fabrics must be different. The easiest thing to sew is a simple dress or blouse, and the most difficult is Wedding Dress or overalls. A little advice for beginners: for fluffy skirts ball gowns can be used not only fabrics and a needle - they can be crocheted, decorated with ruffles and frills. Such dresses keep their shape well, you can often do without a fluffy petticoat, and they look like they’re even now in pictures in a fashion magazine!
Gallery: clothes for Barbie and Ken (25 photos)


Classic embroidered dress
If you decide to sew something for a doll, then it must be a dress. Firstly, the doll's dress is the basis of her wardrobe, and secondly, it is sewn very quickly. The dress should not be made chic if you are not going to take the “girl” to the podium or hold a photo shoot for her. It will be enough to sew an ordinary classic dress in full size. What will be needed?

If you decide to sew something for a doll, then it must be a dress.
- Fabric (chiffon, silk or gabardine is usually welcome) - 0.5 × 0.5 m;
- Scheme;
- Zipper (10 cm) or buttons or Velcro;
- Threads;
- Scissors;
- Needle.
To make such a dress, you will need an A4 pattern (you should print it or copy it), according to which you will cut out the details from the fabric. Next, sew the pieces, process the ends and insert a zipper or sew on buttons. If you don’t get smart with the design of the dress or additional details, then it can be sewn quite quickly - about 30 minutes.
If the dress is one of the easiest outfits to make, then the coat is much more difficult to sew. It is also worth considering that the coat can be both sewn and knitted. Let's consider both options.
How to sew a coat for Barbie
To sew a coat, you should purchase:
- Fabric (wool, crepe, diagonal, boucle) - 0.5 × 0.5 m;
- Scheme;
- Threads;
- Needle;
- Scissors;
- Faux fur (collar);
- Belt (as an accessory) and buttons.
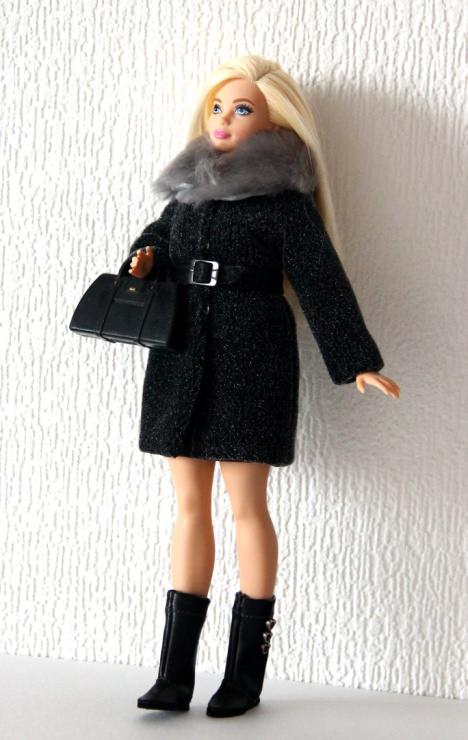
The coat can be sewn or knitted

Work like this: print out the diagram, mark everything on the fabric, cut out, connect, sew everything together. And it's done! A doll jacket can also be made according to the same pattern - only the length of the product needs to be made shorter.
How to knit a coat
If sewing a doll coat is, in general, a simple matter, then it is worth working with a knitting coat, because this is a very painstaking work. But if you approach it with responsibility and a special desire, then everything will work out quickly.
To knit a coat, you should purchase:
- Woolen or acrylic thread (not thick, different color) - 30g;
- Hook number 2;
- Buttons.
Knitting goes from top to bottom.

It is worth working with a knitting coat, because it is a very painstaking work.

We tie the edges of the sleeves and the collar with threads of a different color. Sew the sleeves, sew on the buttons and you're done!
What else should a doll have in her little wardrobe? Of course, jeans, a sundress, a bathrobe, a couple of trousers, skirts, blouses, pants, a raincoat, a lot of shoes and, of course, a fur coat! Ideally, you will need winter hat... But how to make a “girl” a fur coat, and what kind of fabric is needed for this
Beautiful fur coat for Barbie
It will require:
- A piece of fabric (needed for lining);
- Ribbon;
- Velcro;
- felt-tip pen;
- Scissors;
- Threads;
- Needle.


Everything works in the same way as in the previous versions: it is cut out and sewn together.
Buttons can be attached as desired.
Boots for Barbie with foam soles
- Fabric (some kind of elastic);
- Scissors;
- Coffee can (to make insoles);
- Threads;
- Needle;
- Styrofoam (for the sole).
Progress:
- First you need to cut out something similar to stockings from the fabric (the main thing is that they are 1.5-2 times larger than the doll's leg itself). Next, cut out the insoles from the jar and sew them to the stockings from the side of the foot.
- Further actions depend only on you and your imagination, since it is at this stage in the manufacture of shoes that you will have to cut out the foam sole. What will be the sole of the doll, you decide!
- Then glue the made soles into the "stockings", and the boots are ready!
The main thing is to treat this matter very carefully and patiently.
Light knitted slippers
How can a woman do without cute slippers? Of course not! That is why here is the knitting option for this wonderful shoe. If you follow the scheme correctly and do not be distracted by anything, then you can complete this work in a few hours.
- Threads (wool or acrylic) - 30 g.
- Scissors;
- Ribbon - 1 m.

If you follow the scheme correctly and do not be distracted by anything, then you can complete this work in a few hours.
The color of the threads and ribbon is chosen independently. Then it remains only to follow the scheme. It is worth paying attention to the picture in the middle. This very figure shows the foot with which you need to start knitting. Next, the sides are knitted in a circle.
Pumps with high heels
And finally, the shoes! Their manufacture is considered one of the painstaking work in the field of footwear. How are doll shoes made? It is worth considering a simpler version.
- Fabric (any will do) - 10 × 10 cm;
- Cardboard;
- 2 pieces of wood for heels;
- Glue;
- Scissors;
- 2 beads;
- Thin elastic band;
- Sealant for processing (if you took a loose fabric).


First you should use the scheme, then cut the fabric along it. Glue the “insole” of the fabric onto the cardboard (which is also cut out along the foot). It is necessary to glue the back of the shoes, then the toe, then the heels. Next, attach a bead for beauty to the clasp (beads or sequins would work well). Everything, shoes for our beauty are ready! A little tip - make a template for every detail of such a shoe and you can easily and quickly cut out new models.
Ken doll
Ken is Barbie's boyfriend.
In terms of height, he is the same as the “girl”, but a little more in physique (after all, a man), so the clothes for him should be larger than for Barbie.
The girth of his hips is 15 cm; chest girth - 13 cm; arm length - 12 cm; leg length - 14 cm; foot length - 3.5 cm; shoulder width - 8 cm.
Come to think of it, what can Kena sew? You can wear a T-shirt with shorts or pants, a T-shirt, shirt or pajamas. A set of T-shirts and pants is sewn in almost the same way as pajamas, only from a different fabric. For ordinary clothes, gabardine works well, but for pajamas, as for clothes in which to sleep, cotton is great. As you can see, a pajama set does not always include a t-shirt. Most likely, there is something like a jacket. You can verify this by sewing such pajamas.
DIY pajamas for Ken
To make such clothes, you need:
- Fabric (cotton, bamboo, silk) - 1x1m;
- Scheme;
- Button or Velcro or elastic band (inserted into the belt);
- Needle;
- Scissors;
- Threads.
In order to get such beauty, you need to make a pattern, sew, then insert an elastic band or fasten it with Velcro or sew on a button. Everything is made quite simply, so with a lot of patience, pajamas will be ready in just a couple of hours.

To sew the top, take the rest of the fabric, cut out the pattern again, mark everything on cotton or bamboo and sew. You can make a jacket without sleeves (as shown in the diagram), or you can sew on sleeves. Each sleeve should be 8-10 cm.

Other things are sewn on the same principle. Only for each thing there is its own fabric, so you should choose it correctly. If you are in doubt about which fabric is suitable, then you should find out what material clothes are made of for people, then everything will become clear.
Very simple dress for Barbie doll (video)
How to sew a shirt for a Ken doll (video)
The main thing is diligence and patience, because sewing (or knitting) clothes for dolls is quite difficult, despite the fact that they have the same physique as humans. You need to cut out the smallest pieces of fabric, sew them or glue them, and this takes a lot of time and effort. But if you still decide to continue doing such a thing, then you can only envy!
(37 ratings, average: 5,00 out of 5)
natalia popovich
Moral education is one of the sections of all educational programs. Both in kindergartens and schools, they study in detail the country in which you live and your city. Special meaning acquires the education of patriotic feelings: love for the native land, Motherland. Everyone should know the history, sights of their region. Interesting to know about the peoples of your city about culture, about folk costumes. It is boring to tell children from illustrations, it is much more interesting when the information is supported by exhibits that you can pick up, consider in more detail. And when the office is decorated in a variety of ways, this is a plus for the teacher. Some will think that this is difficult, because not everyone has a sewing machine, but I assure you, to make a wonderful the costume is possible without a machine, the main thing is to have a great desire and patience and, of course, creative imagination (how are we without him). I propose detailed technique fulfillment dolls in festive Russian folk costume from simple, improvised materials without the use of a sewing machine.
Materials used:
Textile: red satin, white nylon or any white material
Decorative braid, jacquard,
thread, needle,
Wire,
Meter, pencil, scissors, glue gun.
IN kindergarten I took doll, washed it, combed it - and I got this gorgeous:
Then she set about implementing her plan. Since I don't have a sewing machine, I sewed everything by hand. If something is wrong, do not judge strictly.
Our folk costume will consist of a bottom white shirt with trim, shorts, a top red dress (sundress) and kokoshnik.
I took the idea of \u200b\u200ba pattern for a blouse Houses: I have two girls and naturally they have dolls, took one of the blouses and embroidered it (then sewed it back until my girls saw it, otherwise it would have been a global tragedy, made a paper pattern to fit my dolls, then transferred it to the material. Here's a detail.


To prevent the pattern from moving, we fix it with needles and circle it.

We translate the pattern on the right, then turn it over and circle the left side. Cut out the detail. The clasp will be on the back. Trying on doll. I think it turned out well. The part is single, only the side seams are sewn, but we will sew later when we make the sleeves.


In the decoration of the collar, I used red braid (it’s good that now there are no problems with the choice of this material, I bought what I liked) I just sewed it in a circle, and I got a stand-up collar.


Just like on a shirt, we sew a braid on the sleeves, having previously taken measurements from the hand dolls:

I describe my actions in detail, maybe someone will find this material useful. Let's go further: we sew the sleeves into the shirt and sew it (shirt) and sleeves, can be tried on doll. I didn’t make a fastener on a shirt, I just wrapped it up and that’s it, a sundress will not let her unbutton. This is such a beauty...

We turn to sewing the sundress itself. We measure growth dolls and cut off the rectangle, taking into account future folds on the sundress.
Choose color scheme jewelry. I chose jacquard and decorative ribbons as it is easier for me because they can be glued discreetly with hot glue. We put ribbons and ribbons on the material, we get to work. At the beginning, I put the ribbons on glue (pointwise, but I didn’t take a photo so that they would not go over the material, then I sewed it on.

We sew the part, but not completely, leaving room for the future fastener.

We adjust the length along the top, since the bottom is already finished. We make the necessary assemblies according to the figure. We have a sundress, so we sew a belt and straps to the top of the skirt, you can try it on. For the belt and straps I used the same braid as on the sundress itself. We sew the fastener after trying on the sundress. I used a button as a fastener, you can sew Velcro, even, probably, it will turn out even better (I think so). Here's a sundress I got.

Smoothly, we have reached the last product - the kokoshnik.
Here we need imagination, we take the wire as a basis, but not very thick, so that the kokoshnik is flexible. We measure the head dolls and twist this frame.

In order for the kokoshnik to keep its shape, you need to cover it with something durable. Atlas - the material is easily wrinkled, I did not want to stick it on cardboard. The idea was suggested to me by a colleague, I share it with you: every housewife, for sure, has gelatin at home, we dilute it and soak the material in it (I took sheet gelatin, it is easier to use, dissolved two plates in a small amount of water, and then dry it on a flat surface., it turns out just fine. Firstly , the material became almost like cardboard, secondly, it stopped blooming at the edges, and, thirdly, it cut out just wonderfully!


When the material is ready, we move on to the next phase of our work: using hot glue, we fix our frame on the material.


On the reverse side, we do everything in the same way, but we cut out a little more of our kokoshnik to make it easier and more inconspicuous to stick the decor in a circle.
For decoration, I used sequins. When decorating, we give free rein to imagination and get this beauty:


Our kokoshnik is ready, you can dress up the beauty.
I forgot about the main thing, underwear is being made Just: make a pattern according to doll, cut and sew on the sides and middle (unfortunately, I didn’t take a photo, it can be made from white baby sock, it’s even easier, only the middle is stitched, I think you will figure it out yourself.
Main point: we dress up our beauty and get a lot of pleasure from the work done! I think it turned out even better, not worse dolls bought in the store.

All success and creative ideas in the implementation of their projects!
Barbie doll is definitely the most popular doll in the world. Children from every corner of the Earth want to have this very popular and beloved doll. But the doll's wardrobe is not inferior to her beauty, fashionable fluffy dresses, all possible skirts, trousers and other outfits. Every girl wants her doll to have the most beautiful dresses and costumes. Stores are bursting with all possible wardrobes for Barbie dolls, sometimes very expensive ones. But how not to leave your favorite doll without beautiful outfits. The solution is very simple, with the help of materials at hand, basic sewing skills and free time, you can sew an original and beloved doll costume yourself. There are many options from which you can sew clothes for a Barbie doll, for example, you can sew from elementary things that are in every home: socks, jeans, fabric, old clothes and many other materials.
In today's Master Class, we will tell and show you how to sew a summer sundress for a Barbie doll with your own hands using improvised materials and a sewing machine.
For a summer sundress for a Barbie doll, you will need the following materials:
- Denim, old jeans will do.
- Chintz fabric is a small piece, about 40 by 40 centimeters.
- Scissors.
- Needle with thread.
- Chalk, in order to outline the patterns, since on some dark types of fabric the lines drawn in pencil are not visible.
- Patterns or pattern paper.
- Sewing machine.

Let's start making a summer sundress for Barbie dolls.
First you need to make patterns. The presented patterns are made for a standard Barbie doll and the clothes sewn on them can be large for dolls from the Bratz and Monster High collections. Therefore, for dolls of these collections and dolls of similar physiques, patterns must be made separately. There is nothing complicated about this, and on the Internet you will find many sources on how to easily and simply make a pattern.
For a summer sundress, we need the following patterns: the back of the bodice with darts 2 pieces, the front of the bodice also with darts - 2 pieces, the hem of the sundress - we have a sun skirt, a circle with a diameter of 25 cm - 1 piece, two patterns for the collar, and also with if desired, a sundress can be turned into a dress by sewing sleeves to it, patterns are also presented.

Having dealt with the number and purpose of the patterns, you can begin to cut them out.
First of all, we cut out the hem of the sundress and the collar, only these two parts will be sewn from denim, for this we fit the patterns and circle with chalk. When cutting, we make seam allowances of about 5 mm.


Then we circle and cut out the sleeves and the front and back of the bodice, as well as the sleeves. And be sure not to forget about allowances, otherwise the finished product will be small.


All parts are ready to start sewing. We'll make it to sewing machine, some special professional sewing skills on a sewing machine are not required, but if you do not have one, you can simply use a needle and thread.

First, we sew the bodice of the sundress, the front parts and the back separately, it is necessary to sew the undercuts, so the product will seem more elegant.

After that, we sew these two parts together.

The next step is to sew on the collar at the top of the sundress. To do this, we first sew each detail of the collar along the perimeter with a regular stitch, and then sew it to the bodice, it should turn out as shown in the photo.