Hairstyles for long hair at home really do not take much time, you can do them yourself for each specific outfit, occasion, holiday. There is no need to know some incredible secrets of hairdressing. Now I will prove it. The simplest hairstyle at home from long hair is a ponytail. It is very suitable for office wear. You will look both strict and sexy at the same time. Checked multiple times.
But it's not all the same time to go to work with a tail!? !? ! Of course not! Twist it around the base, fix the hair with hairpins - you get a bun. Also quite office, classic hairstyle. Or braid your ponytail - here's a brand new beautiful hairstyle for you. long hair with your own hands. From the tail you can make a hairstyle-bow. Modern, stylish, unusual.
Of course, I do beautiful hairstyles do-it-yourself for long hair - the so-called festive. At a corporate party, or at the birthdays of colleagues or relatives, at the weddings of friends, but you never know the reasons .... Here, of course, I proceed from the outfit that I plan to wear and the specific occasion. My hairstyles can be rowdy, classic, folk style, high, puffy, modest, slick, with floral headbands, retro…
Romantic gathered bun

Step-by-step instruction:
- If there is a bang, separate it and temporarily fix it until the end of the work.
- Lay long bangs in the form of a " french braid", To do this, divide into three strands and start weaving, moving along the edge of the hair to the back of the head.
- During work, add loose hair to the working strands only from the side of the face, trying to separate uniform bundles.
- At ear level, move on to weaving a regular pigtail.
- Loose hair is collected with an elastic band in a ponytail - a soft ring.
- The hair above the ring is divided in half.
- A “tail” connected by a ring is placed in the resulting cavity, wrapping it inward.
- The resulting inner roller is carefully leveled and smoothed.
- Fill the free tip of the pigtail into the cavity and fasten the entire structure with invisibility.
- Sprinkle the finished hairstyle with varnish.
- The styling looks elegant and elegant.
- If the bangs are short, they are laid last.
- With this hairstyle, you can correct the round shape of the face.
- To do this, the hair is combed high on the crown to add volume, and the side strands are curled with curls and left loose.
- Elongated lines make the face visually narrower.
Greek hairstyle for long hair

Step-by-step instruction:
- Preparing hair for hairstyle. We comb and unravel all the knots.
- We collect hair in a low tail, if desired, its height varies by you.
- We divide into 2 strands of equal width.
- Set the bottom strand aside or stab with a clip.
- We apply the bagel to the head and see that it is placed evenly over the head, and the distance from the tail to the edge of the donut is the same on both sides.
- We fix the donut on both sides of the tail with hairpins, sometimes stealth is used.
- Piercing with studs is best done with a darn for a more secure grip.
- We wrap the bagel, with the upper strand, starting from the bottom. Secure with an elastic band just above the donut so that you can hide the ends under it.
- Hide the ends behind the donut, if necessary, pin with a hairpin.
- Spread your hair evenly on the bagel. Covering all parts with strands of the same thickness.
- It is advisable now to sprinkle the beam with varnish, this will give it a smooth and neat look.
- We proceed to work with the left strand. We divide it into 4 equal parts. We will braid braids from them out of 2 strands. To do this, divide the pending strand into 2 more sections and start the left strand on the right, scrolling it 3 times clockwise.
- This operation must be repeated until the end of the strand.
- Repeat to yourself: start a strand, scroll 3 times clockwise.
- At the end of each tourniquet, we fix the weaving with an elastic band. Repeat the operations with all the strands, recall that you have 4 of them. (Make more or less flagella (3.5) experimenting with variations of this hairstyle).
- We connect all the strands with an elastic band over the donut, then we hide the tips behind the bundle, pushing them inside it with a finger.
- An important stage of fixation with hairpins so that the flagella hold throughout the evening.
- Spread the flagella evenly on the bundle, check their symmetry.
- Spray the already finished hairstyle with varnish and, for owners of bunch hair on the forehead, process the hairline. Owners of bangs, lay it at will by winding or aligning it, laying it in a braid or tourniquet.
- Add hair accessories to make your everyday bun look festive. Use combs, hairpins, screw-in rhinestones.
- Hairstyle is ready, now it's time for the ball!
romantic bun for long hair

Step-by-step instruction:
- We make a high ponytail and secure it with a tight elastic band. It is better that the hair is damp, so it can be conveniently collected, and the hairstyle will turn out to be more accurate.
- We separate a small strand 3-4 cm wide and fix it with an elastic band. For now, we won't need it.
- To make bulk beam use a special round roller.
- If you don’t have such a device, then you can make it yourself, for this, take a tight sock and cut off its tip, twist the sock into a ring and you will get a similar roller.
- We distribute the hair evenly over the roller and put on a thin elastic band on top.
- Starting at the back of the head, separate a small section and begin to twist it, gradually adding hair, so we have to twist all the hair until it runs out, you can get one or two turns around the bun.
- Secure the tip with a bobby pin or hairpin.
- Now let's start creating the bow.
- To do this, take our strand and put on an elastic band on the base.
- Thread the strand through the elastic several times, when it is already a little tight, thread the strand without leaving a small loop to the end, this will be one part of the bow.
- Now twist the elastic and thread the same strand of hair into the resulting loop to form the second part of the bow.
- The remaining tail will serve as the middle of the bow, put a strand between two loops and secure with an invisibility, hide the remaining tip under the beam.
Elegant hairstyle with boho braids

Step-by-step instruction:
- Carefully comb the curls, select the strands as shown in the photo, divide them into 3 parts.
- Tilt your head - it will be easier to weave a braid and at the same time your hands will not get tired so quickly.
- Carefully weave a braid at the back of the head.
- Your braid should be braided to the crown.
- At the top of the head, secure the braid with an elastic band.
- On the last turn, do not pass 1/4 of the “tail” through the elastic.
- Now gather the strands around the elastic band to create a bun, separate the strands slightly to get an even hairstyle.
- Gently gather the strands from the face and lay them on the side to get a fake bang.
- Hide and secure the ends of the curls with bobby pins around the base of the bun.
- Braids will always be in fashion, and every season there will be new variations of the usual styling again and again.
- The main thing is to have time to follow the latest in the world of hairstyles and not be afraid to do something unusual from the usual.
Gorgeous ponytail

Step-by-step instruction:
A ponytail hairstyle with a pile can be done both in everyday and in a business version. This hairstyle works great as a simple and elegant hairstyle for work, especially since it can be done in just a few minutes. But like any visually too simple styling, it looks great only on very well-groomed hair. It can be combined with both straight and asymmetrical parting, as well as with bangs of any style.
- Divide the washed and dried hair with two horizontal partings along the temples, you can place them a little higher or a little lower, but always at equal levels. Separate a narrow strand above the forehead and with light movements, trying not to injure the hair, comb at the roots.
- In the same way, process the following strands, adding them gradually and watching the resulting volume. Sometimes just two or three strands are enough to get a stylish styling pattern. If necessary, strands can be added, but returning them to their original state is difficult.
- Gather all the strands over the forehead and smooth them with a brush, comb the hair to the back of the head and collect the hair in a ponytail at the height you need.
- Separate a narrow strand from the base of the tail and, wrapping an elastic band around it, secure the base with a pair of hairpins.
- The ends of the strands of the tail itself can be designed in completely different ways. Absolutely straight strands or slightly curled ones look organic in this styling. In order not to disturb the style of styling, avoid classic curls, preferring loose curls.
romantic babette hairstyle

Step-by-step instruction:
- First, wash and dry your hair thoroughly, using the principle of drying against hair growth and not forgetting that any oiliness, even at the very ends, will lead to a heavier hairstyle, which will “kill” the necessary volume.
- Then we separate a horizontal strand about 1 cm wide with a special comb with a thin handle and leave it uncombed.
- Next, carefully and carefully comb the next horizontal strand 1 cm wide and, holding it in weight, comb it from the base to the middle of the hair towards the roots of the hair. The bouffant is fixed with a strong fixation varnish, the method should be repeated with 4-5 more horizontal strands.
- Take a massage comb with sparse teeth or with natural bristles and gently comb your hair, smoothing it and giving it the desired shape.
- And then we close the entire bouffant with the first strand without bouffant, fix, if necessary, with hairpins in the back of the head, as well as varnish the entire bouffant. To give a natural look to the hairstyle, it is necessary to use medium or weak fixation varnish for the upper correction.
Hairstyle for long hair

Step-by-step instruction:
- Wash your hair with shampoo and conditioner.
- If the strands are long, apply a styling spray or extra strong hold mousse. Dry your hair with a hair dryer.
- Divide your hair into sections. The topmost strand does not need to be combed, as it will cover the volume obtained by combing.
- Each strand should be combed with a comb with frequent teeth. It is necessary to retreat 5-8 cm from the roots and gradually comb the hair, moving towards the base. It must be remembered that the ends of the hair do not need to be combed.
- When all the strands are combed, you need to cover them with the top layer of hair and gently comb through them with a wooden massage brush. You should not be zealous, the main thing is that the hairstyle acquires an aesthetic appearance without losing its original volume.
- At the final stage, it is necessary to fix the pile with a strong hold varnish
Beautiful braid for long hair

Step-by-step instruction:
- Comb your hair back.
- Then take one wide strand at the crown in your hand.
- Divide the part of the hair that is now in your hand into 3 separate strands.
- Next, take the right side and put it on top of the middle one.
- Then take the left strand and repeat the same.
- Thus, we make several links.
- At this stage, you can already start adding new strands.
- To do this, add a small amount of hair from the corresponding half of the head to the right bundle.
- Then they cross again with the central strand.
- The middle bundle must be pulled to the right side, carefully holding all the strands.
- Further, point number 3 is repeated, but on the other side.
- Then we repeat point number 5, but we pull it to the left.
- All you need to do next is to repeat the previous points in turn.
- The remaining loose hair can be braided into a regular braid.
Romantic weaving for long hair

Step-by-step instruction:
- The hair of a girl who wants to make herself a spikelet pigtail should not be too short, but does not require serious length either.
- The weaving pattern is quite simple and affordable.
- Any woman can handle it.
- If you look at the hairstyle step by step, you first need to comb your hair, take a strand of hair from above and divide it into 3 equal parts.
- Then weave them together, putting the side strands on the middle one.
- Everything is done in exactly the same way as when weaving a regular traditional braid.
- Then the resulting braid must be carefully taken in hand so that each individual strand is separated from the others.
- Now you need to add a small strand on the left and overlay it on the middle one.
- Then the middle strand is retracted to the right.
- Now exactly the same operation is done with the left strand, a small strand is added to it on the left.
- And again, it is superimposed on the middle strand, while she herself is retracted to the left.
- If you want the braid to be tight and even, you need to keep your hands as close to your head as possible.
- Continue weaving until all the hair is gathered into a spikelet pigtail.
- When you get to the neck, you can do different ways: either fix the result with an elastic band in a ponytail, or, if the length of the hair allows, continue to create a hairstyle.
- You can make a pigtail both the most ordinary and traditional, and, for example, a fishtail.
- From ordinary weaving, you can make an openwork, for this, along the edges of the braid itself, you need to carefully pull out small strands of hair.
Romantic braid twist

Step-by-step instruction:
- Divide your hair with a vertical parting into two equal parts.
- We start working on one side of the head. Gather carefully combed hair into a low "tail", tie it with an elastic band.
- Tie another elastic band at some distance from the first. It is better to use silicone rubber bands for an older girl and colored ones for younger girls to make the hairstyle brighter.
- Divide your hair in half between elastic bands.
- Pass the "tail" through the hole.
- Actually, this weaving pattern is called a “twist”.
- Tie another elastic at the same distance as the previous ones.
- We repeat the weaving: we divide the hair between the elastic bands in half and thread the “tail” into the hole.
- Now we pull the hair into a "tail" on the right side.
- At the same distance as the previous braid, we tie another elastic band.
- We make a "twist" in a similar way.
- We repeat the "pattern" of weaving
- Here is such an original hairstyle we got in the end
- The secret of this hairstyle is that it is very easy to perform, it is easy to do even on children who find it difficult to sit on a chair for a long time without moving.
Elegant hairstyle for long hair

Step-by-step instruction:
- We make a parting (whichever you like best - even or on one side).
- At the roots of the hair, you need to do a little bouffant to give more volume.
- We shift the entire armful of hair to one of the shoulders.
- We take a strand from the base of the parting, divide it into 2 identical bundles.
- We twist them together, gradually going down and at the same time weaving new curls in the direction of movement.
- As a result, they should all be matched.
- Then you can braid them into a regular braid of the desired length.
- You can choose a more complex option, in which the curls are divided into 2 identical parts and intertwined with a tourniquet. \
- To prevent the hairstyle from falling apart, clip it with an elastic band or hairpin.
- Now you can fluff your hair with your fingertips, sprinkle with varnish.
- Knowing how to braid yourself with the playful name of the twist will allow you to style your hair in no time, going on a date or other important meeting.
Spit waterfall

- Hair brush or comb.
- Invisibles (several pieces).
- Hairspray (optional).
Step-by-step instruction:
- Hair should be combed well, as it will have to be divided into strands and woven into a braid.
- Take one strand from the front (near the parting) and divide it into three equal parts, after that weave it once like a regular braid.
- Now release the lower strand to hang freely, and instead weave another one of the same thickness into the braid (take a strand from the total mass of hair, next to the released one). Braid the strand taken into a braid - make it medium.
- In the top strand, add hair from the total mass (as you would if you were weaving a simple French braid from the remaining hair.
- Repeat the third and fourth steps until you have braided half of the head. Stop at the back in the middle, secure the weave with hairpins.
- Do the same on the other side, when you reach the point of fixing the first braid, carefully connect the two weaves and secure with hairpins, try to do this as inconspicuously as possible so that the weave seems continuous. Read more:
- Spray the finished hairstyle with varnish (optional).
Quick hairstyle for long hair

Step-by-step instruction:
- Hair prepared, well combed.
- Make a deep side parting.
- Starting from the left side at the temple, separate a small strand.
- Divide it into three equal parts.
- Start weaving a standard braid.
- The upper strand of hair, taken from the front part closer to the temple, is shifted to the middle.
- Repeat the procedure with the bottom strand.
- Make such one “entry”, the lower strand needs to be released.
- In its place, you need to take new strands taken from the top of the head.
- The left bottom strands will serve as a waterfall.
- Making such a “spikelet” with falling individual strands, move towards the center of the head.
- In the center, stop weaving and fasten this part of the hairstyle with a small elastic band.
- Repeat exactly the same procedure on the right, gradually moving towards the center.
- Connect both parts of the hairstyle in the center with an elastic band.
- It is best to take a small rubber band.
- Fasten the strands as imperceptibly to the eye as possible.
- The final touch is to fix the hairstyle with hairspray.
Video: hairstyles for long hair
Women are natural actresses. We always want to change images, delighting ourselves and others with beauty and originality. But when in the daily hustle and bustle it seems that there is simply no time for change - do not be discouraged. In our article you will find many unusual, beautiful and simple hairstyles for every day, the photos of which clearly show the technique of their creation.
Easy hairstyles for every day
The famous artist Nadezhda Babkina rightly noted in her interview that well-groomed woman can be seen immediately, by laying. Do-it-yourself simple hairstyles for every day with your own hands will help create a favorable impression on others. Special skills and knowledge are not required. It is enough to take an elastic band, hairpins, a comb and you can start creating the desired image.
Bundle styling options
Leading position among quick hairstyles occupies the classical beam.
- Make a high ponytail.
- Put on a bagel.
- Tuck your hair into it.
- From the remaining tips, braid the pigtails.
- Wrap them around the base of the muzzle.
- Spray with a spray and styling for a walk is ready.


Light styling is not alien to the stars. For example, Jessica Alba at the Golden Globe ceremony shone with a Greek hairstyle that can be created in just a few minutes. It is enough to put your hair in a low ponytail and scroll it several times around your fingers. Perhaps a neat bun is the best way to complement your best look.


High ponytail hairstyles
You can carefully collect long hair with a simple styling.
- Make a side parting.
- Braid braids on both sides.
- Add a top and bottom tie to each binding.
- Weave to the middle.
- Connect both braids into one with an elastic band.
The option is perfect for going to work or university and the question: “How to make a simple hairstyle quickly?” will fall off by itself.

In some cases, harnesses can give a good volume even to a regular tail. To create a styling, collect half of all the hair in the lower tail on the side. Divide the second half into 3 parts and twist loose bundles. Wrap them around the ponytail and decorate with a decorated elastic band. Available instructions for doing a simple hairstyle for every day are shown in the photo:

A quick and uncomplicated hairstyle will help out with a catastrophic lack of time. Of course, provided that you have mastered the spikelet technique.
- Begin to French braid, taking hair from the forehead and temples.
- When you reach the crown, stop and collect the remaining strands in the tail.
- Fix with varnish.
Fashionable hairstyle with the effect of negligence is ready.

Fashionable everyday styling
Some styling options remain at the peak of popularity for many years. Not for the first year in the trend are fashionable hairstyles for every day: plaits, a voluminous crown with a fleece and braids. Before creating the listed hairstyles, stylists advise applying thermal protection to the hair and straightening the hair with an iron. To add volume, a corrugated curling iron will be an excellent help.
Stylish braids
The easiest hairstyles can be done in just a couple of steps. For example, to create a braid harness, you need to follow these steps:
- Apply a ball of mousse to dried hair,
- Distribute over the entire length.
- Make a high ponytail.
- Divide it into 2 parts
- Tightly twist each.
- Weave them winding one on top of the other,
- Secure the end of the braid with an elastic band.

Despite the unattractive name, the fishtail braid deserves special attention. Almost every girl can do it the first time. The weaving technique boils down to the fact that dividing the hair in half, it is necessary to separate it from the extreme sides along a thin strand and put it in the middle.
By pulling the strands from the bottom up, you can get an openwork braid for every day.


Various variations of do-it-yourself braids for every day using the “Waterfall” technique look so gentle and romantic that for this it is worth mastering the weaving pattern itself. In general, there is nothing complicated. The first binding is done like a regular braid. At the next weave, you need to release the bottom strand and add a side pickup instead. You can weave 2 braids, combining them in the center or bringing them to the opposite temple, hiding the ends under a hairpin with a flower.

The French weaving technique can be used for the cross braid. Start weaving from the temple and pick up the hair from the side of the forehead and crown into the bindings. Then stretch them out a little.
A headband braid looks better on highlighted or colored hair.


A hairstyle with pigtails in the original style can be done without special accessories at hand. Braid a free spike starting from the forehead. Pull out the weave and pick-up strands with the sharp tip of the comb. Styling looks best on owners of curly long hair.
Luxurious curls
Natural curls are a great hair styling option for every day, they will create a romantic mood. If you don’t want to fiddle with curls for a long time, an iron will come to the rescue.
- Take a strand of hair
- Twist it into a rope.
- Styling through your hair
- Let cool.
- Do the same with the rest of the strands.
- Spray on and enjoy gentle waves.

With large curls, you will always look stylish. Curl your hair with tongs after dividing it into 4 parts. Pin the strands in the temporal region behind the ear with an invisibility. Put on a regular or festive headband and twist the hair inward slightly, helping the curls to take on a natural shape.

Beautiful hairstyles for special occasions
Refined and airy hairstyles will harmoniously complement festive image. They emphasize femininity and style, but do not forget that the main accents in beautiful styling fall on the right jewelry.
Elegant low buns
voluminous hairstyle in Greek style is a successful combination of lightness, plaits and braids. You can feel like a queen by step by step following the steps in the photo below. A feature of this styling is weak weaving and stretching of individual strands at the crown.
To keep the volume of styling longer, highlight the strands on which you want to emphasize with wax.

Image business woman will help to realize an unusual, but very simple styling for every day. It is based on a low tail and loose strands near the forehead. It is they who create the original weave around the hemisphere. Perfect hairstyle It will work only on long hair of the same length.

classic seashells
An elegant shell is not possible for all girls. Often the hair falls apart and is not collected with a roller of the desired shape. We offer an interesting version of the famous styling, which is easy to do in any conditions. The ends of the hair must be collected behind the back with an elastic band. Throwing them over your shoulder, squeeze the elastic between the sushi sticks and twist the roller, winding the hair tightly. Visually, the execution technique looks like in the photo below:


Exquisite styling will look appropriate at any festive event. Having trained a couple of times, you will not spend more than 10 minutes on its implementation.
- Make a side parting.
- Twist most of your hair into a loose braid.
- Make it wave.
- Poke the invisible.
- In the same way, twist the roller on the other side.
- Take the strands one at a time, laying them in multidirectional waves.

The favorite styling of Hollywood beauty Anne Hathaway is found in the portfolio of almost every famous hairstylist. But how to make a simple hairstyle at home? Separate the strand at the forehead and temporal region on the right side and secure it with a clip. Gather the rest of your hair into a neat bottom bun. Release the right side of the hair from the clip and lay it under the bun with a light wave. Decorate with pearl hairpins and comb out individual strands for texture. This option is universal, it is perfect for both a wedding and a business meeting. 
hair flowers
A large hair rose is a stylish and simple styling for every day. Apply mousse or a small amount of wax all over your hair. Make 2 tails at the back of the head and laying one on top of the other, tie a regular knot. Twist the resulting strands with a tourniquet and twist clockwise, forming an exquisite flower.
All actions are easy to repeat by looking at the step-by-step photo:

Fashionable hairstyles for every day in the form of a flower will decorate a solemn look with their appearance. You will need a bagel for the bun, on which you will need to wind a lot of small ponytail flagella. Before styling, warm up a little wax in your palms so that the original bundle does not turn into a prickly hedgehog ahead of time.

You can quickly create a romantic look for a meeting with a guy using a simple styling with a flower and waves. The general concept of the hairstyle consists of the following steps:
- Highlight the strand at the back of the head.
- Put the first extreme strands under it.
- Lay the second pickup on top of the middle strand.
- Fasten the resulting ponytail with an elastic band.
- Braid a pigtail out of it.
- Twist it around the inner circle.
- Loose curls twist with a large curling iron.
- Spray with a medium hold spray.
A step-by-step hairstyle diagram is shown in the photo:

Creative styling
Many girls like to emphasize their individuality with bold styling. Their advantage is that such styling looks good and is suitable for any hair length. You can make cool hairstyles for every day with your own hands inspired by ideas.
Updos look best on girls with an oval face. The simplest of them can be created in a couple of minutes. Make a ponytail out of your hair, loosen it a little at the base and thread the ends into it. At the end, tighten the elastic band and the youth fan is ready. In this way, you can create a beautiful ant on the hair. To do this, the fan is divided into 2 parts, and the tail is pushed through the hole again. This variation is very fond of the stars. See how stylish Paris Hilton looks in this look.


Hair wrapped in a net looks intricate. To create it, you can use many small rubber bands or a special weaving technique. The grid cell and pattern may vary depending on the tension and the number of strands. The design made at the temple on one side looks stylish.


The French braid never ceases to amaze with its varieties. Braid braids with an upper tuck in the face area on both sides. Braid the ends of the hair in the same way and collect with an elastic band. Easy styling of braids for every day is ready.

A fun pin-up hairstyle can get a lot of admiring glances at a themed event. Gather the hair in the temporal region and twist it inward in the form of a roller. Make a ponytail from the rest of the hair. Divide it into 8 parts, treat them with mousse or styling gel and curl.


Quick hairstyles for every taste
Different hairstyles for every day allow you to always look beautiful. Today you can try on the image of Brigitte Bordeaux, and tomorrow you can braid an ordinary pigtail in the original version. Interesting ideas hairstyles for every day will help you experiment and find the very image in which you will feel organic.
Ideas for short and medium hair
You can do an original updo for every day right before going to work.
- Divide the ponytail into 3 equal strands
- Poke their ends with hairpins inside.
- Fix all parts at the top, freeing the occipital.
- Twist the bangs in the opposite direction,
- Put on a pretty headband.

Ordinary hairstyles can look stylish with a minimal set of accessories.
Twist the hair of the high tail inward, forming a roller. Secure it with invisibility and spray with a spray. Gently straighten the sphere without disturbing its shape. From below, decorate with a miniature hairpin or crab.

If you are looking for the answer to the question: “How to quickly make a hairstyle?”, Then pay attention to the hair basket. Divide your hair in half and gather each into ponytails at the crown. Braid ordinary braids and cross them with each other.
See the step-by-step technique in the photo below:

High hairstyles for every day in the style of Beyonce are very popular. A bouffant roller and a thin elastic band will help you look like a Latin American diva. Part your hair lengthwise in half. Gather the lower part with an elastic band into a bundle. Lay the top one on a bouffant roller and secure with bobby pins. Pulling out individual strands with a comb with a pointed tip, place the necessary accents. 
Ideas for long hair
Which of the girls did not dream of a variety of beautiful braids for every day? You can create a masterpiece without weaving, with the help of small rubber bands. Its essence is to combine the extreme strands of a high tail. The thinner you take the strands, the more interesting and textured the braid comes out. Finish the hairstyle by pulling out each binding. The use of overhead strands will give the effect of airiness to the styling.

Many people associate the image of Brigitte Bordeaux with fleece. It can be created by combing the hair well at the crown and spraying it with a strong hold spray. But such a work will last no more than 2 hours.
A simple device will help to securely fix the high styling - a roller on the comb.
It is attached under the hair of the crown and retains a given shape for a long time.

With the help of an elegant top knot, you can prepare for a meeting in 5 minutes and beautifully tie your hair up to your forehead. The technique is extremely simple. You need to separate a couple of strands on both sides and tie them with a regular knot. So that it does not come loose, pin the part that will be on top with a hairpin to loose hair. Pay attention to the clip, if it is heavy, it will not linger on the hair. Ideally for this case, a crab is suitable. 
Four-strand braid with ribbon a good option hair styling for every day. The principle of weaving is easy to understand if done at least once.
- Divide all hair into 3 sections.
- Tie a ribbon of the desired color to the ends.
- Put the first strand on the left under the tape and on the second strand.
- On the other hand, do the opposite. Put the rightmost one on the tape and slip it under the third one.
- With this technique, continue weaving until the end of the free hair.
The final version looks like a continuous strip of inverted bows.

In continuation of the topic: “Simple hairstyles for every day with your own hands”, one cannot but mention the Celtic knot. First, select 2 small, adjacent strands. Loop the right one. With the left, you need to wrap the hanging tip of the loop and push it inward from the back. The finished pattern resembles a pretzel in shape. Following a simple weaving technique, you can create masterpieces from several braids.

A Greek-style hairstyle is easy to do without having a special headband on hand. Pull all your hair back and braid the most ordinary braid. Screw it in. Tuck the remaining tip into the hole at the base of the weave. Pull the strands at the crown with the sharp tip of the comb. Styling looks best on owners of curly long hair.

High hairstyles always delight the males and are very popular with the females.. Divide all your hair lengthwise into 3 sections and tie into ponytails. Comb them well with a comb, curl the ends with a curling iron. Pin all the hair at the crown, if you have bangs, curl it in the opposite direction. 

Spectacular styling for a special occasion should not take much time, because there is still a lot to do. A good option is 2 parts of hair styled differently and united by one common concept. From the right half of the hair, make a ponytail at the back of the head and curl it. On the left, braid a regular pigtail. Having previously pulled strands out of it, attach it to the tail and wrap it a couple of times.


Modern girls are purposeful, self-sufficient, carefully think through all the details of the image. But the romantic style has not lost its relevance, it emphasizes youth, tenderness, natural beauty. Soft wavy curls, elongated lines distinguish everyday and festive styling. Romantic hairstyles create a special mood, it is not surprising that they are chosen for exceptional occasions.
Features of an elegant hairstyle
Story Ancient Greece and ancient Rome are inextricably linked with mythology, the gods, like people, were subject only to the power of romance, love. In ancient civilizations, women paid great attention to their curls. Complex hairstyles, curled strands, braids and high curls were decorated with ribbons, headbands and precious stones.

Medieval hair beautiful ladies sung in ballads, knights fought in duels just to touch the lock of their beloved. The Renaissance brought new trends, voluminous forms appeared, during the Rococo period, huge wigs replaced neat boucles. For centuries, the image of a woman remained unchanged, fragile, tender, mysterious, fatal, beautiful - she inspired poets, painters, filling the world with beauty and harmony.

Everything changed in the 20th century, world wars, revolutions affected the external, as well as inner world young ladies. New ideas about gender equality led to the emergence of short haircuts with sharp textured lines. In the post-war years, they change again fashion trends, curls, curls appear, but already in short versions, shoulder-length.

At the heart of modern hairdressing is one or another era, today you can try on the grotesque baroque, and tomorrow you can create the image of a Greek nymph. The main recognizable elements of the romantic style are curled curls. Smooth waves emphasize tenderness, femininity, touching, sometimes naivety. They are the prerogative of young girls, mature women should choose elegant minimalism.
Stacking in romantic style they are used in everyday looks, but they reveal their advantages to the maximum in special, solemn occasions. The reason for creating a hairstyle can be a date, graduation, marriage.
Advice. As decorations, you can use flowers, ribbons, headbands and hairpins, decorated with stones and beads. The romantic style includes light, airy styling; graphic, sharp lines and androgenic haircuts are contraindicated.
General execution technology
Regardless of the type of appearance and the shape of the haircut and hair structure, romantic styling can be done by everyone. A feature of the style are soft lines, smooth curls, allowing you to emphasize the natural beauty. Before choosing a particular hairstyle, you should familiarize yourself with general rules preparing strands for a feminine, elegant look.
The main characteristics of romantic hairstyles:
- hair should be well-groomed, healthy, you need to regularly apply balms, masks for nutrition, moisturizing, immediately and before creating a romantic hairstyle, you need to wash the curls, apply a mask for shine, radiance, elasticity of the trunks;
- split porous sections need to be updated at the hairdresser, the haircut should not be too short with pronounced asymmetry or shaved elements, it's better to stop at classic models medium or below shoulder length;
- be sure to use a heat-protective spray, a curling iron, an iron is used to create curls, high temperatures lead to dryness and brittle hair;
- when choosing styling products, it is necessary to take into account the structure of the hair; for thin, devoid of volume, mousse, foam are used;
- hairpins, invisible hairpins should fit along, you can choose in one color scheme or use classic decor in the form of elegant pearl studs, thin rims.

Styling tools:
- hair dryer, comb brushing;
- iron, curling iron;
- foam, mousse;
- lipstick, wax;
- bijouterie, hair decor hairpins.
Actual options for short hair
Women's haircut"Garson" refers to romantic hairstyles. There are no sharp torn lines, light careless curls emphasize the tenderness of the image. Suitable for young ladies of different age groups, thanks to a haircut, even after 40 years you can look cute and touching. Performs on thick soft as well as hard hair, it is recommended to choose the owners of a regular, triangular oval, a neat bang will easily correct a high forehead.

Structured haircut short length implies the layering of strands, the volume is distributed evenly from the crown to the very tips. Layering will be the best solution for round, square ovals, it will help curvy ladies look more slender, graceful. Differs in a practicality home care, short haircut looks elegant even with minimal styling. It looks good with monochrome coloring, as well as highlighting in light natural shades.

Beautiful haircuts for curly curls look stylish, modern, but at the same time emphasize tenderness and attractiveness. The execution technique differs from the classical structured one, the master takes into account the peculiarities of the curly structure. Goes to young ladies, as well as slender mature women, looks good with evening dresses, as well as casual style.

Current hairstyles for medium length
A shoulder-length cascade suits dreamy natures, emphasizing the natural beauty of curls. A structured haircut involves a gradual lengthening from the crown to the cuts, creating smooth transition. A universal option for all types of appearance, will give tenderness, emphasize femininity. The hairstyle has anti-aging properties, corrects the disproportions of the features, highlights the look.

The classic square in a romantic style involves light waves and a voluminous shock. There are no strict graphic lines, flowing curled strands soften the oval, voluminous styling is suitable for a casual look and a special occasion. A semi-long haircut allows you to look attractive, feminine, loose hair gives dynamics to the hairstyle. Harmonious combinations with round, square, and also the correct oval. A haircut is performed on thick, even or slightly curly strands. For young ladies, you can experiment with fashionable shades, after 40 it is better to give preference to natural tones.

An elongated curly bob looks stylishly modern, but thanks wavy curls the hairstyle looks romantic. Women's haircut includes a voluminous top and a gradual lengthening to the face. The technique gives the correct proportions of the face, it is recommended for round, square, regular oval. It is combined with a romantic style in clothes, it can also be used for casual and business.

Structured shaggy is a great option for thin curls devoid of splendor and volume. Smooth transitions are achieved by alternating short and elongated strands. Stylish hairstyle does not have age restrictions, beautiful, elegant shape suits slender and curvaceous ladies.

"Malvinka" refers to the classic romantic styling, its description is found in the days of Ancient Rome, Ancient Greece. Today, the technology is somewhat different, instead of curled letters, the main emphasis is on naturalness. The structure of the strands does not have to be changed to emphasize a delicate, sophisticated look.

Important point! Particular attention should be paid to the choice of decor, modern options look luxurious, as well as classic headbands with beads and flowers.
Current hairstyles for long hair
A cascade on long curls is suitable for owners of thick, thin hair. It is easy to make a hairstyle with your own hands, giving lightness, volume to the mop. It is not necessary to create symmetrical curls, casually developing long curls also correspond to the image of the princess. You should not use an arsenal of styling, one product will be enough.
Hair should look natural, attracting with dynamics, smooth lines. Romantic styling looks better on strands dyed in natural shades without sharp transitions. The original bezel emphasizes the tenderness of the created image.

The assembled hairstyle is based on historical models, but in the 18th century, styling was distinguished by pomp and intricacy. Modern girls can create romantic options on their own, outwardly styling should look easy and relaxed. Curls can stand out from the general shock, emphasizing the naturalness of the form.
Models with collected hair can be used in everyday life, look spectacular at evening events. Suitable for young ladies of different types of appearance, thanks to the voluminous crown and strands near the face, you can highlight the look, create embossed cheekbones, and emphasize natural good looks.

A variety of weaves have been used to create romantic hairstyles for centuries. During the Middle Ages, long braids were a symbol of beauty and innocence. Modern young ladies use spikelets to create wedding styling, and the models also look organic in everyday life. Depending on the type of oval, you need to correctly distribute the volume.
The braid around the head fits triangular, the right people, asymmetric - the best option for chubby girls.

Antique hairstyles make you feel like a goddess. An open line of the neck, shoulders, light curls are suitable for young girls. Also, the option is used for the image of the bride, looks organically at a social event, a gala event. It is combined with various stylistic directions, looks better with dresses made of light, airy materials.

Attention! Select hair accessories based on the general concept of the image.
Options for romantic hairstyles for girls
Elegant bunches for girls are used for matinees and graduations. Collected hairstyles suit all young ladies, they emphasize cuteness, childish immediacy. When creating step by step, a foam rubber bagel and hairpins are used; it is not recommended to create a hairstyle too often so as not to injure thin hair.

Semi-collected styling is performed at medium length and below the shoulders. More universal options can be used in everyday life, but look luxurious just as a festive hairstyle. Little fashionistas are so fond of curled curls “like mom's”, imagining themselves as real princesses from fairy tales.

Complex hairstyles with elastic bands require styling experience, intricate weaves are not easy to create the first time. Laying is suitable for special occasions, retains its shape even with active pastime. Assembled and semi-assembled options go to all girls, regardless of age group and temperament.

Curled loose curls, complemented by a wreath of flowers, create the image of a little fairy. A universal model for any celebration, at a birthday or graduation, the image of a little fashionista will not be left without attention. Suitable for fine, medium and below shoulder length hair. You can also lay thick strands, it is important not to weigh down the styling. Beautiful hairstyles with loose curls can be supplemented with braids or braids, it all depends on the mood of the young princess.

Useful videos
Three quick hairstyles for a date.
Romantic evening hairstyles for a date, graduation, wedding.
Hardworking - a bright light burns through life, lazy - a dim candle
Hairstyles for long hair in 5 minutes - 50 easy ideas
Long hair is a real gift of nature. If you like to experiment with your appearance, look different every day or are going to a celebration, then do-it-yourself hairstyles for long hair will definitely come in handy. We have collected for you a few ideas of simple hairstyles that you can do yourself with the help of improvised materials.
Not every girl can afford to grow the length - someone has split ends, someone's hair does not grow below a certain length, and someone lacks volume. Long hair looks beautiful and charming on its own, even when naturally tousled, it attracts men's looks. So, let's begin!
original tails
Perhaps it is difficult to find a more popular hairstyle among owners of long hair than a regular ponytail. He helped you more than once, while you were in a hurry and did not have time to do your hair or even wash your hair. However, the ponytail can be created not only with a single rubber band, there are more creative ways to create this hairstyle.
Cord
This hairstyle is done in just two to three minutes. First you need to create a regular tail. Then divide it strictly into two equal parts. Twist them with each other with a rope - as if you are trying to weave a braid of two strands. To prevent the hairstyle from falling apart, the tension must be sufficient, but be careful not to twist the hair too much. Twist the end of the cord with another rubber band. For this purpose, it is fashionable to use invisible rubber bands, but if you wish, you can, of course, take a bright one.
stepped
Do you remember Princess Jasmine's hairstyle? If you have long and Thick hair, you can create something similar on your head.
Comb your hair thoroughly and spray it with a fixing spray. And then everything is simple - first you make a regular tail, and then pull it with rubber bands at regular intervals along the entire length. The areas between two adjacent elastic bands should be fluffed up to create the effect of volume and roundness.
Side
To get started, comb well and make a side parting. On one side, begin to twist the hair into a roller and fix it with hairpins. As soon as the roller reaches the opposite ear, tighten it with an elastic band. You can combine this hairstyle with a cord if you do not braid a roller, but a ponytail of two strands.
everted
And now we will learn how to do the tail in reverse! First, make a regular tail, as you are used to. Now divide the hair above the elastic into two equal parts. There should be a small hole in the middle. Twist the resulting tail into a tourniquet and insert it through this hole. Then you can fix the tourniquet on your head, pull it with an elastic band or dissolve it.
Hairstyles with braids
Contrary to popular stereotype, long hair braids are not as time consuming as they seem. With pigtails, any girl will look beautiful and feminine. The main thing is to learn how to weave them. Perhaps at first it will take you more time to master the technique, but then you will learn how to do it very quickly and surprise others in a new romantic way every day.
Braid headband
Select a small strand of hair at one of the temples and braid a thin pigtail. Repeat the procedure on the opposite side as symmetrically as possible. Throw both pigtails over the frontal part of the head towards each other and secure their ends with invisibility. In the same way, you can make a rim from one thick braid - you get a national Ukrainian hairstyle.
Tail and braid
With the help of a pigtail, you can also diversify the usual ponytail. Having collected the hair in a ponytail, separate one strand about 3 cm thick and braid it in a pigtail in any way convenient for you. You can pull the resulting pigtail with an elastic band and leave it in the total mass of hair, or drag the base of the tail to it and fix it with invisibility.
mermaid tail
A very romantic hairstyle that will give you a little mermaid charm. How to weave this graceful and delicate braid:
- Separate two identical strands of about 3 cm in girth from the temples. Cross them at the back of your head.
- Let's say the right one is at the top, and the left one is at the bottom. Then fix the strands with your right hand, and grab the same thin strand on the left side with your left hand. (If the left one is at the top, vice versa).
- Put a new strand on the top strand, connecting them into one. Overlap again and repeat the procedure.
- When the braid falls below the level of the neck, continue to grab strands from the loose tail in turn. The braid will gradually taper and become very thin at the end.
Video
french braid
This hairstyle not only looks spectacular, but is also very practical - the hair does not get out of it, and the braid itself does not interfere with you. You can braid one French braid in the center of the head or asymmetrically, as well as two braids on the sides. The weaving technique is based on the usual braid of three strands. The essence of weaving is that the extreme strands move in turn to the center - almost every woman can do this hairstyle.
The French braid differs from the usual one only in that it begins to be braided not from the entire volume of hair, but from three central strands, and then you expand the hairstyle, adding more and more strands from the sides. There is also a reverse French braid or dragon - its difference lies in the fact that the side strands are captured not up, but down, under the nearest strand.
Spit waterfall
This hairstyle is based on the French braid. It is suitable for girls who love loose hair, but at the same time, a braid rim will make the hairstyle complete. In this case, the braid is woven horizontally, from temple to temple. All those strands that you grab from the sides, you use in weaving a French braid, but then leave it free to hang. This hairstyle is perfect for a party, romantic date, going to the cinema or theater.
Scythe shell
Great hairstyle for those with long hair. First, you weave a braid in any way convenient for you - regular, French, mermaid tail, etc. Then you put the resulting braid on your head in the shape of a shell or any other figure, fasten it with invisibility, fix it with a styling tool.
Bows, bundles, shells and others
Decorative elements of the hairstyle always look unusual and attract attention. However, girls do not do them as often as the stronger sex and the beauties themselves would like. And all because many are convinced that it takes a lot of time and experience to create figures on the head. But actually it is not. Having given enough time to training in front of the mirror, everyone can flaunt a beautiful and unusual hairstyle.
hair bow
Prepare a thin rubber band and invisible hairpins. Make a regular tail, but not in the center of the head, but slightly shift it to one of the sides. Pull the bun out of the tail by pulling the mass of hair in the opposite direction. Divide the bundle into two parts, you will get two loops - this is exactly the halves of the bow. Now take the end of the ponytail and bring it back between these halves, and then wrap it around the base of the bow and secure with bobby pins.
fast beam
On the basis of the ponytail, you can also make a bun that is fashionable in the coming season. To do this, first you will need to collect a high tail, and then divide it in half. Twist one half around the base of the tail and secure it with an invisible hairpin. With the second half, do the same, but do not fix it too much, leave a slight effect of negligence. The same bundle can be made if you first braid the entire volume of hair into small pigtails.
Shell
This hairstyle is perfect for a festive event, whether it's a graduation or a wedding, and it is done in front of a mirror in 5-7 minutes. So, we start as usual with a ponytail, collect the hair in the usual way, and then slide the elastic band down 6-7 centimeters. Twist the hair into a bundle and begin to turn it inward, towards the roots of the hair, as if you were winding the threads on a spool. If you do everything right, then the elastic that fixes the tail will be inside the shell, and it will not be visible. Secure the hair with hairpins and invisible, fix with varnish.
Hair roll
Comb well and collect your hair in a low ponytail. Then lower the elastic a little and divide the hair above it into two parts. Pull your long hair through this hole, twisting it into a ponytail like a reverse ponytail. But now we will not leave the tail, but hide the tip inside the roll, attach the side parts to the head, and then fix it with invisibility and varnish. Now they won't bother you. A hair roll is well suited as an office hairstyle for every day.
For loose hair
What owner of long hair will refuse the pleasure of flaunting her loose hair? However, to keep your hair looking neat, we recommend pairing loose hair with various elements hairstyles.
side parting
Asymmetry is back in fashion. Comb your long hair to one side. To prevent the hair from flying apart, fix it with a hair styling product. You can diversify this hairstyle by adding various headbands and decorative hairpins - for example, a classic rectangular hairpin on the side is well suited for the office. Curly curls laid on their side look even more impressive, with a flower on one temple - a great hairstyle for a celebration.
Quick curls
Curled curls have always been considered an adornment of a girl. You can create them in just 5-10 minutes. Comb your hair thoroughly and apply a heat protectant without skipping a single strand. Then braid the entire volume of hair into thick or thin bundles - depending on whether you would like to see small or small in the mirror. large curls. Now slowly run the iron over each tourniquet. Undo the braids and spray your hair with hairspray to create a style.
corrugation
You can also make a stylish hairstyle if you use. You can choose a styler with the curl size you need to match your facial features.
Most importantly, do not forget about thermal protective agents and care for weakened hair.
wet effect
A win-win option for a party with friends or a romantic date, as well as a walk on a summer day. This hairstyle goes almost all girls, and also goes well with light summer dresses and sundresses. To create, you need to wash and dry slightly terry towel, and then apply the mousse along the length, but without affecting the root zone. Let your hair dry naturally, do not touch the hair dryer. If you want playful wet curls, wind your hair with soft curlers or braid it for a while into small pigtails, and then unwind it back.
Hairstyles with accessories
Jewelry works wonders - you can look stylish and feminine with the right headband, headband, decorative flowers, etc. The main thing is to choose accessories in such a way that they match your style and facial features. And there are a great many hairstyles with their use - choose and experiment!
For example, you can do this hairstyle with a hairpin for long hair:
- Divide the hair into front and back parts according to the level of the ears;
- Divide the front part in half again with a symmetrical parting;
- Tie the two front halves together in a knot;
- Point both ends down towards the rest of the hair.
- Decorate the resulting knot with a stylish hairpin.
Conclusion
Hairstyles for long hair with your own hands will help you look individual and unique, you can look different every day. The creation of each hairstyle takes no more than 10 minutes, so in the morning you do not have to spend much time in front of the mirror. Try these hairstyles to listen to compliments from others, feel desired and attractive.
In summer, circumstances oblige us not only to lie on the beach, but also to go to work, walk and date. If you can put on a light cool dress on your body, then the situation with hair is more complicated. Heat air forces girls to look for not only stylish, but also quick ways to remove their hair. We offer 55 hairstyle options different style which you canSpit
If you think that the classic braid is too banal for a summer walk, we offer some fairly simple, but stylish options, which will be a great alternative to the traditional hairstyle.Option 1
To begin, make a parting on one side and start weaving a braid from the opposite temple. Move diagonally, weaving strands from the crown and forehead area. As a result, you will get a stylish asymmetrical and not at all hot summer hairstyle.Option 2
This is a very simple and quick technique that will help to improve the classic braid a little. First of all, tie a not too tight ponytail with a thin, inconspicuous elastic band. Make a gap above the elastic in the hair and thread the tail through it. Then, braid your hair with whatever technique you like. Thus, a simple everyday hairstyle is ready.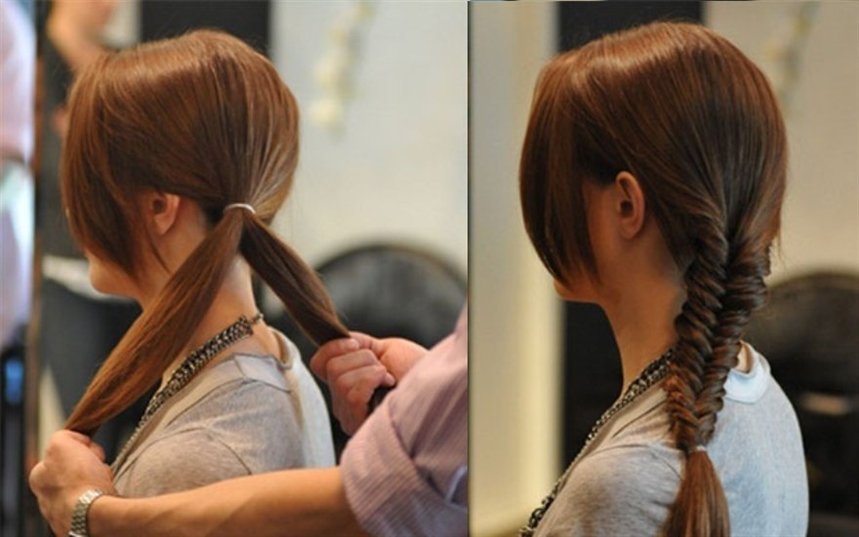
Option 3
This hairstyle looks great on long hair. To start, tie a ponytail that is not too tight on the side. Make a gap above the elastic and pass all the hair into it. To add volume, relax a few strands. A little lower, tie another elastic band and repeat all the steps again. The number of sections depends on
Option 4
To get so careless, but stylish braid, you need to twist hair light waves and bouffant at the crown. Then braid the braid with any technique that you know. When the braid is ready, pull it in different directions to add volume. At the end, divide the hair into two parts, tie in a knot and secure with an invisibility from the inside.
Option 5
Separate at each temple (above the level of the eyebrows) one side strand. Braid them. Grab a curl next to each pigtail and fasten them to the back of the head with an elastic band or hairpin.Repeat the steps, separating the strands near the ears. Braid them into pigtails, grab the neighboring curls and fasten them to the back of the head. The rest of the hair can be left loose or braided.

Option 6
Comb your hair with a side parting. Separate the strand near the ear and braid the pigtail with any technique. Don't braid too tight. Secure the end of the braid with a clear rubber band. Release the strands from the braid to give them volume. The final touch: spray hair with varnish. This option will look best on curly hair. If you have straight curls, spend a couple of minutes curling with a curling iron.
Option 7
Make a side parting. Separate a strand at the parting and start braiding, grabbing the hair that frames the face. Use any technique. When you reach the neck, change the braiding technique and weave the remaining hair into the main braid. When finished braiding, put the elastic on the end of the braid. Loosen the strands, from which the hairstyle will appear more magnificent. Lastly, spray your hair with hairspray.In the photo below you can see a combination of a simple braid and " fish tail". Looks very impressive.

Option 8
A quick and easy hairstyle that even a first-grader can handle. Despite the ease of weaving, the end result is a styling that others will find unusually difficult.So, divide your hair into three equal parts. From each part we braid one braid, the ends of which we fix with small elastic bands. Now take one braid and fold it into a ball. We fasten it with hairpins at the base of the back of the head. We make balls from the remaining braids.
This hairstyle has only one drawback: the true Rapunzel will have to tinker with braiding their curls. But the owners of hair middle length handle weaving in minutes.

Option 9
An inverted braid seems unusually complex, but in reality everything is very simple. The weaving technique is surprisingly simple and with its help you will create a unique hairstyle in a couple of minutes.First level: separate one strand above the forehead and make a ponytail. So that the ends of the hair do not interfere with your work, wrap the ponytail at the crown and secure it with a clip.
Second level: capturing the side curls, we make the second tail. At the same time, we retreat a little from the first tail. Now remove the clip. We divide the first tail into two halves, between which we draw the second tail. We wind the tip of the second tail up and fasten it with a clip. Leave the ends of the first tail at the bottom.
Third level: grab a strand a little lower, connect it with free ends (from the first tail). We make the third tail. We remove the clip, divide the tips of the second tail into two halves and pass the third tail between them. We fasten the third tail with a clip on the back of the head. Leave the ends of the second tail at the bottom.
We repeat the steps as needed. When you finish braiding the braid, secure the end with an elastic band. The turn of the final touch: carefully release the strands, starting from the very first. The higher the strand, the more volume we give it. It is not necessary to braid your hair to the end - the hairstyle will look chic even with three levels.

If you are looking for a simple but original summer hairstyle, an unusual ponytail will be a great option for both everyday life and evening walks.
Option 1
To do this hairstyle, first twist the hair a little at the ends. Tie the tail with a thin elastic band. Make a gap in your hair and thread the ponytail through it. If necessary, curl your hair a little more or part the curls with your fingers to add volume.
Option 2
For this hairstyle, the hair must be even, so if necessary, use a flat iron to straighten it. Then, divide your hair into two layers: top and bottom. Gather the top layer of hair with a thin elastic band at the back of the head on either side of the head. From the bottom layer, weave a braid in the opposite part. The thickness of the braid depends on your personal wishes. Wrap the elastic around the ponytail with a pigtail and secure the tip with a small hairpin.
Option 3
To create a more elegant ponytail, you will need hair foam or wax. Make an even parting (in the center or side, which suits you better) and collect the hair on one side. Apply foam on them and divide into two equal strands. And then just tie a knot twice in a row. Fix with a thin invisible elastic band right under the knot, and wind the ends of the hair a little or make a light bouffant.
Option 4
To make this stylish ponytail perfect for any kind of summer event, you'll need a curling iron, hairspray, bobby pins, and a little time. To start, curl your hair at the ends. Then divide them into 4 parts: at the back of the head, at the crown and on both sides at the temple, and tie them with elastic bands so that they do not mix with each other. Take the hair from the crown and comb it a little from the inside, and then twist it with a flagellum and secure it with invisibility. Repeat the same with the hair at the temples. When the hairstyle is ready, sprinkle it with varnish, for reliability.
Option 5
Very romantic summer hairstyle. To make it, divide your hair into two parts along the parting line. Braid pigtails on both sides, which converge at the back of the head from the temples. Tie them together with a thin elastic band. Then separate a thin strand from the tail and braid the pigtail. Wrap an elastic band with it and secure it with an invisibility from the inside. Comb the tail a little with a comb or twist with a curling iron.
Option 6
The ponytail is one of the most popular and universal trends in the world of hair. This option is very fast and original. First, curl your hair at the ends and then divide it into two sections. From the hair at the crown, begin to weave a loose braid, weaving all the strands into it along the line of the forehead to open the face. The pigtail should end at the back of the head, and then lift the rest of the hair and gather it together with a thin elastic band. To hide the elastic, you can wrap it with a strand of hair and secure it with an invisibility on the inside.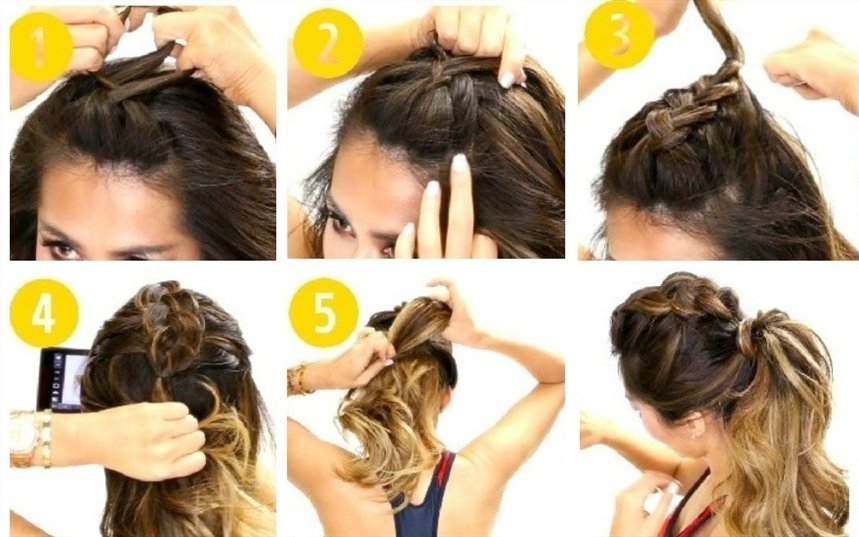
Option 7
Another light and fast way how to make an elegant ponytail. Curl your hair at the ends to make light waves. Then split them into two parts. Comb the hair at the crown a little and tie it high with a thin elastic band. Gather the rest of the hair just below and also tie with an elastic band. To create more volume at the top of your hairstyle, loosen a few strands at the crown.
Option 8
This is a great way to turn an ordinary ponytail into a original hairstyle. Tie all your hair into a ponytail at the back of your head. Separate a small strand and wrap it around the elastic to hide it, and secure it with an invisibility from the inside. Then tie another elastic band just below. Make a gap in the resulting sections and pass the hair through it. Tie another elastic band a little lower and repeat the procedure. The number of sections directly depends on the length of your hair. To make the ends look natural, twist them a little with a curling iron or iron.
Option 9
Divide your hair into 3 strands (central and two side). Secure each strand with an elastic band if you're doing your own hair. So the hair will not get tangled. Fold the central strand into a tourniquet and wrap it around the side ponytail on the right. Separate one curl from the left strand. Roll it into a bundle and wrap the right tail. We also fold the remains of the left strand into a tourniquet and wrap the tail around it. We fix the hair with an elastic band.This hairstyle has several advantages. Firstly, we do not need to observe a clear symmetry (uneven strands give a chaotic gloss). Secondly, the lack of parting allows you to mask some defects: unpainted roots, dandruff or too sparse hair.

Headband made of ... hair
This is the easiest and most original way to replace the usual headband and remove hair from your face on a hot day.Option 1
First, divide your hair into two sections. Gather the hair at the back of the head with an elastic band so that it does not interfere, and proceed to the strands at the front of the face. Make a parting on either side and start weaving a braid, weaving strands into it along the forehead line. When the "rim" is ready, loosen the hair at the back of the head and enjoy the original hairstyle.Option 2
Separate a small strand of hair in the neck area and weave a thin pigtail out of it. Wrap it around your head and secure with an invisibility on the opposite side. This hairstyle looks great on curly hair.
Option 3
Make an even parting and separate two strands on both sides of the head. Weave them into pigtails, not too tight, and tie at the ends with invisible rubber bands. Connect them together at the back of the head and fasten with invisibility.
Option 4
Separating the strand in the area of the bangs, we make a pile. Near the ear on the right, we separate one curl and form a flagellum, twisting the hair away from us. Secure the tip with a clear rubber band. Take the invisible and fasten the tourniquet on the back of the head, closer to the left side.We repeat the steps on the opposite side: we separate the strand at the ear; we form a flagellum; fasten the end with an elastic band. We start the second flagellum under the first and fasten it with an invisibility.

Hairstyle in 30 seconds
If time is running out, and you are in a hurry to an event where you need to be smart - these options are for you!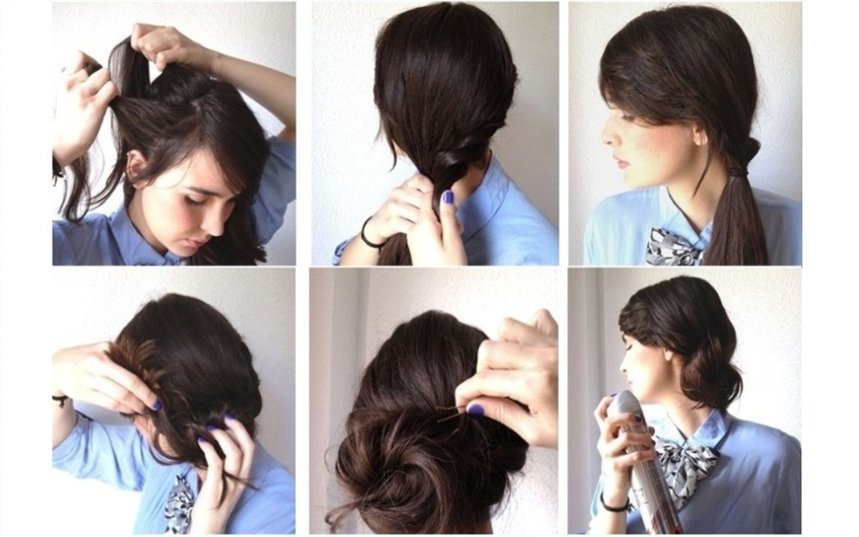
Option 4
Divide your hair into three sections. The average should be larger than the rest. Weave from it voluminous braid and fold into a knot using bobby pins or hairpins. Strand, which is on the left, roll into a tourniquet and let go around the knot counterclockwise (bottom). The strand that remains on the right, wrap around the hairstyle clockwise (through the top). Secure with invisible or sprinkle with varnish.
Option 5
To make such a hairstyle, you need hairspray, invisible hair and a little time to practice. To start, fluff up your hair with your hands to get a good volume, and coat it with plenty of varnish. Then gather your hair together and wrap it inward, forming a shell. Secure your hair with bobby pins. You can leave a few loose strands to give the hairstyle a sophisticated carelessness.
Option 6
This is a very easy way to make a knot at the back of your head. First of all, tie the tail and divide it into two equal strands. Twist each strand in a clockwise direction. Then begin to twist the strands together (counterclockwise). Tie the tourniquet at the end with an elastic band and fold it into a knot at the back of the head, securing with hairpins.
Option 7
Tie a ponytail at the back of your head, not too high. Make a gap above the elastic and pull your hair into it. Then, carefully curl the ponytail into a shell and secure with a hairpin or other accessory.
Option 8
To make a hair bow, you will need a thin elastic band, invisible hair and 1 minute of time. To begin, tie a knot high on the top of your head and divide it into two parts. Pass the tip of the tail in the middle and secure with an invisibility behind. This hairstyle is also called "Lady Gaga Bow".
Option 9
The creation of this hairstyle will take more time than the previous ones. You will need a foam donut and hairpins. Tie a high ponytail, put a “doughnut” on it and hide your hair one strand under it, securing it with hairpins for reliability. At the end, the hairstyle can be decorated with a bow or other accessories.
Option 10
Figured "donuts" look much more interesting than ordinary round ones, if you like bunches of ballerinas. Such "donuts" can be bought in specialized stores or ordered online. The execution technique is no different from classic options. Hair must be plugged into a donut.
Option 11
Gather your hair into a ponytail high on top of your head. Divide the tail into two halves, wrapping each with a flagellum. Now fold the bands around the elastic band. We twist them tightly and in opposite directions (left - to the right, right - to the left). Fix the hair with invisible hair and fix it with varnish.
Option 12
Divide your hair into two halves. Take the first strand, separate the curl from the forehead. We twist the curl away from us, starting at the forehead and ending behind the ear. We tie the first ponytail low at the back of the head. We do the same with the second half of the hair. And now it remains to twist the bagels. Ready!
Perhaps the most easy way to save yourself from the heat in the summer and at the same time create an exquisite hairstyle - this is a Greek bezel.
Option 1
Put a Greek headband on the top of your head and thread small strands of hair under the elastic. You will get a beautiful hairstyle in just a few minutes.
Option 2
This is a more complex example of how a Greek headband can be used. You will need two headbands for this hairstyle. Put one under your hair, and then bouffant at the back of your head. The second - put on the crown and wrap the strands under it. Voila!
"Malvinka"
One of the fastest and cutest hairstyles is familiar to us from an early age, thanks to Malvina, a girl with blue hair. The main difference between this hairstyle: the hair is loose, the upper strands are pinned high at the back of the head.Option 1
A great way to diversify the image if your hair barely touches your shoulders.Separate the strand above the bangs and backcomb. We put a roller under the strand and fix it. Velcro curlers can be used as a roller. They stick better to the hair. We grab the side curls and (together with the combed strand) we fix them on the back of the head with an elastic band. Using any thin object, we stretch the hair a little from above, giving it volume. A Chinese stick or an ordinary hairpin will do. It is better to pull strands with your fingers on long hair, but not on short hair.

Option 2
Separate one strand at each temple (above the ear) and fasten them to the back of the head with an elastic band. With the first strand we grab the curl, draw it over the tail and wind it behind the first strand. We repeat from the opposite side: we grab the curl, draw it over the tail and wind it under the lock. We connect the ends of all four curls with an elastic band. It makes a cute heart.
Option 3
Using a hair straightener, twist the ends on a few side strands. Separate one strand at the crown and backcomb with a comb. To keep the strand in place, spray it with hairspray. Having laid the combed strand, pin your hair with a hairpin, making a “malvinka”. Ready!A great option for a romantic date, going to the theater and even for a wedding.

Option 4
Grab a wide strand (from forehead to ear) at each temple. Secure the strands at the back of the head with an elastic band, masking it with a thin curl. Randomly, in random order, braid a couple of thin braids. For more blunders, you can curl the ends of your hair a little.
Option 5
Separate a strand from each temple and make two flagella (turning the strands away from you). Connect the flagella at the back of the head, tying them with an elastic band. From the loose ends of the tourniquet, braid a pigtail, choosing your favorite technique. For example, ala "fish tail".
Emphasis on accessories
With the help of ribbons and scarves, you can turn even the most ordinary ponytail into a work of art. Someone will think that hair with a scarf resembles a collective farm style. And wrong! It is fashionable and beautiful - even Hollywood stars flaunt branded scarves skillfully tied to their hair. In summer, a scarf will protect you from the scorching rays of the sun. He also has other advantages: with the help of a well laid scarf, you can hide hair imperfections, regrown roots, gray hair or a rare parting.Option 1
Release and comb your hair. Tie a knot around the middle of the scarf. It can be a regular or decorative knot - to your taste. Put the scarf over your forehead (so that the knot is a little to the side). Tie at the back of your head double knot and hide the ends of the scarf behind the base of the fabric.
Option 2
love fashion images pin-up style? Then this option will suit you.Divide your hair into two sections: back (crown and nape) and front (forehead). Gather your hair in a bun at the back. You can pre-braid it in a braid, which will allow you to give hairstyles fixation. Twist the hair in front into a tourniquet, style it with a donut and secure with invisible ones. Finishing touch: tie your head with a cute scarf or shawl.

Option 3
Another great version of the image of "pin-up girls". Make a long bang by separating a strand above the center of the forehead. Collect the rest of the hair in one or more tails (the ends of which we curl with a curling iron). The most important stage is the formation of bangs. It is the large bangs that are one of the hallmarks of this style. We wind the front strand onto the curling iron. We give it the desired shape and sprinkle with varnish. Behind the bangs we tie a small handkerchief with polka dots with a bow.
Option 4
The popularity of The Great Gatsby rekindled interest in American culture in the 1920s. And, of course, this interest has not bypassed the fashion world. Ladies of that era, going to a party, preferred short hair, and long curls were removed under a catchy headband. However, the bezel was also worn on short hair. In addition, the hair is often curled. If you like visiting Mafia clubs or jazz bars, then retro styling will come in handy. Let's look at one of the ways to create such a hairstyle.Comb your hair to the side and put on a glamorous headband. We pass the hair by the rim - strand by strand. Voila! For owners short hair we advise you to smooth the curls with gel and (where can you go without it?) put on a headband!

Among these hairstyles, you are guaranteed to pick up a few for yourself.