This article will help a little beginner needlewomen. For knitting with a hook, basically the same threads are taken as for knitting. But the difference in working with a hook is that with the help of a hook you can knit and very fine yarn. Directly choose a hook for knitting, depending on the choice of thread and the density of the fabric. The hooks themselves vary in thickness. The diameter corresponds to the number. Crochet voluminous and bright colors- a very exciting activity.
The hook material also needs to be selected. The best would be a hook made of metal. In order not to hurt your finger, the hook is chosen not very sharp.
How to learn to crochet beautiful flowers quickly and easily
Any knitting begins with an air chain, the number of loops in it depends on the product. The working thread is always thrown over the index finger, and the free tip remains in the palm of your hand. The article will show step by step crochet patterns for the very beginners.
The diagrams above show how to properly hold the working thread in your hands and how to crochet loops.

The following diagram shows how to knit a single crochet, but based on an air loop.

Crochet stitch patterns for beginners

Double crochet in one loop:

Scheme of knitting a double crochet with a common top:

Scheme for knitting a popcorn column:

The scheme of how the purl embossed column is knitted:

And the last scheme, how to knit a front embossed column:
These patterns will help beginner knitters learn the very basics of knitting technique.
We create decorative flowers with a description of the work with our own hands
Crocheting flowers is a very exciting activity. They can decorate any thing from a small napkin to clothes. In general, if you include more imagination, you can create many miracles. Crochet flowers can be knitted in various sizes: both the smallest and the largest. Here are photos of finished flowers crocheted:


The flower, which is shown in the photo, can be knitted even by the most inexperienced person. This flower can decorate any part of the baby's clothes.
 First, six air loops are knitted and connected into a ring. In order to tie the base for the petals, you need to tie four air loops and attach to the ring, doing it with a half-column. Stretch the threads to the center of the ring. So it is necessary to repeat five times.
For the petals, knit: knit one loop with a half-column, the second with a single crochet, from the third to the seventh with a crochet, knit the eighth loop again without a crochet, finish with the ninth half-column. This will be the top of the flower.
The bottom layer of the petals is knitted with five air loops, which are then attached to the back of the petals.
The lower petals are knitted according to the scheme: knit one loop with a half-column, the second without a crochet, from the third to the eleventh with a crochet, the twelfth again without a crochet, and finish with the thirteenth half-column. So you need to repeat five times. Tie the resulting flowers together.
To knit the flower shown in the photo below, you will need yarn and a hook number 2.5.
 Knitting this flower must be done in two threads. First of all, a chain of seventy-five air loops is knitted. In the second row, you need to add two columns with one crochet to each loop. On the third row from the previous row, skip two loops, and on the third row, knit seven double crochets. Then, from the previous row, skip two loops again, and in the third column already without a crochet. So repeat from start to finish. Below is a crochet flower pattern for beginners:

Roll the finished flower in a spiral, and fasten with a thread on the back. The flower is ready.
We make a flower "corn kernel" with step-by-step instructions for work
Tie six air loops and connect into a ring with a blind loop. Next, one lifting air loop is made and twelve single crochet stitches are knitted. The excess thread must be cut and the ring closed. Make three more loops of lifting, the next loop is knitted with four columns with a crochet, pulling out a loop and a hook. Crochet between all the lifting loops and the very first column, thus grabbing the thread with a hook and forming into a corn kernel.
Next, you need to knit three more air loops, and the next column is knitted with three lifting air loops and a single crochet. Double crochet four stitches and slip into one stitch of the previous row. Pulling up the loop, pull out the hook. You need to stick the hook between the first column and the lifting loops. Grab the loop and stretch.
Knitted flowers became very popular. We crochet flowers, then decorate clothes, hats, use them as key chains on a phone or a backpack. Very beautiful bouquets can be created as a gift: flowers as a decoration will appeal to any girl or woman!
In the photo below you will find a lot of options for using such an accessory. But, besides this, a simple micro (you can watch videos on YouTube for free) will help you figure out how to knit correctly, a detailed lesson with a description and useful understandable diagrams would be great for beginners! So let's get started!
How to crochet a flower for beginners?
To tie beautiful flower, relying on diagrams with pictures is very simple. You can not only choose the desired color, but also the flower itself: lilies, roses, chamomile. Such products can not only act as a separate composition, they can be used as a decorative element. By the way, when knitting, you can use beads for decoration or beads to create unique designer jewelry.
Crochet flowers video
In this master class, you will learn how to knit the simplest flower for beginners in this type of needlework. We need yarn of two colors: yellow for the middle and white for the leaves. Of course, you can do the work in one color - then the middle will not be visible.
So, we need quite a bit of yarn, you can use the leftovers. And also - hook number 3. 

- 1 R.: 5 S.B.N. in an amigurumi ring.
- 2 R.:(2 V.P., P.R. from S.S.N., 2 V.P., S.S. to the same P.) * 5.
Thus, the amount of S.B.N dialed at the beginning
. corresponds to the resulting number of petals. If you want not five, but 6 petals, dial 6 S.B.N.
Thus, we got beautiful flower, which can be sewn on top of a children's panama, make a brooch out of it for clothes, decorate a children's hat or a small knitted amigurumi figurine, as in the video tutorial below. What to decorate - you choose for yourself, but how to properly tie such a flower will tell our video:
Crochet flowers step by step
In the master class above, you have already learned how to knit flowers from 5 petals. And now we bring to your attention pretty flower with eight petals
. This is a very practical option, it can be used to decorate hats, in the form of a brooch or decorate a gift box with it. 
We have chosen rich green shade from which to tie 10 V.P. and closed in a ring with the help of S.S. 

- 1 R.: 3 V.P.P., 23 S.S.N., S.S. in 3 P.P.
- 2 R.: V.P.P., 8 arches from 3 V.P. (AR.), each AR. Fix S.B.N.
- 3 R.: 3 V.P.P., in each AR. - 2 S.S.N., V.P., 2 S.S.N., S.S.
- 4 R.: Let's move on to the petals. Under V.P. m/s S.S.N. - 7 S.S.N. Start the very first column with 2 V.P.P.
- Our beautiful element is ready!
Crochet flowers patterns and descriptions
With a crochet and two knitting needles, you can knit absolutely any elements, napkins, make a beautiful thing with a pattern. The main thing is that the work gives pleasure! For beginners, we recommend trying crochet flowers. Any needlewoman can handle them!
Knitted flowers in pots crochet patterns with a description
Flowers in a vase would be a great gift. They will decorate the interior well!
We chose yarn Iris» pink, yellow, brown and green.
Our work begins with knitting a vase. For her, we take a hook numbered 0.9. We collect 5 V.P. with a brown tint. in the circle of S.S. 
- 1 R.: V.P.P., 11 S.S.N. close S.S.
- 2 R.: 3 V.P.P., S.S.N. in 1 P.P., (2 S.S.N.) * 10. In total it will turn out 12 times. S.S.
- 3 and 4 R.: 3 V.P.P.. 2 S.S.N. in a trace. S.S.N. prev. R., (S.S.N. in the next S.S.N. prev. R., 2 S.S.N. in the next S.S.N. prev. R.) - to the end. S.S.
- From 5 to 16 R.: 3 V.P.P., S.S.N. in S.S.N. prev. R., S.S.
Flowers We make 12 pieces. We type 6 V.P. in pink. in the circle of S.S.
1 R.: 6 V.P., 3 unfinished S.S.2 N., knitted together in a ring, 5 V.P., (S.S.N. in the ring, 5 V.P., 3 unfinished S .С.2Н., 5 V.P.) * 4. S.S.
flower center in the amount of 12 pieces: in yellow, dial 3 V.P. in a circle. 1 R.: V.P.P.. 10 S.B.N. S.S. Leave a thread of 20 cm - cut the rest.
Stem(12 pcs.): Wrap a piece of wire with the yellow yarn that we just left. Lubricate with pva glue - m from above. 
 6 pieces of leaves: in green we recruit 12 V.P.P. 1 R.: S.B.N., 9 S.B.N. in a trace. 9 V.P., 2 V.P., 8 S.B.N., in the next. 8 V.P. 2 R.: V.P.P., 7 S.B.N. in a trace. 7 S.B.n. prev. R., 2 S.B.N. in the arch, 2 V.P., 2 S.B.N. in the arch, 8 S.B.N. Then we continue according to the scheme with direct and reverse R.
Collecting carefully, all details starch, we put a vase on some form, preferably a plastic one. Such knitted flowers in pots will look very nice on the desktop at the computer.
crochet roses
Another master class with a video knitting lesson roses from pink thread. Recruiting 48 V.P.
- 1 R.: S.S.N. in 4 P., (P. skip, S.S.N., V.P., S.S.N.) - to the end.
- 2 R.: V.P., (2 S.S.N., 2 V.P., 2 S.S.N.) - in each arch. Flip the canvas.
- 3 R.: V.P., 7 S.S.N. in the arch, S.B.N. - between them.
We cut off the thread, leaving 5 cm, insert them into the needle, sell them into the loops of the typesetting chain. We tighten. If the description seemed too complicated for you, we suggest you look at a simple video lesson.
Volumetric crochet flowers: schemes with a description of the master class
Most often, voluminous flowers become such by knitting using lush columns.
How to do it right - you will learn now! So, a flower with lush petals begins with the choice of a hook (we have number three) and yarn (red, 100% cotton).
Legend:
- W.P.P.- air lifting loop.
- S.B.N.- a single crochet.
- S.S.N.- double crochet.
- S.S.- connecting column.
- P.ST.- a magnificent column.
Description of knitting:

Now we will describe in more detail the process of knitting the most P.ST.: start like S.S.N. (N., P. pull out), do 2 P. (total 2 P.), repeat 1 more time N., pull out P., knit 2 P. (total 3 P.), finish knitting 3 ST. (total 6 P.). We tie together 5 P., then those 2 that remain.
Let's make another voluminous flower.
It will differ from the previous one in that it will multilayer. For him, we took a thinner yarn and a smaller hook. 


Knitted crochet flowers master class video
In the master classes below, we will show you how to create unique masterpieces!
Crochet flowers for decoration - crochet accessories
Often needlewomen knit flowers not as an element decor
but as an accessory to order to sew on children's hats or jackets
. Today you are waiting for the scheme and description of knitting just such flowers! 


How to crochet a flower for a hat?
Volumetric rose on a hat made of red thread .

Thus, the rosette turns out very volumetric And beautiful and very suitable for headdress decoration! 

Jewelry for clothes
For clothes, we offer to make a beautiful brooch
of related pansies
from dark purple and lilac yarn. Still need a little yellow color for the center of the flower. So, we take hook number 2. We make a ring from V.P., then we knit according to the scheme. 

For everyone who loves beauty and knows how to handle crochet and thread, and is just learning to knit, flowers are one of their favorite topics. They are very diverse: complex, simple, large and small, but the result, of course, pleases everyone.
Flowers, crocheted no one will be left indifferent. And there aren't many of them. So here are some more ideas and tutorials.
Basic techniques in crocheting flowers
Knitted flowers can become an independent composition, as well as decorate clothes and accessories (for example, you can decorate a bag, sweater, headband, hair band), shoes, interior, gifts and much more, giving charm and originality.
To knit flowers, you need a very small amount of thread - the leftovers from knitting are perfect. And depending on the size of the hook and the thickness of the threads, textures, colors, you can create different flowers even in the same pattern.
The hook for knitting flowers should be selected according to the thickness of the threads. If thin threads, then the corresponding hook. Well, vice versa. But if you want a looser texture, use a thicker hook.
Also, you can experiment with patterns. For example, if the petal pattern has a single crochet, you can try to make 2 or 3 crochets, getting wider petals, or vice versa: knit with single crochets. And we will not limit ourselves to this: we are trying to change the number of petals in a flower, the number of layers, etc., getting the desired shapes and sizes.
If you evaluate crocheting flowers with a general look, then the work comes down to knitting the core of the flower and knitting the petals. And if you make the core of the flower empty, you can make a beautiful frame, for example, for buttons. So, experiment and have fun with it.
Knitting pattern


The article about knitted flowers turned out to be quite popular. Therefore, we continue to publish a collection of knitted flowers.
Pansies:
knit the first flower
scheme 1. Dial 6 air loops with eggplant-colored yarn, close them in
ring. Knit 1st and 2nd row according to scheme 1. Knit in orange color
3rd row.
Knit the second flower according to scheme 2. Dial 6 air loops,
close them in a circle. With orange yarn and knit from the 1st to the 4th row of the pos
scheme 2.
Bud: cast on 6 air loops from eggplant-colored yarn, close them in a ring. Knit from the 1st-4th row according to scheme 3.
Assembly:
starch the flowers and the bud, put the second flower on top of the first,
put on a plastic stem and fix with stamens. buds
plant on plastic stems.
 |
 |
 |
Three-leaf knitting pattern - brooches  |
 |
 |
 |
 |
 |
 |
 |
 |
 |
 |
 |
| The following flowers are very easy to put together
|
 |
 |
 |
 |
 |


We continue to publish a collection of knitted flowers.
Knitted daisies.
The core and petals of the flower are knitted with contrasting threads.
We knit a small flower:
cast on 5 air loops and close them in a circle with a half-column.
1 row: one air loop for lifting, 12 columns without a crochet.
2 row: * 7 air loops, in the second loop we knit a column without
nakida and then 6 single crochet, we knit the 6th column in the second
circular column*; repeat from * to * 5 more times (for a total of 6
petals).
3 row: tie all the petal according to scheme 1.
Heart of a small flower:
cast on 2 air loops.
1 row: 5 single crochets in the 2nd air loop
2nd row: 10 single crochets we knit behind the back wall of the loop of the previous row.
3 row: we make increases through 1 loop = 15 loops.
For a small flower, you need to finish knitting and break the thread. For a large flower, we knit 4 rows: we increase through 1 loop = 22 loops.
We knit a large flower according to scheme 2.
 small flower and small flower center |
 big flower |
| Knitting pattern for daffodils:
|
 |
 |
 |
 |
 |
 |
 |
 |
 |
 |
 |
| Author's flowers from Nelya Solovey:
|


Master class on knitting a flower "Poppy, field" from Elena - koluchka.
 |
1. Close 8 VP into a ring. (Yarn "Tenderness")
2. Knit 12 sc in half loops.
3. In the same half loops, knit the third row of 16 sc.
4. In the fourth row, 21 sc are knitted in the center of the "berry".
5.6. Turn the “berry” over and knit a row of 21 sc.
7. Take a thinner yarn ("Tulip"), pull the loop from the center of the "berry".
8. Insert a hook and loop in front of the last row of RLS, pull out and knit a loop from the thread under the “berry”.
9. Knit RLS for the edge of the “berry”, 3 VP, RLS for the edge of the “berry”.
10. Similarly, perform the remaining six jumpers, pulling the loops from the center of the "berry"
11. Knit a row of 21 sc.
12. On each loop of the previous row, perform a “stamen”: 16 VP, SS (21 pieces)
13.14. For the petal, attach from the inside of the conn. column and knit
first row 10 VP, SS. Second row: tie the first row with 12 sc. Third and
fourth row: 14 sc. Fifth and sixth row: 16 sc. seventh, eighth,
ninth: 18SBN. In the tenth row, evenly add 10 loops (total 28
loops). Eleventh row: RLS, PS, SSN, SS2N, SSN, PS, RLS
(repeat three times).
15. Similarly, tie the second upper petal. Make the bottom petals
a little more, increasing the chain from the VP of the first row by 2 -12 VP.
Accordingly, the number of columns in each row of the lower ones will increase by 2
petals.
16. In conclusion, tie poppy petals step by step(yarn "Canaris" 203 m -20gr).
This flower can be used for decoration knitted product or
like an Irish lace motif. Elena's website has an online topic open
knitting products in the technique of Irish lace for lovers of poppies

For knitting flowers you will need: Iris threads in 2 additions, a 1.3 mm hook and a flower pot.
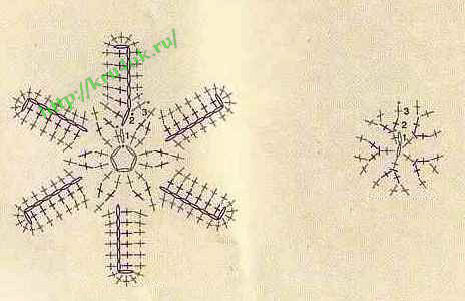
Knit petals according to the scheme 1 - 6 pcs.
flower center:
Knit in a circle
1 row: ch 2, from the first ch. knit (st.b / n, 6 ch) 6 times.
2 row: From each art. b / n of the previous rows knit 2 tbsp. b / n, with
this chain of 6 in. n. prev. Leave rows ahead of knitting.
3rd row: art. b/n.
See the result in photo 1.
 |
| Now you need to tie the petals with connecting posts in 2 reception of 3 things to the middle of the flower. The first 3 petals are tied to row No. 2 of the middle of the flower, and the second 3 - to row No. 3 (photo 2). For the stalk, you need to tie a number of art. b / n for connection. columns and more knit in a circle, if the stem is too wide - do reductions in the forefront, knitting 2 tbsp. b / n together. I reduced to width row 8 tbsp. b/n. Then a straw for cocktails just enters the stalk (for stability) (see photos 3 and 4). |
 |
| Earth in a pot: In the last row of the stem, change the thread to brown. 1 row: 1 st.b / n, (2 st. b / n from 1 st. previous row) 3 times, 1 st.b / n, (2 st. b / n from 1 st. previous row) 3 times. 2 row: 1 st.b / n, (1 st.b / n, 2 st. b / n from 1 st. previous row) 3 times, 1 st.b / n, (1 st.b / n, 2 items b / n from 1 item previous row) 3 times. 3 row: 1 st.b / n, (2 st.b / n, 2 st. b / n from 1 st. previous row) 3 times, 1 st.b / n, (2 st.b / n, 2 items b / n from 1 item previous row) 3 times. Then we sew the resulting hexagons of the earth in several colors along short sides. We tie in a circle to the required width of the pot. In order for the flowers in the pot to stand steadily, I cut out a piece of styrofoam along the size of the inside of the pot and stuck the tubes of stems there, and I glued the bound earth along the edge to the circumference of the pot. |

Petal:
Dial 5 in. n. and knit in a circle.
1 row: ch 1 lifting, 4 st b / n., 2 tbsp. b / n to the extreme v.p. chains,
2 vp, 2 tbsp. b / n in the same extreme c. n. chains, 3 tbsp. b / n, 2 tbsp. b/n c
1st vp chains, ch 2, 1 tbsp. b / n in the same loop.
2 row: 2 tbsp. b / n, 3 half-columns with a crochet, 2 tbsp. b / n, in a chain of
2 vp tie (1 st b / n, 2 ch, 1 st b / n), 2 st b / n, 3 semist. s / n,
2 st b / n, in a chain of 2 ch. tie (1 st b / n, 2 ch, 1 st b / n).
3 row: we knit with b / n columns, in a chain of 2 ch. tie 1 st b / n.
4 row: we knit with connecting posts one in one st b / n.
 |
flower center:
1 row: ch 2, from the first we knit 6 st b / n.
2nd row: 1 st b / n, 2 st b / n from 1 tbsp. previous row - repeat to the end of the row.
3rd row: knit st. b / n without increments.
Sheet:
1st row: Cast on 20 ch, 19 st double crochet, 5 st double crochet from extreme c. n. chains, 19 tbsp. with a crochet.
2 row: art. b/n.
Assembly: We attach 3 petals with connecting
columns to the last row of the middle of the flower Then with threads of green
colors on the connecting posts we knit a row of st. b / n and then in a circle to
required stem length. Sew 2-3 leaves to the base of the stem. IN
I inserted the stems for the stability of the tubes for cocktails, and for
base tied around 2 old CDs. To keep the flowers from falling
sewed the middle through the hole of the disk tightly to the strapping from below.

Multiple Schemas crochet flowers to your piggy bank. They can decorate a hat, dress, panama or make a brooch.
MATERIALS
Remains of yarn of various colors.
HOOK
Choose the size according to the thickness of your yarn.
Types of loops:
Air loop (ch.p.): in p.
insert the hook, throw a thread on it and stretch it through the loop.
Single crochet (st. b / n): insert the hook into the loop of the chain or lower
row and pull up a new loop, grab the thread and knit 2 loops on
hook in one go.
Double crochet (st. s / n): make a crochet on the hook, insert it into
loop of the chain and pull out a new loop, knit 3 sts on the hook in pairs in
2 receptions.
Column with 2 crochets (st. with 2 / n): make 2 crochets on the hook, enter
hook into the loop of the chain and pull out a new loop, knit 4 sts on the hook
in pairs in 3 doses.
Flowers: according to schemes 1,2 and 3.
DESCRIPTION OF THE WORK Flower "A".
Dial a chain of 16 c. p. and knit according to scheme 1.
ASSEMBLY
Fold the resulting braid in a spiral and secure the center from the wrong side with a few stitches.
DESCRIPTION OF THE WORK Flower "B".
Dial a chain of 52 c. p. and knit according to scheme 2. After finishing the 4th p., cut the thread.
ASSEMBLY
Roll the resulting braid in a spiral and fasten in the center from the inside. sides with a few stitches.
DESCRIPTION OF THE WORK Flower "B".
Dial a chain of 40 c. p. and knit according to scheme 3.
ASSEMBLY
Roll the resulting braid in a spiral and fasten the center from the inside. sides
several stitches. In the case of using flowers as a brooch,
attach with out. side pin.


Crochet has always been in demand, but to a different extent. Today
this type of needlework is more popular than ever. Classical
types of knitting: loin knit pattern becomes a border summer jacket;
elements of guipure tablecloths - magnificent decor of blouses. Napkin patterns
hat fields are knitted, collar motifs are jacket coquettes. There are many examples.
This is a natural process, a kind of creative game. in value in
preservation of traditions and their modern embodiment.
Have you noticed, dear craftswomen, that the emphasis in knitting is on
complex options not playable on knitting machine?
One of these areas is guipure. It is designed to mimic the complex and
expensive Venetian embroidery.
The best examples of such knitted lace were obtained from the Irish
nuns, so over time it began to be called "monastic", and later
- Irish guipure. Please do not confuse with Irish lace, which
method of execution differs from guipure. Classic guipure knitting
complex and painstaking. Since he imitated needle-embroidered lace,
then they used lace linen, thin cream or white paper threads
for knitting elements and very thin for nets and brids. Modern fashion
takes into account our busyness, the rapid pace of life, the desire to
realize the intended product. She favors models
coarse knit from thick yarn. This is in the hands of novice craftswomen.
You may have noticed that the mesh that holds the elements together is rarely
used. Actual canvases "coupling" guipure. steel elements
larger, the thread is thicker.
So, suppose you decide to knit a blouse completely or
fragment with guipure elements. It is advisable to pre-draw
sketch on the pattern, you can improvise in the course of knitting. Most
compositions are occupied by leaves. In various books and magazines,
Lots of knitting patterns. It is not possible to discuss them within the scope of this article.
manifold.
For example, it is customary to knit a classic guipure sheet in two ways: with
extension from one RLS (scheme 1) and with an extension on the arch (scheme 2).
At the same time, knitting methods can be different: for both half-loops, for
back half-loop, for the front half-loop, for the purl horizontal
half-loop of the columns of the previous row.
The texture of the sheet in the first photo turned out to be flat, in the second - ribbed.
Photo1. The sheet is crocheted according to scheme 1 for both half loops:  |
Photo 2. The sheet is crocheted according to scheme 1 for the back half loop:  |
Photo 3. Complex sheet.  |
Crochet leaf pattern 1 and 2:  |
Photo 4. Sheet 1 is crocheted according to scheme 2.  |
Scheme 3. Crochet a sheet. 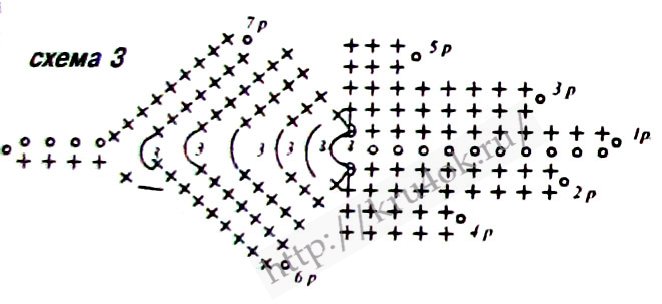 |
Scheme 4. Crochet a sheet. 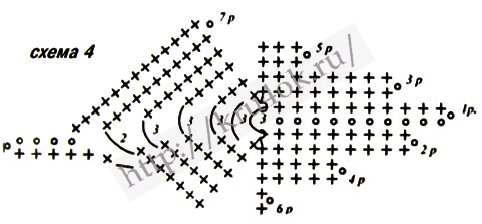 |
The shape of the leaf, connected according to scheme 1, is wide at the handle and sharp at
end. Increases on the arch according to scheme 2 create a sharper one at the handle
leaf shape. With a large number of dialed air loops (10-12) and
the generally accepted indentation of 2 columns without a crochet sheet turns out to be wide.
The teeth of the leaf are concentrated on the front, the leaf is smooth at the handle.
This form is good when connecting them into a complex sheet (photo 3). At
a small number of air loops of the original chain (4-6) sheet
it turns out narrow and with multi-row knitting - long. teeth
are located along the entire length of the sheet (sheet 2 in photo 4).
And if the composition requires a large sheet with teeth along the entire length? Increase the number of single crochet indents (diagram 3).
For clear, ornamental compositions, one or two types are used.
leaves. The sketch draws leaves of different sizes and shapes: small and
large, flat and curved. The rotation of the sheet is obtained when knitting
different number of RLS on the left and right sides of the arch: 1 and 2, 2 and 3
give a slight turn of the sheet, and 1 and 3 - a steeper one. Sheet 4 on photo 4
associated with a turn in one direction (Scheme 4). This variety of shapes and
the size of the leaves only decorate the composition.
To be continued …

We continue the conversation about knitted leaves.
Diagram 5 shows a sheet in which the turns are connected alternately in
different sides. A variety of leaf shapes decorates the composition, gives
her expressiveness. Experiment and you. How else can
get curved leaves? In addition to zabchatyh, there are rounded and
random leaf shapes. Often found in compositions small
leaves connected by columns of different sizes. For rigidity and
beauty, tie them with single crochets with "pico" or "crustacean step"
(see diagram 6 and 7).
Tip: do not knit more than 2-3 half-columns in a row. Their function is to create
smooth transition from single crochet to double crochet.
Similar to knitting
small leaves seems logical knitting leaves of medium size
columns with 2 and three crochets. Yes, it is possible, but the sheet is even after
strapping is somewhat loose. Medium sized leaves
look better if you tie them with single crochets, half crochets and
columns with one crochet on both sides of the VP chain (diagram 8).
Tie such a sheet with single crochets twice in the same
column heads. Of course, on the rounded places of the sheet, add
single crochet. For the handle, knit 6-7 air loops and in
in the opposite direction, tie single crochets on them.
 |
Another version of the sheet: knit different-sized columns on columns without
nakida, with which on both sides tie a chain of air loops
(scheme 9).
Tie this sheet with bourdon: fold the knitting thread in half (this is
bourdon), secure the single crochet in the middle of the bourdon, fold the threads
bourdon together. Then hold the thread along the fabric and tie
single crochet. Having tied the sheet completely, tie 6-7 sc around
threads (on bourdon) for a leaf stalk. Tie the VP, cut off the bourdon
unevenly, attach the remnants to knitting and knit RLS in reverse
direction. Tie the connecting posts at the base last
sheet, break the thread and pull it to the wrong side. Thread tail use
for stitching elements together.
If you have conceived a canvas of openwork, transparent elements, then
the way the leaves are knitted is changing. The diagrams show options for
leaves: small (scheme 10) and medium (scheme 11). Binding in two rows
RLS will give shape.
 |
 |
 |
Two more options for openwork leaves are shown in Scheme 12.
To be continued …

We continue to publish patterns of knitted leaves. This part of the leaves
real flowers and plants: clover, oak leaf, etc. They are perfect
for knitted applications, brooches, color compositions.
Knitted clover leaf  |
Knitted oak leaf  |
 |
 |
 |
 |
For an example, how you can use knitted leaves in a composition:  |
Knitted maple leaves  |
 |
Knitting is an interesting needlework activity. Peculiar various crafts crochet used in decoration technique mobile phones, individual parts of clothing, hats, household items and home interiors. Crochet crocheted flowers are a durable and multifunctional gift, since the decoration is used as an element of outdoor decor at home. And the precisely selected color range of petals made of threads on tablecloths and napkins will help to elegantly decorate the festive table relatively economically.
Crochet crocheted flowers - a durable and multifunctional gift
You will need:
- Mercerized cotton yarn 100%;
- Hook 1.5 mm.
How to do:
- Crochet one lifting air loop. In the resulting ring we knit seven loops with a pigtail without a crochet.
- Connect the row by threading the first loop. We knit the resulting ring in stages in the same way further.
- From the initial knitting point upwards, we knit three free loops with a pigtail.
- With two columns we connect the top of the loops and the base of the flower with a thread.
- Knit two loops back up, close the petal, pulling the thread through the column of the loop base.
- We knit the connecting loop through the base column, stretching the thread. The first flower petal is ready.
- Then knit in the same way: three loops up, connecting columns with a bump, two down, a column and pulling the thread through the base.
- Stretch the thread of the last petal from the wrong side, pull the end of the thread through it, tighten the knot. You have a chamomile.
For decoration small parts it is best to soak gently with colorless glue or PVA.
Crochet flowers for beginners with patterns for free (video)
Crochet small flowers: description
To get started, you need to clearly understand what kind of flowers you want to make. Accordingly, choose the appropriate color scheme for the flowers, especially if they make up a pattern. From a thin woolen thread you will get a fluffy flower without clear contours, cotton threads highlight the boundaries of the figure, and mercerized cotton gives the product an extra shine.
We knit a peony
Necessary:
- Fine cotton yarn;
- Hook.

To get started, you need to clearly understand what kind of flower you want to make.
How to do:
- We form the initial ring - the basis of eight loops with a pigtail. Connect them by knitting into the first initial thread.
- Knit up three air loops, knit the fourth as follows: stretch the thread twice from the second loop of the warp, hooking it with the upper loop. It looks like an arch. Stretch the thread from the arch into the third air.
- Calculate on the first row odd number such columns with a crochet, knit each main loop in this way.
- At the end of knitting, tighten the thread by making two air loops.
- For the next row of flower petals per arch, increase the number of loops. Stretch the thread into the base.
- We make four loops up, pull the thread through the main yarn over, closing the circle of the petal.
- Having finished the first row of petals, we pull the thread to the wrong side and make the second row. The nakida in the lower circle needs to be made a little larger in size.
- After the end of the flower weaving, we pull the thread out, string the bead and return it to the wrong side. Fasten with a knot.
We knit a convex flower like a simple button
You will need:
- Hook 2.0 mm;
- Mercerized cotton yarn.

Although the flower fits very simply, this does not prevent him from being beautiful.
How to do:
- At the base of the thread, retreating 50 cm, we make a knot, we thread a hook into it. We collect three main loops, closing the circle, threading the fourth thread into the formed ring.
- Immediately knit another connecting chain loop.
- From it we knit 8 columns, back we close the ring with a thread through the main circle without a crochet.
- We start the next petal with one loop, pulling the thread through the single crochet from the base.
- To make the flower seem fluffier, add two columns in each of the remaining loops.
Finish knitting by pulling the thread to the wrong side.
We knit a camomile
You will need:
- Microfiber white, yellow;
- Hook 2.5 mm.

Chamomile can be knitted quickly and easily
What to do:
- We make the middle of the chamomile by circular knitting: from the initial loop we knit three air loops, connecting with the main one. Pulling the thread through the formed ring of loops, we knit the following.
- From the last loop of the middle of the flower, change the color of the thread.
- We start the first petal with twenty air loops. We close the circle by knitting the base from the inside out.
- We go back, pulling the thread through each loop through the air loops, we form the next row of the petal.
According to this type of knitting, continue until the desired volume of the petals of the knitted decoration.
How to tie a flower decoration: step by step instructions for beginners
Necessary:
- Thin woolen thread of red color;
- Green cotton thread;
- Hooks 3.0 mm and 2.0 mm.

Such a rose will perfectly decorate a hat or hairpin.
What to do:
- Cast on a pair of stitches. We knit the base with single crochets.
- Then two air ones for lifting and a connecting loop with a column.
- At the beginning, stretch the thread five times, knitting a yarn over each time. Do this until the end of the chain.
- Twist the resulting spiral with a rosette, sew at the base with a regular thread.
- We make a rose petal by knitting a chain of seven loops with green yarn.
- Then two air, three columns with a crochet through each loop, two air ones without a crochet. Repeat the pattern until the end of the chain.
- With one thread, draw a connecting thread through the first loop of the beginning and the last loop of the end of the green leaf.
- Sew knitted rose with a leaf.
- It is good to steam the product with an iron through gauze. To fix the stability of the jewelry, cover with colorless glue.
Attach the product to the hairpin by gluing the base with the surface.
Crochet petal: a simple pattern
The simplest crochet petal can be crocheted from air loops in stages, not in contact with the base.
Necessary:
- Cotton yarn;
- Hook 1.5 mm.
How to do:
- Close five air loops into a ring. We pass through the first column, from it ten air ones without a crochet, a thread through the middle arch, we close the petal with a column.
- Back we make ten air loops, through the arch, a connecting column with the base.
- Having knitted this way to the final loop of the base, make the second row - fourteen air ones, securing them behind the previous petal. Repeat the pattern to the end of the row.
- Knit a hollow petal with the second loops, attaching them to the main ones.
- If desired, you can tie each detail of the flower with multilayer loops, visually creating volume.
It turns out a flower with holes inside. To decorate such petals, you can use beads, sequins, carefully sewing them into the middle.
Floral knitting has a unique and original style. Such an inexpensive decoration on a hat made of multi-colored thread brings a special flavor to the headdress. And a beautiful necklace of voluminous petals of yarn falling to the bottom will surely cause the envy of those around you at the solemn event. A hand-knitted brooch will update your everyday dress.
Simple crochet flowers: a master class of flat flowers (video)
A wide flight of imagination, a little patience and desire will provide you with fashionable things for many years to come. And you don't have to spend a lot of money on it. IN modern world where the image dictates the terms, decoration made with my own hands, more relevant than ever, than the mass production of tailoring the same type of models. With such details in the form of flowers, you can decorate a hat or scarf for a child.