Preparing for a wedding is a lot of work. Need to pick up beautiful outfits for the bride and groom, choose the style of the event, think about wedding decorations for the festive table and take care of other pleasant little things. One of the elements that reveal the individuality of the newlyweds is an originally decorated bottle of wedding champagne. According to tradition, on festive table 2 special bottles of champagne must be present, one is opened on the wedding anniversary, and the second on the birthday of the first child.
.jpeg)
The birth of a tradition
The custom to decorate alcohol at a wedding came from the times of Little Russia. On a significant day, the bride and groom were presented with a bull and a cow as a gift. Such a surprise was considered expensive and revered. The gift was tied together by the horns, symbolizing the strength of the marriage bond. When a couple had a baby, the newlyweds gathered relatives and friends to feed them meat and drink milk. Over time, the bull and cow were replaced by expensive liquor. A bottle representing a cow was filled with champagne or wine, for a bull they chose a stronger option - cognac or vodka. Today, brides and grooms prefer champagne, due to the lightness, sweetness and versatility of the drink.

Champagne decoration options
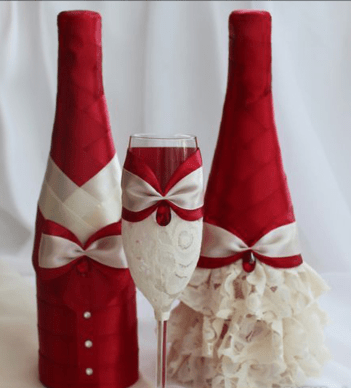
Decoration of wedding champagne can be entrusted to professionals or done original design with your own hands. A simple technique can be done even by beginners, if you devote a little time to the lesson. When wondering how to make a unique creation, it is worth remembering the style of the wedding. Every little thing must correspond to the prevailing atmosphere. In addition to decorating champagne with your own hands, you can do decor wedding glasses harmoniously combined with the created bottles.

Types of decor for wedding bottles:
- Satin ribbons. This option is considered the most popular and requires a creative approach. A little imagination can help create a unique ribbon champagne costume that your invited guests will admire. In addition, there are a large number of master classes, which, thanks to step by step photo help to bring extraordinary ideas to life. In addition to the main component, beads, lace, rhinestones can be used to decorate the surface of the bottle.

- Lace decorations. This type of design will require a little time and desire. Required attributes: lace, satin ribbons, beads, glue.
- Decorating with flowers. original version involves the use of any colors that you can make yourself.

– Roses from polymer clay. Such decorations will turn wedding champagne into an elegant and touching masterpiece. You can make flowers with your own hands or purchase them in specialized stores.

- Knitted attributes. Those who like to spend their evenings crochet can put their time to good use and create unique champagne clothes. You can also sew the bride and groom on your own, adding maximum creativity to the celebration.

Master class on creating wedding bottles
The presented master class with step-by-step photos will teach you how to create wedding bottles for the bride and groom. Pictures allow you to study the technique in detail. A beautiful representative of the weaker sex will be dressed in a charming White dress bride, groom dress in an elegant black suit with a bow tie.

Before you start creating champagne with your own hands, you must remove the label from the container. You can create a neat decor only on a flat surface of the bottle. To do this, put the bottle in a container with warm water, add dishwashing detergent. You can get rid of paper after 30 minutes. After the procedure, the work surface must be wiped and degreased with acetone or alcohol.
The following attributes will help decorate the bottles:
- oblique trim or satin ribbon (black - 8 m, white - 10 m);
- glue stick "Moment";
- lace - 10 cm;
– wide bow – 3 m;
- rhinestones or beads.
picking up necessary materials for decoupage, you should take into account the fact that the satin ribbon practically does not stretch. This property complicates the process of sticking to the bottle. To get jewelry work, you should pay attention to the oblique inlay.
The ideal glue for decorating a bottle should not leave marks or bumps, be completely invisible on the product. Based on these requirements, it is best to choose a glue stick.
Champagne decoration - brides
1. Lace should be glued onto the prepared container. Before the action, you need to try on to determine the size of the product.

2. The next step involves taping the bottle with tape. We first glue one turn, which should initially be measured. Subsequent revolutions are applied to the surface lubricated with glue, after which the excess part is cut off. After applying the first turn, you should outline the middle of the bottle, the place where the ends of the tape converge. Soap can be used for this procedure. Thanks to the basting, the edges of the tape should lie exactly on top of each other.

3. Each turn of the fabric overlaps slightly with the previous turn. When working with glue, it is necessary to coat the joints on the reverse side, fixing the position of the product.
4. After most of the product is pasted over with a thin white tape, we continue to braid the bottle with even turns to the very bottom of the container.

The main part of the work has been done, now you need to add jewelry for the bride. As additional decorations, you can create lace flowers, charming skirts, hats, veils, all kinds of removable covers for the bride and groom. One easy way to create adorable bottles is to use bride and groom stencils. Having printed the models you like on the printer, you can easily bring them to life. Connect fantasy - and original product ready. A wide selection of photo bottles will help you create a beautiful attribute, among which you can choose the perfect option.

To create a skirt, you need to take three parts of a regular organza bow. The length of one part is 1 m. The edges of each bow should be soldered together, making a circle. To carry out the procedure, you need to take a metal ruler, fix the ends and hold with a heated soldering iron. The resulting product is folded in such a way that one part is slightly longer than the other. Next, you should pick up the bow by applying small stitches. In order not to miscalculate with the width of the product, you need to try on the frill on the bottle. The thread should not be pulled tightly, leaving a small gap. In a similar way, you need to make 3 frills.

To decorate the upper part, you can use a gold-plated ribbon. To fix the frills on the bottle, use a glue stick. The distance between the parts should be about 2 cm. The top layer can be fixed with an inconspicuous monofilament, fastening the inlay and tape. To decorate the neck, you can use a thin ribbon, decorating it with rhinestones.
A very small but useful thing that should be used when drinking wine is a napkin on the neck of the bottle, which absorbs smudges that form when pouring liquid from the bottle. I didn’t find anything like this on the Internet when I was looking for how to do it, so I decided to write it myself. It is important that standard wipes are used and no special means. I know 2 simple ways fix the treasured piece of paper on the neck; one of them, perhaps, no one uses except me, that is, I can consider myself the author :)
Option #1 is the easiest.
So, we take the most common square napkin with a side of 120 mm:
We unfold it once and fold it three times to get this strip:

Bend one end about 1 centimeter:


We bend our tip inward, tighten the second end, straighten it, rejoice:

Option number 2, more complex, but more beautiful.
We take all the same napkin, we also bend it three times, but straighten it again:


We throw out the middle strip, in the remaining napkin we cross 2 ends like this:

First we bend one end along the fold line of the napkin:

And then the second end and we get this thing:

We put it on the bottle, straighten it, rejoice:

It looks more solemn, or something, although the method requires a little more time and the presence of scissors.
Thank you for your attention! Subscribe to, follow to
Bottle tie
Ties are not only used as decoration for a man's official dressing room, but there are also ties for bottles of wine and champagne. The tie is worn on the neck of the bottle, thanks to which the drops formed when pouring into a glass will not fall on the tablecloth or clothes, but the tie will completely absorb them. But for this you need to properly put on a tie on the bottle. Especially for this, we have placed on the boxes a diagram of the correct tying of a tie for a bottle of wine, as well as a bottle of champagne, since the bottle of champagne is wider, so the tie must be opened and tied, as described in the diagram.
Usually bottle ties are matched to the color of table napkins, but if you want to experiment, you can choose the most unusual color combinations! We will help you choose suitable color, and we can also apply a seal or hot stamping to apply the coat of arms or symbols of your company.
We produce ties in packs of 100 pieces. If you have never used ties when serving, then you can buy a box of ties for testing from our distributors in Moscow and St. Petersburg.
A wedding is always a costly event, especially if you want to keep all the traditions and newfangled trends. Often, even such a thing as buying wedding champagne in a store becomes a significant waste. But you can easily do it yourself. For example, I have such a friend.
For it I needed:
Satin ribbons of medium thickness;
glue;
scissors;
lighter;
decorative flowers and half beads for decoration.
champagne.

It is best to start from the top, so the first thing we will do is the collar of the shirt. To do this, cut off a small piece of a wide satin ribbon, fold it in half like this and measure the required length.


Don't forget to burn the edges with a lighter! Now, that half of the front side, which will be adjacent to the bottle, is well lubricated with glue.

Glue so that the corners of the fold are in contact. The bottom corners will close afterwards, so don't worry about them.

For further work, we need tapes of medium width.

In order to measure the next segment, it is best to apply it over the collar.

The ends of the tape should overlap a little. Now we stick it right under the fold of the upper tape, having previously unbent the collar.

Thus, we seal the entire part of the bottle that the shirt occupies.

Now it's time for the tie. After reviewing many MKs on this topic, I came to the conclusion that the best solution would be to tie the most ordinary tie. Having measured the desired length of the tape, I made a regular (or whatever it is called) knot and smeared it a little with glue so that it would not move somewhere.


In this technique, we glue the entire part of the neck of the bottle until it stops expanding.

Now you need to slightly reduce the angle of the tape to make a smooth transition.

Then, we glue one end of the tape to the bottle perpendicularly, grease the entire empty part of the champagne with glue and wrap it with tape.


Here is the result.

We start decorating. To imitate the buttons of a jacket, I decided to choose gold-colored half-beads in the shape of a heart. Glue them on carefully.

And in the place where the pocket should be located, we glue the flower. Boutonniere in place.


Now you need to build a cylinder so that the image is complete. For this I needed:
A sheet of cardboard (you can cover from a common notebook);
felt-tip pen;
glue;
scissors;
satin ribbons of medium width to match the jacket.

First of all, we cut a strip from the cardboard and glue its edges.

This will be the middle part of the cylinder. The main thing is that it sits well on the cork of the bottle. Now, attaching the middle to the cardboard, draw two circles on it. The inner should be equal to the circumference of the middle part.

We need two such circles: one for the top, the other for the brim of the hat.