Sticky Notes (Sticky Notes, Notes) is an application for creating notes on the Desktop, built into the Windows 10 operating system. Microsoft program Sticky Notes is very easy to create a reminder entry, make other short notes.
What is Sticky Notes? In Sticky Notes, a note is created on the Windows Desktop in a window that looks like a sheet of paper stuck to it. After launching the application, add stickers (stickers) to the Windows Desktop, which can be "pasted" anywhere on the monitor screen.
It seems to me that it is very practical to set reminders on the desktop. In small notes, it is convenient to write down reminders or other useful information.
The ability to take notes is built into the Windows operating system, but for some reason this application is little known to most users. There are similar programs from third-party manufacturers, as well as extensions for browsers.
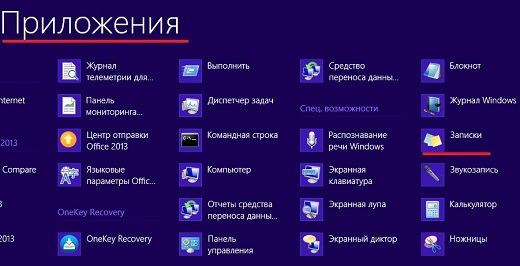
In the operating room Windows system 7 this application is located along the path: Start menu => All Programs => Accessories => Notes.
In the Windows 8.1 operating system, enter "Applications", then go to "Accessories - Windows". The app is called Notes.
Starting with the Windows 10 Anniversary Update, the app is called Sticky Notes. In Windows 10 1607, the program has been modernized, but the principle of operation has remained the same. In former Windows versions 10 program is called "Notes". The app can be downloaded from the Windows Store.
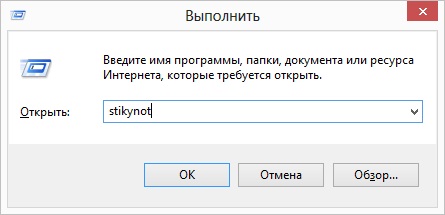
Where is Sticky Notes in Windows 10? You can find the application in the start menu, in the list installed programs. Another way to open the note-taking application is to enter the expression: "Sticky Notes" (without quotes) in the "Search in Windows" field, and then run the program.
Sticky Notes
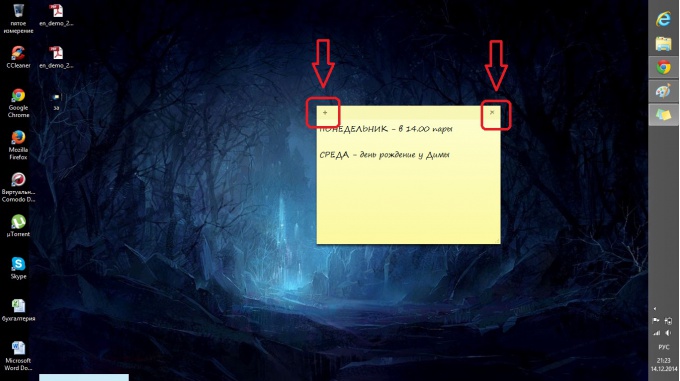
After launching Sticky Notes, a window will appear on the monitor screen, resembling a piece of paper glued to the screen. At the top of the program window there are control buttons that are displayed when the application window is active, after clicking on the note with the mouse.
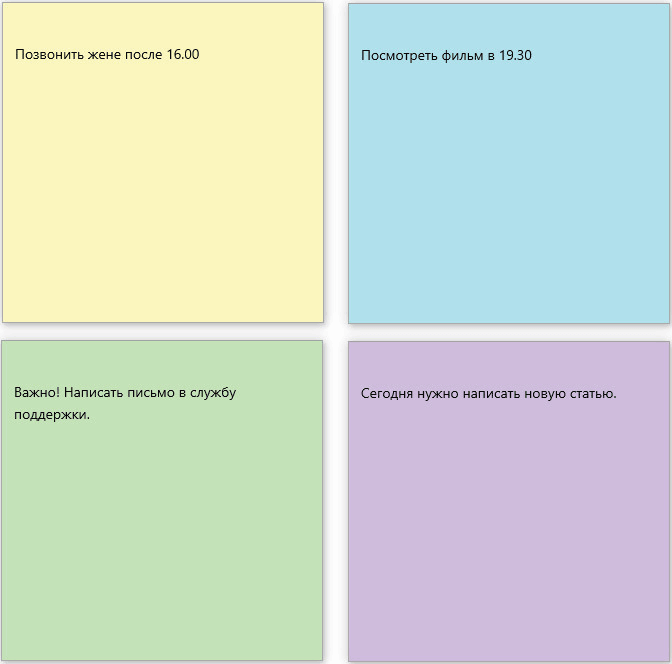
In the Sticky Notes window, you can leave a note, a reminder that will be relevant throughout the day or a certain period of time.
To copy text from a note, select the desired entry, right-click, then use the appropriate context menu items to copy or cut the text to the clipboard for pasting in another application ( text editor, browser, etc.).
You can paste text from another source into your notes. Right click in the note window. Click on the "Paste" context menu item, and then paste the text from the clipboard.
Standard Windows keys work in Sticky Notes, with the help of which the necessary actions are performed.
Create new notes on the desktop
To create a new note, in the open window, click on the "Add note" ("+") button. If necessary, leave an unlimited number of reminder entries on the screen.
Change the background color of notes in Sticky Notes
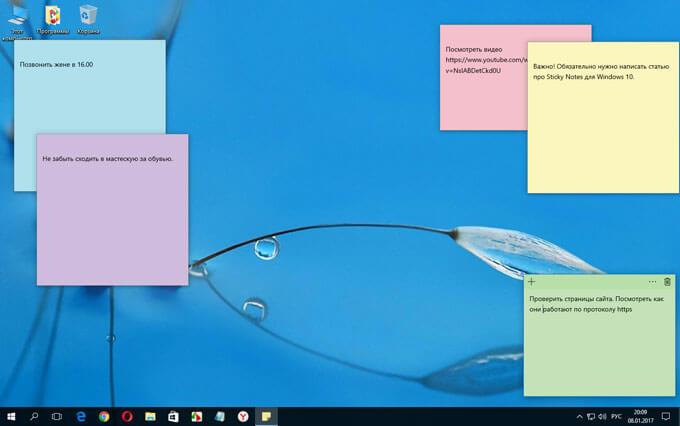
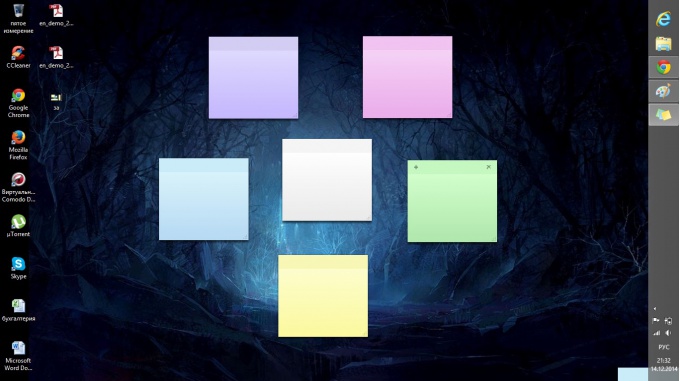
Notes open in a window by default. yellow color. This was not done by chance, on such a background the text is more noticeable at different times of the day.
In the Sticky Notes window, click on the "Menu" ("...") button, a window will open that provides a choice of six colors for the background of the notes.
![]()
Choose different colors for the reminder background. Distribute colored notes on the Windows Desktop in the right places.
Moving notes around the desktop
The sticky note can be easily moved to any place on the desktop. Just drag the note with the mouse to the desired location on the monitor screen. Groups of notes can be created in different places on the Desktop.
How to collapse all notes
If you want to remove all notes from your desktop, collapse notes. To do this, click on the application icon on the taskbar. After clicking again, all notes will return to the desktop.
How to Close Sticky Notes
The Sticky Notes application can be closed while saving the text written in the note windows. There are two ways to close Sticky Notes:
- Minimize Notes in the Taskbar. Right-click on the application icon, select "Close Window" from the context menu.
- Click on the window of any note on the desktop, press the "Alt" + "F4" keys.
After a new launch of Sticky Notes, all previously closed notes with saved texts will open.
For convenience, the application can be pinned to the taskbar.
Other Sticky Notes Settings
The size of the notes can be adjusted. Move the mouse cursor to the edge of the application window, and then increase or decrease the width or height of the window.
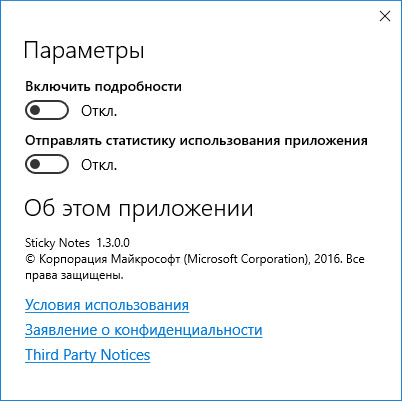
After entering the “Menu” (“…”), the “Parameters” (“gear”) button will be displayed in the lower left corner of the program window. The "Options" window will open, in which you can turn off the "Enable details" and "Send application usage statistics" items.
After turning on the "Enable Details" settings item, the application connects to Bing and Cortana, some "smart" actions are included in the notes.
How to Delete Sticky Notes
It is very easy to delete a Sticky Notes note from your computer. To delete an entry, click in the window of the note you want to delete, and then click on the "Delete note" ("trash can") button in the application window, or press the keyboard shortcut "Ctrl" + "D" in the active application window. Agree to delete the recording from the PC.
Conclusion
The Sticky Notes application is used to create notes on the desktop, which can be placed anywhere on the monitor screen. The program is part of operating system Windows.
Instruction
Find the Notes program through the search or in the programs on your computer and open it.
After starting the program, a field will immediately open in which you can make an entry. You can add a to-do list for the day, important reminders, and more.
Take a look at the note sheet. At the top left, with the "+" label, you can create new notes. At the top right, a cross indicates the deletion of a record.
To change the background color of a note, right-click on it and select the desired color. There are 6 colors to choose from in total.
Decorate your friend's photo on a social network with a beautiful icon - sticker is a feature available to all users. But, as a rule, it is paid. Although in "My World", for example, it is possible to send free stickers.
You will need
- Registration in "My World".
Instruction
Sending stickers in "My World" is made from a special page. To enter it, in the left column near the main photo, select "More" and in the pop-up window, find the "Gifts" section. By clicking on this inscription, go to the gift catalog and select "Stickers".
All icons from this section are sent for a fee. As a rule, the price of one sticker is equal to twenty mails, which is approximately thirty rubles. To send a badge, select a sticker and choose whether to show it privately or publicly. In this way, you determine whether your gift will be available to other network users or only your friend will be able to view it. After that, select the recipient from the contact list and click the "Pay and send" button.
In "My World" there is also the ability to send badges absolutely free. But for this you need to first install the "Stickers on Photo" application, which is located at: http://my.mail.ru/apps/431065. Using this add-on gives you the opportunity to receive free points, which determine the value of the badges. Points are awarded for each friend invited to the application.
There are two ways to add friends to Photo Stickers. Select manually or automatically invite all users. To do this, click on the icon with the "+" sign above the application and check the box "Select all". After your friends join the add-on, you will receive points in your account that you can use to send decorations.
To attach a funny animation to a photo of your friends, you will need to find the "Give a sticker" item in the application, select the icon and go to the recipient selection window. Tag a friend for whom the gift is intended, and use the mouse to drag the icon onto the photo. For convenience, you will be offered a sticker in several sizes, choose the one that suits you and put it on the photo. Write a message to the recipient and click Send.
By the way, the sticker itself will not be added to your avatar. Therefore, the photo with the icon will need to be uploaded first. When downloading an image from sticker you can add it to your album on "My World" by selecting the "From the Internet" item, and add a link in the URL field, which will be indicated in the bottom line of the notification window.
If the received bonuses seem not enough for you, you can replenish your account in the usual way for you (from your phone, through the terminal or from bank card) and still get a few extra points.
![]()
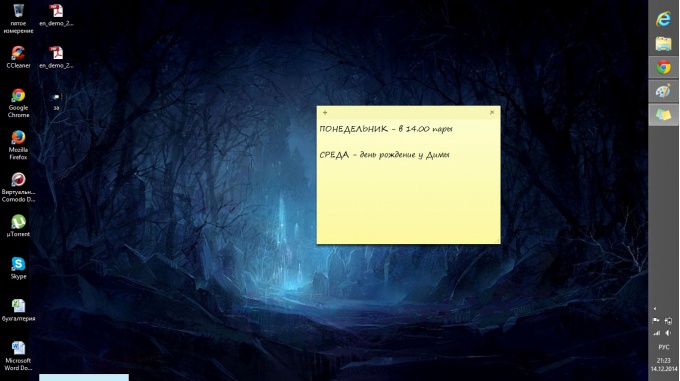
Hello again my dear readers! I am very glad to see you all. And especially good mood, due to the fact that my daughter finally lost her front milk tooth, otherwise the last few days there was crying during every meal. Now such a funny smile). In general, today, in my high spirits, I would like to tell you about one interesting little thing, namely, notes for a worker. windows table 8. Yes, at one time my entire monitor was pasted over with different stickers, on which I wrote what I had to do today or until a certain date. I want to tell you that my head was spinning. No. I have nothing against stickers, except that they constantly come off my monitor and can even get lost somewhere.
In general, this is a very wonderful thing. We are all people and we can all easily forget something, and these notes will help us a lot.

But what am I getting at? After all, Microsoft doesn't work for fools either. And they also provided the possibility of creating digital notes, notes (as you please). Yes, it's cool. At first I thought it was some gadget, but it turned out that not at all. Such electronic notes are already built into the system and in this article I want to tell you how to call them and how to use them without any third-party programs. Do you want to know about it? Well then let's go!
How to call electronic stickers?
Well, how? Is it simple? Does everyone succeed? Great! And, by the way, notice that we did it with built-in windows tools and without any programs!
In general, there are programs that create stickers on your desktop, but is there a need for them? Well if you want your stickers to be different colors or put the date and font on each sticker, please. In this case, I can offer you a program, for example, 7 sticky notes. But personally, I don’t see the need for third-party programs, this functionality is enough for me.
How to use these stickers?
When the sticker is already on your desktop, you just need to press the left mouse button and start writing tasks in these reminders.
If you want to add another note, then you need to click on the small plus sign, which is located on the sticker. Among other things, you can change the size as you like. To do this, you just need to hold down any end of the sticker with the left mouse button (you need to have a double arrow instead of the cursor) and, without releasing the mouse, drag it in any direction, then it will increase, decrease, stretch or narrow.
If you do not need a sticker, then simply delete it by clicking on the cross in the upper right corner.
I hope that my article helped you and you will use this wonderful thing, and leave the paper stickers for other things. By the way in this video course there are many useful features that will help you master Windows and various useful programs. Everything is told in order, sorted out and told in human language, unlike most of these courses. Will master any beginner In general, I highly recommend.
Well, I'm done for today. See you in the next lessons. Don't forget to subscribe to updates of my blog articles and stay up to date with everything. Bye bye and good luck everyone!
In the recent past, many of us always kept a notepad and pen with us so we could take quick notes when needed. Of course, in some cases, taking notes in a notebook is much more convenient, but these days, you can use modern technologies from time to time, namely smartphones. There are many applications that allow you to quickly take notes right on your smartphone, and we decided to dedicate today's article to just such software solutions. Introducing best apps for Android devices that can be downloaded and installed from the official Google Play store.
Microsoft OneNote
Let's start the review with a proprietary application from Microsoft Corporation. It's hard to disagree that OneNote is one of the leading apps of its kind. The application will help you create personalized notes. OneNote is ideal for taking random or quick notes, such as quickly writing down a phone number, an address, a random thought or idea, and so on.
Notes made in the OneNote app can be automatically synchronized between work devices registered to the same account. Ready-made notes can be edited, as well as add handwritten notes, attaching photos and other media files to them. Ready notes can be found by key queries. You can also share notes with friends.
SomNote is next on the list. The application is different from most analogues beautiful design. It is ideal for creating text notes. Ready notes can be sorted into categories. You can attach media files up to 100 MB to your notes while creating or editing them. Together with the application, widgets are installed in the system, which are designed to simplify the process of creating new notes.
Recordings can be synchronized in the SomCloud cloud storage created by the developers. Ready notes can be posted on popular social networks, sent by e-mail or as a short message. There is the possibility of importing information from other applications, as well as exporting to them.
MetaMoji Note Lite
This app is more than just a note-taking app for your smartphone. The creators of MetaMoJi Note tried to get a truly comprehensive solution, and they succeeded. The application differs in that it helps the user to perform almost any "office" work. Developers implemented text and graphics editors. The application also has its own browser for quick browsing of web pages and sites. If you often deal with PDF files, then MetaMoJi Note will allow you to add notes directly to PDF files.
There are a variety of templates and styles for notes. In addition to general design appearance You can customize the pen style, colors and so on. Again, there are widgets installed with the application. Supports attachment of media files and even musical arrangement. Ready notes can be sent to friends via email and social networks.
There is also a separate cloud storage for storing notes, which is called Digital Cabinet. Each user of the application has 2 GB of free space.
Write

If you are a fan of minimalism, then you will definitely like the Write application. The application allows you to create handwritten notes, and is also ideal for creating small diagrams or other text files. The creators of Write decided not to overload the application with unnecessary components, leaving the most important tools that will help when editing text documents. You can add images, bookmarks, change the style to the text and save it in popular formats such as PDF, HTML and SVG.
color note
We finish our selection with the ColorNote application, which is designed to quickly and efficiently create notes, notes, reminders, schedules, lists and other text files. It is noteworthy that the notes created in the application can be protected from unauthorized access using passwords. You can also create backups on a memory card and share notes via social networks or email.
That's all. Finally, I wanted to know what application you use to create notes on your Android device.
One of the best free e-sticker management systems today. It has good reminder scheduling tools, a handy notes manager and supports not only text but also graphic data types! In addition, the crown feature of the program is the function of exchanging stickers with other users on the Web!
The human brain is a unique system! It stores information about the entire life of an individual, but at the same time, not all of it is available to our consciousness ... The process of forgetting is responsible for the availability of certain knowledge. Moreover, we can forget everything: starting with memories of our childhood, and ending with: “What did I eat for breakfast today?” :).
Seriously speaking, few can boast of excellent memory. In the modern dynamic world, it is almost impossible to remember everything, so smart people began to come up with all sorts of tricks that allow them to remember important things at the right time.
One such invention was stickers. A simple piece of paper, stuck in time, for example, on a computer monitor, allows you to quite successfully deal with "forgetfulness".
However, conventional stickers also have their drawbacks. So, for example, if there are too many of them, then sometimes it can be difficult to find exactly the record we need at the moment. And aesthetically, they are not very acceptable. In addition, many of them, after removal, leave traces of glue on the surface (or even do not want to rip off at all :)).
And since stickers are very fond of a common person who often works with a PC, the numerous programmers decided to implement their own version of virtual sticky notes! And today I will introduce you to one of these developments, which is simply called Stickies.
Comparison with a paid analogue
Stickies allows you to quickly create and conveniently manage a variety of virtual stickers, the appearance and content of which you define yourself! In terms of its capabilities, Stickies resembles the popular paid Power Notes utility. A comparison of the possibilities is given in the table below:
As you can see, the free version can do everything that the commercial version does. And even more! Unlike a paid counterpart, Stickies can show not only formatted text in notes, but also graphics, and also allows you to share stickers with friends via the World Wide Web!
Installation and Russification of the program
To install Stickies, just download the archive with the program from our website and run the installer from it. Only one window will appear in which you can set all the presets:
From the options here, you can choose to install a special library to support hotkeys, as well as install for all PC users or only for the administrator. Further, everything is standard: the installation path and the ability to launch the program and help on it after the installation process is completed. When all options are set as required, click the "Install" button.
At the end of the installation (if you have not changed the default settings), the following windows will appear in front of us:
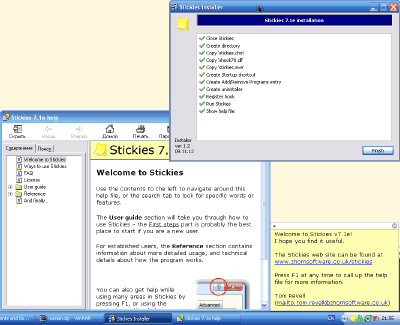
The topmost (in the screenshot) is the installation status window. It can be closed by clicking the "Finish" button. Below you see the help window for the program. Unfortunately, there is no Russian-language version, so if you are not very friendly with English, this window must also be closed.
The last window is actually an example of a program sticker, and is a greeting with links to the author's website. Also, the Stickies icon will appear in the tray, but more on that. Now the main task is to force the program to change the interface to Russian.
To do this, open the downloaded archive again, find a folder called "RUSIFIER" in it and copy its contents to the folder where the program is installed (by default: C:\Program Files\Stickies).
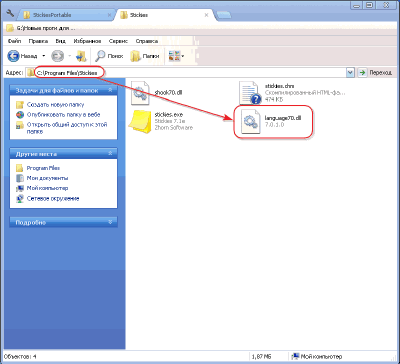
After that, it is enough to restart Stickies and we will get the Russian version of the interface. Similarly, the program can be translated into any of the languages available on the author's website!
Program main menu interface
Now that Stickies has a Russian-language interface, I propose to take a closer look at main menu programs. It can be called by right-clicking on the tray icon:
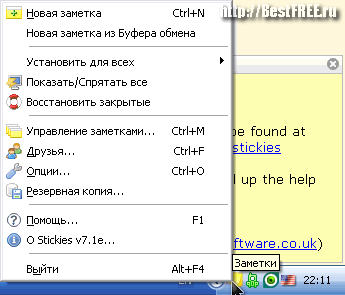
All functions here, as you can see, are divided into 4 (except for the exit button) sections. The first section contains items that allow you to create new notes, the second - the functions of displaying stickers, the third - additional features of the program, and the fourth is devoted to reference materials. We will return to the first section a little later, in the second, and so everything is very clear, but I propose to consider the third now.
Program settings
Specifically, we should be interested in the "Options" item:
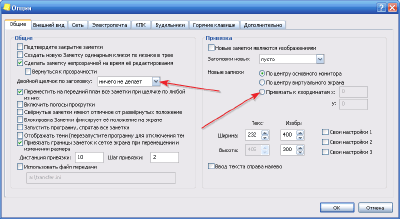
By activating this item, we will get to the window (see the screenshot above), which contains all the possible settings of the program. All Stickies options are divided into several tabs. Let me give you a brief overview of the features of each of them:
- Are common. This tab contains settings regarding the placement of new stickers on the screen, as well as their functionality. For example, here you can bind the creation of new notes to specific coordinates, apply one of the possible actions when you double-click on the sticker title, and much more.
- Appearance. Here you can find all the possible settings related to the styling of stickers. You have the ability to create up to 10 different styles formatting notes with different colors and level of transparency. In addition, it is possible to download additional skins from the Internet or even create your own using a special utility!
- Net. Allows you to enable network support in the program to be able to share stickers with friends (disabled by default).
- Electric mail. Here you can enable the program's support for mail protocols, through which you can also exchange notes (the function is also disabled by default).
- PDA. Provides the ability to set up job sharing between a computer and a Windows PDA or Palm OS device.
- Alarms. Allows you to customize the functionality and sound design of alarm clocks in Stickies.
- Hotkeys. Allows you to change some keyboard shortcuts to speed up work with certain program functions.
- Additionally. Here you will find the ability to add search engines to the program to quickly search for selected texts on the Internet, and you can also set up logging of the application and some additional options. Of the latter, it is worth noting the item “Link .sti and .ssk files to the program”, which allow you to set the appropriate file associations in the registry (by default, Stickies does not make any changes to it).
That's all, in fact, according to the options - configure Stickies as you like;).
Working with stickers
It's time for the most interesting part - actually creating stickers! To do this, either double-click the left mouse button on the program icon in the tray, or select the "New Note" item in the main menu (first item).
![]()
An empty window will appear in the form of a yellow sticker in which you can enter the desired text. By clicking on the text field of the note, we will call up the style change menu, with which you can change the appearance of the entries, as well as set the selection of individual words and paragraphs (for example, create a list):
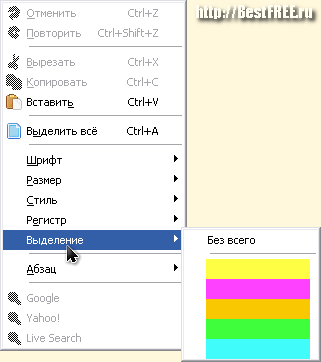
Also, with activated access to the Web, you can create a search for the selected text from here (for example, in Google).
In addition to changing the appearance of the text, in Stickies we can also change the appearance of the note background itself, as well as set the time or event for its display. For this, another context menu is used, which is called by right-clicking on the sticker title:
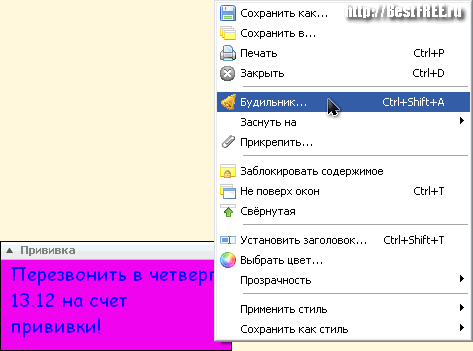
All items in this menu are divided into five sections. The first section contains the functions for saving and printing notes. Moreover, you can save both to a separate file and to the note manager (more on that below). The second section allows you to set the conditions under which the sticker will be displayed.
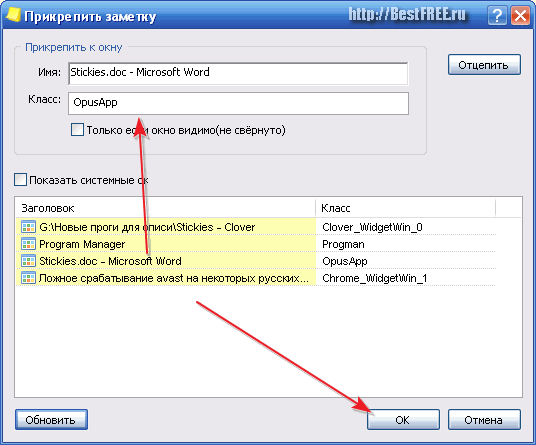
At the same time, using the "Alarm Clock" you can set exact time displaying a reminder, the “Sleep on” function allows you to delay the display of the sticker for a certain period of time, and “Attach” allows us to bind the appearance of a note to the appearance of a specific window (for example, launching a program or opening a specific web page):
The third section of the menu allows you to block editing of the note, cancel the display of the sticker on top of all windows, or minimize the recording window to the title. The last two sections are responsible for the appearance of our reminder and allow you to set a title for the sticker.
When a network and/or mail connection is activated, another section will appear in the menu, allowing you to send notes to friends.
Adding graphics to a note
By default, all notes that are created in Stickies are text, but you can also create stickers containing graphics. There are several ways to make this kind of notes:
- Copy the desired picture to the clipboard (select and press CTRL + C), and then in the main menu, click the "New note from clipboard" button.
- Create a regular blank sticker and press CTRL+SHIFT+K (an empty graphic area is activated with no option to return to text mode).
- In Options, set the default to create graphic notes. To do this, in the "General" tab, activate the item "New notes are images."
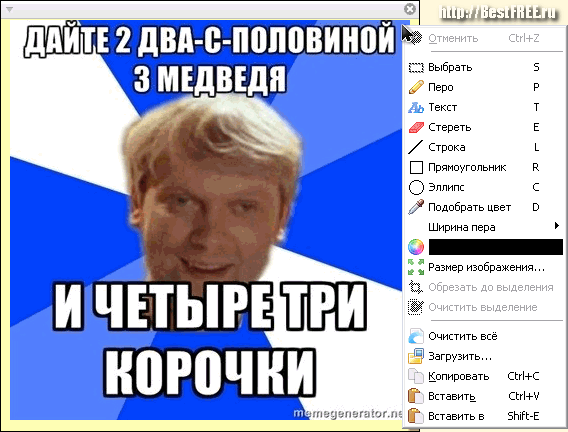
When you right-click on the workspace of this type of stickers, you will get access to graphic editing tools that will allow you to change or create the desired image from scratch.
Otherwise, working with graphic notes is similar to text mode.
Additional Stickies Tools
Now that we've covered the basic functionality of Stickies, it's time to look at additional tools. These include the Notes Manager and the Contacts Manager.
The notes manager is called by activating the item "Manage notes" of the main menu of the program:

With it, we can quickly search for the necessary reminders, edit them or set the display time. Also, by selecting the "Saved" item, we can first create new category for stickers, and then the stickers themselves in the created section using the appropriate items in the File menu:
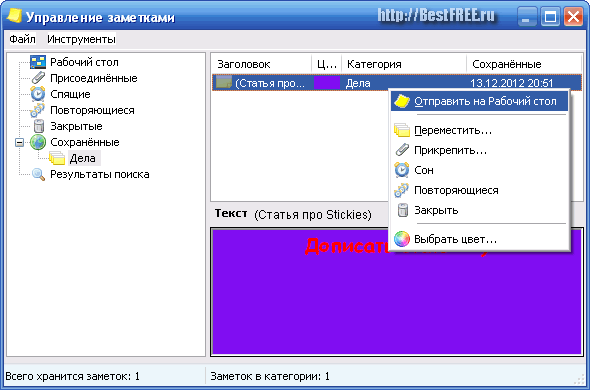
Also of interest: in the "Desktop" section (where all active notes are stored), we can enable two modes that are not available in the main sticker menu. This is hiding the note and switching to "ghost mode". The latter allows you to still display the sticker on the screen, but at the same time makes it "transparent" for mouse clicks.
That is, if there is a label under the note, a click on the note will be perceived as a click on this label! Combined with the ability to make the sticker translucent, we get the perfect reminder that is always in front of your eyes, but does not interfere with your computer work!
The last feature we'll look at is the contact manager. It is convenient to use it if you have activated and configured Network support and / or Email in options. The manager is called from the main menu of the program when clicking on the "Friends" item:
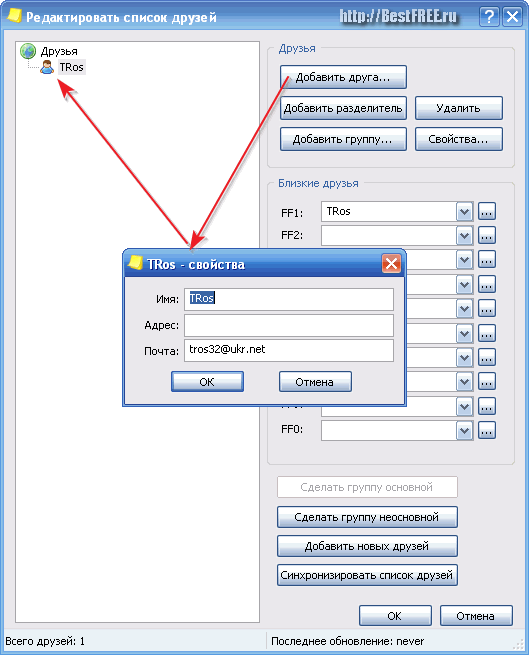
In order to add a new contact, just click the "Add a friend" button and fill out a simple form containing the name and email address of the person you need. The contact manager allows you to sort friends into groups, as well as using separators. A quick send list of up to 10 contacts is also provided, called Close Friends.
Advantages and disadvantages of the program
- unlimited number of reminders on the desktop;
- extensive customization options for ways and moments of displaying notes;
- the ability to change the appearance of stickers with skin support;
- convenient sticker manager;
- the ability to create graphic notes.
- there is no way to set a password for mail;
- not very convenient work in graphical mode.
conclusions
After reviewing several sticker maker apps, I came to the conclusion that Stickies is the best of the free ones, and even one of the best of its kind, even compared to commercial counterparts! Rich options for customizing the appearance of notes, convenient functions for scheduling their display and the function of sharing notes with friends are the main advantages of the program.
Therefore, if you still buy paper stickers and stick them on your monitor so as not to forget about important things, then Stickies will allow you to forget about this thankless task, and save you from the constant waste of money and nerves;).
P.S. It is allowed to freely copy and quote this article, provided that an open active link to the source is indicated and the authorship of Ruslan Tertyshny is preserved.