We make voluminous applications from paper
There are 2 ways to make a volumetric application with your own hands, and I will gladly tell you about them.
How to make volume? Method 1
Printing templates clouds and a balloon for applications, fold the paper with an accordion and cut it out.
We glue our volumetric blanks to the background. It should look something like this (only balloons will be solid):

Method 2
We draw and cut out clouds and balloons, as if we were going to do a regular paper application. And now we give volume to the details: we take two identical balls or clouds, bend them in the middle and sew them together. Like this:

Let's launch planes into the sky
Clouds and balloons are not all the paper crafts that I will talk about today. Next is the plane.

We will use the template to prepare the details for the paper appliqué.

Now let's put it all together!

small birds
You can also make birds out of paper! You can use this template.
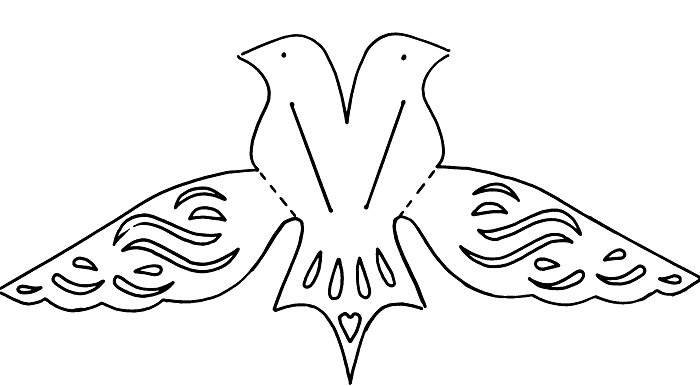
Cut out the bird along the outline. We bend exactly in half and glue, leaving the wings. Now carefully bend the wings along the dotted line. We tie a thread, and that's it - the bird is ready to fly!
Fantasize by combining voluminous origami in unique applications or interior decorations. Here, for example, you can add not balloons or planes to the clouds, but simply a multi-colored rainbow:

In this article you will find popular craft paper balls for all occasions. For example, you have a holiday at home and you need to decorate the apartment. All crafts of varying complexity from the simplest to the most complex. Have a good time.
Detailed instructions on how to make a paper ball.
1 option
In this master class, we will show you how do it yourself christmas ball from paper. To do this, you will need a sheet of white and necessarily colored paper, scissors, glue.
1 step .
First you need to print the template in two copies (on white and colored paper) on the printer. 
2 step .
Then, of course, you need to cut out the templates and lay them out in the shape of a "sun". 
3 step . Glue the cut circle to the glue in the middle, connecting all the rays at one point.

4 step .
Now let's start forming the ball. Color template lies on white. First, we intertwine the white rays with the colored ones (see photo) 
5 step .
Then it should turn out that the white rays are on top of the colored ones (see photo), now they need to be hidden again under other rays. 
6 step . Such a beautiful ornament is obtained when you intertwine multi-colored rays.

7 step . At the end, we connect the rays and fix them together at one point.

Thank you for your attention! We hope you enjoy this handmade origami.
How to make a paper ball with your own hands.
Option 2
Here we will tell you how to do it yourself beautiful ball from colored paper. For this we need 3 sheets different color, circle template, pencil, scissors. 
1.
Cut out 4 identical circles from the same color, and similarly with other colors. You should end up with 12 circles of the same size. 
2.
We add the circles in a certain order: 2 circles of the same color (for example, 2 blue), then put 2 circles of a different color on them (for example, 2 pink), then, for example, 2 blue, and repeat in the same order. After that, we bend them in half. 
3.
You can put a thread in the middle if the ball should end up hanging. 
4. Fasten the middle with a stapler in two places (see photo below).

5. Divide one semicircle into 3 equal parts.

6. Apply glue diagonally to the top 1/3 of the semicircle. Then glue it to the adjacent semicircle.


8. And so with all the semicircles, alternating, glue all sides (see photo).

So quickly turned out a beautiful ball, made by hand, which can be hung on Christmas tree or decorate the interior.
Bright paper balls.
3 option
To make such a bright volumetric ball with our own hands, we need to take colored paper and scissors.

Small print template

Large printable template

1.
After cutting out the templates, take one of the flowers and glue a long loop of thread to it. 
In this article you will find popular craft paper balls for all occasions. For example, you have a holiday at home and you need to decorate the apartment. All crafts of varying complexity from the simplest to the most complex. Have a good time.
Detailed instructions on how to make a paper ball.
1 option
In this master class, we will show you how make your own Christmas paper ball. To do this, you will need a sheet of white and necessarily colored paper, scissors, glue.

1 step. First you need to print the template in two copies (on white and colored paper) on the printer.
2 step. Then, of course, you need to cut out the templates and lay them out in the shape of a "sun".
3 step. Glue the cut circle to the glue in the middle, connecting all the rays at one point.
4 step. Now let's start forming the ball. Color template lies on white. First, we intertwine the white rays with the colored ones (see photo)
5 step. Then it should turn out that the white rays are on top of the colored ones (see photo), now they need to be hidden again under other rays.
6 step. Such a beautiful ornament is obtained when you intertwine multi-colored rays.
7 step. At the end, we connect the rays and fix them together at one point.
Thank you for your attention! We hope you enjoy this handmade origami.
How to make a paper ball with your own hands.
Option 2
Here we will tell you how to make a beautiful ball of multi-colored paper with your own hands. To do this, we need 3 sheets of different colors, a circle template, a pencil, scissors.
1.
Cut out 4 identical circles from the same color, and similarly with other colors. You should end up with 12 circles of the same size.
2.
We add the circles in a certain order: 2 circles of the same color (for example, 2 blue), then put 2 circles of a different color on them (for example, 2 pink), then, for example, 2 blue, and repeat in the same order. After that, we bend them in half.
3.
You can put a thread in the middle if the ball should end up hanging.
4. Fasten the middle with a stapler in two places (see photo below).
5. Divide one semicircle into 3 equal parts.
6. Apply glue diagonally to the top 1/3 of the semicircle. Then glue it to the adjacent semicircle.
8. And so with all the semicircles, alternating, glue all sides (see photo).
This is how a beautiful hand-made ball turned out so quickly, which can be hung on a New Year tree or decorate the interior.
Bright paper balls.
3 option
To make such a bright volumetric ball with our own hands, we need to take colored paper and scissors.
Small print template
Large printable template
1.
After cutting out the templates, take one of the flowers and glue a long loop of thread to it.
2.
Pin all templates together with cut lines in each piece. 
3.
This is how it looks from the inside. 
Thank you for your attention!
Origami paper ball.
See what original balls can still be made from paper.

Paper ball interesting scheme
You need to cut 8 circles of the same size, then fold 3 edges to make an equilateral triangle. Draw half a line on each side. Then we begin to fasten all the blanks together. At the end, glue a loop of string. Here is an interesting ball.

Video master classes paper balls.
This subsection contains video master classes that are not included in the detailed description.
Such a ball can decorate the interior of the apartment before the festive celebration. Looks very nice on the Christmas tree.
Volumetric colored ball. Your child will love the process of assembling origami. You will need colored thick paper, scissors, glue.
If you carefully read the article, you should have noticed. Detailed description this origami is above.
Do not forget to share your crafts with us, send photos of what you have done in the comments.
Application templates, paper application, application for the younger group of kindergarten, application templates for download, application for printing, application for children, application for kindergarten
Here are applique templates for kids " Balloon". The set includes 1 sheet with appliqué details for practicing cutting skills and 1 background picture. The material is intended for creativity of children 2 - 5 years old.
How to make an application "Balloon"
1. Print the application template on a color printer. If a kid of 2-4 years old still does not know how to handle scissors, then cut out the details of the application yourself. If the child can cut it on his own, then entrust him with cutting.
2. Invite the child to independently lay out the details of the application on a clean white sheet of paper, focusing on the sample.
For application as a background, you can also use white or blue colored paper.
3. Show your child how to handle the glue and on which side of the cut out part of the appliqué the glue should be applied. If necessary, help your child glue the ladybug parts.
4. The finished application can be framed and hung on the wall in the nursery or in the living room. This application is perfect for applique classes in junior group kindergarten.
Good luck to you and your baby!
Application templates for children "Balloon"

We will show you how to do it very simply and quickly with your own hands. Christmas tree toy paper ball. All you need is a printer, a white A4 sheet, thick colored paper and scissors. Glue will not be used. The template has grooves into which the next part of the template is inserted, and so the whole ball is assembled.
To get started, download and print the template of the desired size:


If you don't have a printer, no problem. We increase the template on the monitor to the desired size (ctrl button + turn the mouse wheel), attach a white sheet of paper, circle it. We translate the template onto thick colored paper or cardboard. For one Christmas ball You will need 12 flower templates. Cut them out along a solid line. You will get such flowers with slots.
If you plan to hang a ball on a Christmas tree on a string, you need to think about this string in advance. We pierce 1 flower in the middle, insert a rope or ribbon folded in half to make a loop, fix the end with tape or glue. In the end, this tip should be inside the ball, it will not be visible in the finished craft.

We insert the parts into each other along the slots.


Be careful not to crush the ball.