Depending on the age and gender of the child, you can craft with him rowan crafts different levels of complexity and type. Girls will love stringing rowan beads. True, the berries will soon dry out, and the beads will look different than immediately after assembly. After complete drying, the beads can be varnished, or used for other crafts.
Almost as easy as beads, rowan snake caterpillar or centipede. Berries need to be strung either on a thin wire or on a strong thread. The legs of a centipede are made from slightly sharpened pieces of matches that are stuck into the berries. Eyes can be made either from the same match heads, or from any oblong seeds stuck into the first bead head. For the head, you can take a larger rosehip berry. Bead-berry stringing develops fine motor skills and helps to develop patience, accuracy and perseverance. Crafts from rowan great for this kind of work.

"> Clusters of mountain ash and autumn leaves make beautiful bouquets with which you can decorate the room. If the child is already old enough, you can try to make a bouquet or a wreath of mountain ash and flowers collected from autumn leaves. Physalis fruits, dried flowers, curved branches and tree growths are suitable as additional decorative elements. To make such rowan crafts, you will need floral tape, wire, glue, adhesive tape, strong threads.
Doll-amulet Ryabinka
From two rowan twigs, a small string of rowan beads (or any red-orange beads), a piece of cotton and a few pieces of fabric and braid, you can make a beautiful folk amulet doll A mountain ash that keeps the house from evil and misfortune. The main thing in this doll is rowan twigs.

Required:
- a rectangular flap of red cotton or linen;
- a square of white matter;
- colored patches for a scarf and apron;
- a piece of braid for an ochelya;
- red lace for belt;
- rowan beads;
- strong cotton or wool red thread.
The twigs must be carefully cut so that one is shorter than the other: handles will come out of it. We fold the twigs crosswise and tie with a red thread.

We put a piece of cotton wool on the upper part of a long twig, trying to give it a spherical shape.

Then we take a square piece of white fabric, cover it with cotton wool and tightly tie it with red thread, forming a head. You need to try to smooth the fabric so that wrinkles do not form on the “face”. The flap is positioned so that something like sleeves for twig handles is obtained from its corners. We fix the fabric on the “wrists”, also tying it with a red thread.

The photo shows how to form the "chest" of the doll from another piece of cotton wool, but this detail can be omitted.
Now it's time to dress Ryabinka. We take a red rectangular patch, the length of which is equal to double the distance from the "shoulders" to the end of the long twig. Traditionally, scissors are not used to make amulets, all fabrics are torn by hand, but for children's needlework, scissors are indispensable. Cut the flap lengthwise to make 2 long strips. We wrap the doll with them as shown in the photo, so that we get a semblance of a sundress. We tie the sundress with a belt, we fasten the apron with it.

On the head of the doll we attach a piece of braid in the form of a headband, on top of which we tie a scarf. It remains only to give the doll a string of rowan beads, and the Ryabinka coast is ready.
Children are very fond of making dolls, and the process of making Ryabinka will certainly be of interest to them. Along the way, you can come up with a fairy tale about a chrysalis made of rowan twigs.
If for some reason natural materials for creativity are not available to you, create from what is at hand: cereals, newspapers, clothespins ... The main thing is to give free rein to your imagination, and you will succeed!
Experienced and caring parents willingly spend their free time with their kids: walk in nature, in the park, spend time on playgrounds, take part in children's parties. The change of seasons brings its pleasures: joint crafts from natural materials on the theme "Autumn", "Winter". In addition, material for joint creativity can be prepared together and with pleasure. Children especially enjoy the joint creative pastime, which develops abilities and creative possibilities. So, let the pedestrians run clumsily through the puddles, as the crocodile Gena sang in the cartoon about Cheburashka, and we collect the gifts of autumn on the desktop: dried berries, acorns, nuts, cones, autumn leaves and seeds, and we are preparing to create crafts from them on theme "Autumn". It can be a squirrel and a bear, a forester and a grandmother Ezhka - do not forget, by the way, to make a hut for her on chicken legs - and other forest wonders.
The change of seasons brings its pleasures: joint crafts from natural material
Autumn-themed crafts are popular mainly due to the fact that the material for them is varied and affordable. Can be used for the base sets of cones different size, Chestnut Fruit And Plant Seeds. An ideal basis for a creative autumn panel will be multi-colored autumn leaves: fantasies on the theme of bright leaves will decorate the hallway, the nursery, and the living room.
In order to get creative with autumn foliage, you should go to a nearby park and store to stock up on material:
- colorful autumn leaves;
- sheets of thick cardboard of different colors;
- glue;
- oilcloth, tweezers, scissors and a brush for glue.
You can make a panel from a freshly fallen leaf, you can dry it a little. In any case, the craft will delight the eye with aesthetic perfection.
- Before starting work, prepare materials and cover the table with oilcloth. The materials are available and begin to sketch the future panel.
- A sketch of the picture is made on a sheet of paper, taking into account the available natural material, its size, color and shape.
- I begin to apply details on a sheet of cardboard, following the pattern: leaves that are too large or unsuitable in shape are allowed to be cut or reshaped as you wish.
- Glue is applied pointwise to the leaves: in small patches, otherwise the leaves will be deformed.
- For a couple of days, the finished painting is sent under a press so that the elements of the panel lie on the surface perfectly evenly.
The finished panel made of natural material can be coated with a colorless varnish and placed in any frame, which can also be made by hand.
Gallery: crafts from natural material (25 photos)


Butterfly from leaves (video)
Autumn crafts from cones and leaves: what can you think of
Recently, various accessories for transforming home interiors, made from a mix of natural and factory materials, have come into fashion more and more. An interesting and popular model is an unusual decoration for a living room or bedroom called "wind music".
To implement such a project, you will need materials:
- a pair of not long sticks:
- leg-split;
- cones;
- colorful autumn leaves;
- hot glue;
- spray can with golden paint;
- beads, jewelry, colorful ribbons.
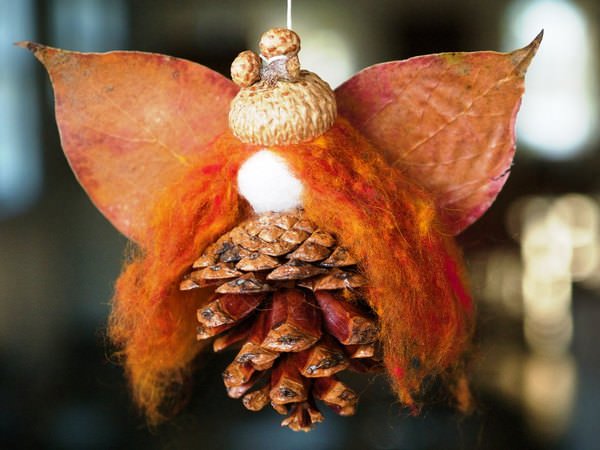
Recently, various accessories for the transformation of home interiors have become more and more fashionable.
Before starting work, it is recommended to treat some details with gold paint: leaves, cones on one side, sticks. Wait until the parts are completely dry and proceed to the manufacture of the product.
- The sticks are tightly tied together with a cross using twine. 9 ropes of twine of the same length are cut from the twine (the length is calculated based on the desired length of the product, plus a little for a knot at the end).
- The parts are laid out in the desired order in order not to be mistaken in the order later, and they begin to string them on the twine, making preliminary punctures. Secure with a double knot of twine.
- At the end, the thread is fixed with a double knot, after which they pass through each part with a drop of glue for final fixing.
The finished “wind music” is fixed on a chandelier or on a window baguette in such a way that when the wind blows, the parts “rustle”, touching each other.
Baba Yaga in a mortar: how to make from natural materials
Kids especially like making fairy tale characters from natural material. An indispensable hero of many fairy tales is Baba Yaga in a mortar, so there are many options for creating this fabulous masterpiece.
To make a Russian heroine folk tales you will need materials and tools:
- cones, twigs, rowan berries;
- a plastic cup, a piece of burlap;
- leg-split;
- plasticine, scissors, glue;
- threads, pasta "horns".

Kids especially like the production of fairy-tale characters from natural material.
The first step is to make a flying machine for the cute Yagi, as he should be given time to dry.
- The glass is coated with thick glue and wrapped tightly with twine. Leave the mortar to dry.
- A “horn” is carefully placed on the tail of the cone - this will be Yagi's hooked nose. With the help of a piece of plasticine, a cone-body and a cone-head of a fabulous Baba are attached to each other.
- From small pieces of plasticine, the eyes and mouth of the heroine are made, from pieces of twine - hair, which is attached with glue to the head.
- The branches are inserted into plasticine - hands are obtained, beads are made from rowan berries, strung on a thread, and placed around the neck.
- I put the burlap in a glass, securing it with twine, after which they send the fabulous Baba there and fix it firmly with glue.
The broom for the heroine is made of thin twigs tied together with twine.
How to make Leshy from natural materials
Decoration of a zoo corner in kindergarten or winter garden on the loggia there will be a figurine of Leshy, made of birch bark and cones.
For a cheerful hero, you will need materials and tools:
- a piece of rectangular birch bark;
- a pair of cones of different sizes, a walnut shell;
- a couple of pumpkin seeds;
- straw;
- hazel branch, some moss;
- glue, scissors, black marker.

The decoration of a zoo corner in a kindergarten or a winter garden on a loggia will be a figurine of Leshy
Before starting work, a small hole is made in the bark, imitating the mouth of Leshy.
- The cone is glued to a hazel branch and sent to the hole in the bark, securing it with glue for strength. Pieces of moss are glued around.
- bump bigger size attach in place for the nose and fix with glue.
- Pumpkin seeds are glued onto the nut shells, the pupils are drawn with a marker in the center - these are the eyes of the future hero.
- Eyes are glued to the bark, with the help of straw they form hair.
A cute Leshy can be attached to the wall - he will become a cheerful decoration of the home "living corner".
Crafts from rowan berries
Rowan berries will serve as a suitable material for a decorative garland that can decorate a candlestick or a home vase.
In order to make such a garland with children, you will need materials:
- rowan berries;
- strong threads of different lengths;
- confetti;
- Maple leaves.

Rowan berries will serve as a suitable material for a decorative garland
The product is made from natural materials, you can add small beads, beads, paper flowers.
- Berries and confetti are strung alternately on the threads, filling the length to the end.
- At the end of each thread, beads or flowers are fixed with glue.
- The finished threads are intertwined with each other, securing at the end with glue.
Ready-made threads can be hung in arcs, can be distributed around a candlestick or decorative vase.
Rowan colorful fantasies
Kids will love it joint creativity from rowan berries, which are pre-painted in different "autumn" colors.
For a picture of berries, materials should be prepared:
- rowan berries;
- colored cardboard;
- green, red, brown nail polish;
- glue.
Rowan berries are laid out into 4 equal parts and painted in different colors nail polish. After drying, the material is ready for use.
- The trunk and branches of a tree are drawn on cardboard with a wax crayon or watercolor pencil.
- Lubricate the areas around the drawn contour with plenty of glue and cover with multi-colored berries, press them with a napkin for several minutes to fix.
- The lower part of the picture under the tree is thickly smeared with glue and covered with colored rowan beads, fixed.
The picture is left to dry for several hours, after which it can be inserted into the frame.
A sprig of rowan from the mass for modeling and foamiran. Master Class
Kolesnikova Tatyana Sergeevna, teacher of labor training, GKOU RO boarding school of the 5th type, Zernograd.Purpose: a sprig of rowan can be used as a gift.
Age: the master class is intended for high school students, parents, teachers of additional education.
Tasks:
- To acquaint students with new material - foamiran, ways of processing it.
- To develop children's creative abilities, fine motor skills, imagination, accuracy.
- Cultivate aesthetic taste.
By folk calendar on the autumn of Peter and Paul, Indian summer ends and real autumn comes.
And on this day, the mountain ash has a name day. In the old days, she was affectionately called Ryabika and planted at the porch so that the house would be protected from "dashing people and bad news." And although the mountain ash is a low, fragile tree, it is not afraid of drought or frost and lives and bears fruit for about 100 years.
So, if you see a mountain ash - tear off the brush and hang it in the house for good luck.
And how delicious is this scarlet berry!
Mountain ash is a genus of deciduous frost-resistant shrubs and trees of the Rosaceae family. The botanical name of the mountain ash is Sorbus aucuparia, the generic name comes from the Celtic word "sor", which means "tart", and the species name comes from the Latin "aucupari", translated "to catch birds". It seems that the name comes from birds feasting on the fruits of mountain ash. There are more than 100 species of mountain ash in the world (according to some estimates, almost two hundred), while about a third of the species grow in the territory of the countries of the former USSR. Mountain ash is widespread not only in Russia, Ukraine and Belarus, but also throughout Europe and Asia, as well as in North America.
Rowan legend
Once the daughter of a rich merchant fell in love with a simple guy, but her parents did not want to hear about the poor groom. To save the family from shame, he decided to resort to the help of a sorcerer. His daughter accidentally found out about this and the girl decided to run away from her home. On a dark and rainy night, she hurried to the river bank to the meeting place with her beloved. At the same hour the sorcerer also left the house. But the guy noticed the sorcerer. In order to take the danger away from the girl, the brave young man threw himself into the water. The sorcerer waited until he crossed the river and waved magic staff when the young man was already getting ashore. Then lightning flashed, thunder struck, and the guy turned into an oak tree. All this happened in front of the girl, who, because of the rain, was a little late for the meeting place. And the girl, too, remained standing on the shore. Her thin frame became the trunk of a mountain ash, and her hands - branches stretched towards her beloved. In spring, she puts on a white outfit, and in autumn she drops red tears into the water, grieving that “the river is wide, you can’t step over it, the river is deep, and you won’t drown.” So they stand on different banks, two loving friend friend of lonely tree. And “you can’t get over the mountain ash to the oak, it’s clear that the orphan can swing alone for centuries.” This is such a beautiful and sad story.
Required materials and tools:
* mass for modeling,
* foamiran lemon or yellow color,
* wire,
* dry pastel red and Green colour,
* wet wipes,
* Glue "Second", PVA glue,
* gouache orange, red,
* stripe brown corrugated paper.

Progress:
1. Roll the ball out of the mass for modeling, it can be replaced with polymer clay. Cut the wire 5 cm long, bend the edge with a loop. Pass the wire through the ball.


Prepare 10-15 such berries. Leave to dry overnight.

2. Paint each berry with a mixture: orange gouache + red + PVA glue. (PVA glue creates a thin protective film so as not to get your hands dirty)

Then cover each berry with acrylic glossy varnish. This varnish does not have a strong smell, gives a beautiful gloss, so even children can use it.

These are such beautiful berries. I like to do a lot at once, so to speak "just in case"

Take a berry and draw a "6-pointed snowflake"

Connect the berries to make a twig.

3. We start making leaves and twigs.
Take lemon or yellow foamiran. Cut out 5-7 leaves from it, make a leaf carved.

I have lemon foamiran, but in the photo it seems white ...
4. Prepare a wet wipe and dry pastel.

5. Wrap your index finger with a damp cloth, rub the pastel and start painting the leaf.

Leaves can be one color, or they can be two-colored.

6. Draw the veins with a felt-tip pen.

7. Take any "super glue" pour it a little on the cardboard, take the wire, dip it in glue and attach it to the back of the leaf.


8. Connect the leaves to make a twig.

9. Connect a sprig of berries and a sprig of leaves together.

10. Wrap the wire with brown crepe paper.


11. Tie a beautiful bow. The rowan branch is ready.

I look forward to your wishes, questions, comments.
Thank you for your attention.
I wish you creative success!
The master class is intended for children from 5 years old.
Purpose: design of a group, class.
Target: to master the technique of working with cotton wool and cotton buds.
Tasks: development of the ability to roll cotton wool into flagella, roll balls of cotton wool, place cotton swabs in certain places. Develop imagination, thinking, creativity, interest in cotton wool applications.
Required material:
A3 cardboard sheet
Cotton buds
Gouache yellow, red, green, brown.
tassel
Step by step workflow
We tint a sheet of cardboard with yellow gouache.

We paint cotton wool in brown and red colors. We paint cotton swabs in green, red, half in red and green.
We make a rowan trunk: from brown cotton we roll a tourniquet along the length and width resembling a tree trunk. Tree branches: roll up the flagella thinner, glue on a sheet of cardboard.

We continue to roll flagella from cotton wool and glue them to the trunk.


Tree with branches photo ready.

For rowan leaves, cut off cotton buds, leaving only the part with cotton wool.

Rowan leaves: the basis cotton buds glue at an angle to the branches.
Rowan berries: roll small balls from red cotton wool, glue them in the form of a rowan brush.

We continue to glue the leaves and berries.


The rowan is ready.

Coral clusters of mountain ash are one of the most impressive, expressive decorations, a kind of its hallmark. They can be a good theme to create in kindergarten or at home.
Craft rowan in kindergarten can be made from a variety of creative materials and in the most different techniques. We suggest trying to create your own rowan twig from thin colored paper or napkins.
What you need to create crafts: rowan branch (only its dried leaves, which can be harvested in summer), thin transparent colored paper, glue, landscape sheet, brush and paints.
If there is no rowan branch prepared in advance, it can be replaced with another plant with a similar leaf shape.

Application "rowan" from paper lumps
We draw a petiole of a branch on a landscape sheet, using a simple pencil and paints for this. The craft will look more interesting if several petioles are directed in different directions. Separately, draw the base of the bunch of berries.
Using glue, we attach rowan leaves to our petiole, arranging them as they are located on a real rowan branch, that is, opposite each other, from smaller to larger, and again to decrease.
Now you need to glue berries to our branch. But first we will make them from thin paper.
We tear off a piece of paper and roll it into an even ball - we get one berry. We try to tear off pieces of the same size so that the berries do not differ from each other. We make as many berries as we need.

Glue the berries to the painted base of the bunch. We try to arrange them as naturally as possible and press them tightly to the sheet for better fixation.

So the rowan craft was made with paper and dried leaves!


From lumps of paper you can make mountain ash on which ladybugs fly.

Rowan for application can also be made from droplets of red paint.

Do-it-yourself rowan beads
Perhaps all of us made rowan beads in childhood.

Watch the video on how to make rowan beads:
Rowan for decorating autumn compositions
Rowan berries will perfectly complement the autumn composition for kindergarten.

Rowan can be supplemented with various men and animals from natural materials.