The New Year is certainly a fun and long-awaited holiday, but often the joy of celebration is overshadowed by long checks from stores and colossal cash costs. If you want to forget about the “wind in your wallet” once and for all, learn how to do it. christmas toys from paper! Free, fun, and most importantly - with a soul! Isn't this the kind of gift that each of us dreams of?
Toy "Bunny"
Instructions on how to make a New Year's toy will come in handy if you want to decorate a room or present a gift in an unusual package! In such unusual shape you can fill it with candy, money, cute trinkets or any other gift!
All that is required is to print the scheme you like on a color printer and glue the elements together! Even a child can cope with this task, so you can safely engage in this exciting hand-made with the whole family!
A paper toy "Bunny" can be a great decoration for a Christmas tree or a cute gift wrapping.


paper lantern
Children's New Year's paper crafts amaze with their diversity. Help your child cut and glue this openwork lantern, which can also be a great gift wrapping.
Follow the diagram shown in the photo, and you will definitely succeed! As a material, you can use thick paper or cardboard.


If you want to make a Christmas paper toy, download these patterns for free!


Volumetric snowflake
Volumetric paper snowflakes look very impressive and beautiful. To make such beauty with your own hands is quite simple. We offer you schemes of volumetric paper snowflakes of varying complexity. Among them, you are sure to find the one that you like the most.
Fold two square sheets diagonally, and then again to make isosceles triangles. Then cut out the "petals", as shown in the photo, and in each of them make 2 equidistant cuts, not reaching the core.

Expand the resulting blank and glue the middle "petals" to the core. Do the same with the second triangle, and then fasten both blanks back sides crosswise.

Such volumetric snowflake can even make from paper Small child. Fold a piece of paper like an accordion and staple it in the center with a stapler. Cut out any pattern you like or make holes in the "accordion" with a hole punch.

Make a second exactly the same blank, unfold them and fasten them together with a stapler or transparent tape.

Such New Year's paper crafts can be decorated with sparkles or made from multi-colored materials.

We hope you found at least one instruction on how to make a New Year's toy useful. Such creativity significantly improves mood and creates the right festive atmosphere. Therefore, if you feel that for some reason the joyful fuss has bypassed you, try to “lure” it by starting to make paper toys for the new year! Finally, the video material will allow you to “stir up” your imagination and, maybe, give you a couple of creative ideas!
Do not think that New Year's paper toys are boring and primitive, because everything depends on you! Choose unusual paper and create real miracles with it!
You can prepare thoroughly for the manufacture of crafts by purchasing various materials for creativity, or you can show your imagination and use what is at hand. But in both cases, everything will turn out great, and your efforts will not be in vain.
Where to begin?
Let's start with what can be done from improvised means - paper, scissors, water, ice, plastic cups and much more, where glue is not needed at all. You can make a huge variety of figurines and interesting crafts from paper. Schemes, templates are presented below.

paper bow
We will need:
- Three narrow strips of paper - completely different in shades and widths.
- Wide - 20 cm.
- Medium - 48 cm.
- Narrow - 46 cm.
To make white paper crafts without glue, we need to do the following steps:
- At the ends of each ribbon, make a V-shaped cutout.
- Now carefully fold the strips - wide at the bottom, medium - in the middle, narrow - at the top.
- We combine the centers of the strips and clamp them with a paper clip.
- We wrap the narrowest strip at the place of compression and make a bow so that the knot is at the bottom of the wide strip.
- Straighten the bow.
- You have a beautiful bow for bandaging a gift box.
- Cut the ends of the bow at an angle.
- That's all, paper craft without glue is ready!
Candlesticks
We all remember the tale of the Snow Queen very well. She lived in a beautiful ice palace, which played with different colors. So we decided that we need to plunge into a fairy tale. The exception will be that our ice candle holders will bring you cozy warmth. Let's start manufacturing.
We will need:
- Forms (you can use cups, plastic containers, etc.).
- Water.
- Candles.
Manufacturing:
- Pour water into molds.
- We put them in a cold place. We are waiting for the water in them to freeze somewhere by 80%. Now we place our candles in the center.
- See if the candlesticks are completely frozen. If yes, then we pour warm water over the molds so that our ice cubes can easily come out of them.
- Well, the final step. We place our candlesticks on the steps in front of the entrance to the house or on the railing. We enjoy the view of the luminous path to the land of fairy tales.
You will be surprised, but even from an ordinary sock and cotton wool you can make a wonderful and simple craft. Your children will certainly appreciate this idea, especially since it will not cause difficulties even for the smallest, and their work will be appreciated in the kindergarten.
paper angels
In order to make without glue, you can use variety of options. To work on paper crafts, completely without the use of glue, it is important to prepare:
- A4 plain paper.
- Medium sized scissors with sharp tips.
- Pencil.
Production order:
- Using a pencil on a white sheet of paper, you can display contours or figures. Do-it-yourself paper angels (templates must be made once and then used with great success when creating numerous crafts) are made quite simply.
- If you replace the white A4 with a denser version, which can be white cardboard, even a thick paper plate, then the crafts will gain considerable stability.
- It can be a very exciting activity to create compositions called "Paper Angels" with your own hands. Templates can be used for any dark background, which will create a stunning and elegant panel. And then decorate everything with a variety of sparkles or bright and fluffy tinsel and get a surprisingly tender gift for dear and close people.

Or you can make a template for an angel. A cute decoration for the holiday is made quite simply. For this we need:
- a sheet of colored paper;
- colored thread;
- double sided tape;
- ruler;
- simple pencil;
- sharp scissors.
We manufacture:
- We print out a template or diagram of an angel (or draw it by hand).
- Next, take this template, impose on colored paper and cut out figures along the contour - 3 pcs.
- Then take a ruler and use it to bend them in the center.
- We attach two templates to each other, and the third - from above.
- We thread and hang our angel from the ceiling.

sock snowman
In order to make a snowman, we need:
- White sock (or socks if you're making more than one).
- Cotton wool.
- Thin rope (you can also use an elastic band).
- Buttons.
- A piece of red cloth and a piece of orange.
- Scissors.
- Threads and corners.
Manufacturing:
- Stuff the sock with cotton a little more than half. Seal it and tie it at the top with a rope. Cut off the remaining tip with scissors, but do not throw it away, it will come in handy for us, we will make a hat for our snowman from it.
- Mentally divide the snowman into 3 parts, and separate the upper, intended head, from the body by tying it with a rope. We tie this place on top with a "scarf", having previously cut off a narrow long strip from the red fabric.
- Next, sew on 2 small buttons or beads in the place where the eyes are planned. You can glue plastic eyes from some unnecessary toy.
- We sew 3 more buttons on the "body".
- For the nose, cut out a triangle from orange fabric and sew or glue it.
- The mouth can be drawn or embroidered with threads.
- Now we make a hat from the remaining cut of the sock. We sew the part of it where there is no elastic band, and turn it inside out. You can sew a small pom-pom on top.
- We put a hat on our heads. You can also use snowflake templates.
- Our snowman is ready!
Corrugated paper Christmas tree
What we need:
- corrugated paper different colors.
- The adhesive tape is double-sided.
- White sheet of paper.
- A thick sheet of colored paper, preferably blue or light blue.
- Scissors.
- White paint or cotton.
Manufacturing:
- We cut corrugated paper into different pieces.
- Next, we take and use it to attach the pieces to a white sheet of paper.
- Now cut out the triangles. Our Christmas trees are ready.
- We also attach them to thick colored paper.
- Draw snow with white paint.
- You can attach cotton wool in the form of snowdrifts and falling snowflakes.
Let's say a few words about the most common type of crafts. It all depends on effort. You can approach the manufacture of crafts more thoroughly and visit handicraft stores first. We will do everything necessary for this ourselves.
snowman for kids
Snowman can be made from plastic bottles. What do we need for this:
- plastic bottles of small size and with a "waist";
- cotton wool;
- buttons;
- a piece of fabric, preferably felt.
Manufacturing:
- We start by rolling balls of small diameter from cotton wool so that they pass into the neck of the bottle. We do this so that the “insides” of our snowman look prettier.
- We fill the bottles with these balls to the top.
- Glue button eyes on the top of the bottle. There we also glue the nose from a triangular piece of orange felt.
- We tie a scarf around the neck.
- On the "torso" also glue the buttons. All. Ready!
For decoration, you can use snowflake patterns. They can be made in a variety of sizes. Most likely, in the future you will want to make not only a snowman, but also other paper crafts. Animals, beautiful birds, children, flowers will turn out just amazing!

Applications without glue
To work, you need to prepare:
- Cardboard.
- Paint.
- Scissors.
- Clothespins-pegs, from which we will make figures of people. We can buy them in needlework stores or flower stalls.
To make interesting paper crafts:
- Print and cut out templates.
- Then we outline them along the contour on the cardboard.
- Cut out carefully with a utility knife.
- Now we paint the details.
- We assemble, without glue, simply by inserting trees and animals into the grooves.
- And we paint and decorate little men made of clothespins with colored paper skirts.
- Our paper craft without glue is ready!
Roll of paper without glue
For this we take:
- Lid off cardboard box or thick white paper.
- Foil.
- Vatu.
- Spruce cone.
- Double sided tape.
- Figures of people or animals that you can cut out of pictures, make yourself from plasticine, or use toys from kinder surprises.
Manufacturing technology:
- We attach foil to white thick paper with double-sided tape. This will be ice.
- Along the sides we attach cotton wool in the same way. This is snow.
- In the center, you can place it after "powdering" it with snow from cotton balls.
- Well, at the end we have "skaters" on the rink.
- Our paper craft without glue is ready!
paper swan
It may seem that such a craft - a paper swan - requires the most complex tools, and the technique itself must be studied for a long time and constantly trained. All these are erroneous opinions. When mastering this teniki, you can make not only a swan, but also other paper crafts. Animals, beautiful christmas snowflakes or a snowman, a chicken for Easter - everything will turn out just fine!

- A sheet of paper in the form of a square should be bent in half, and then straightened.
- Bend two intact corners to the center, and bend the resulting corner so that the tip slightly passes the line of the bent sides. Fix it.
- Turn the workpiece over and bend it along the diagonal line. Pull the head, and position it at a height.
- Bend the tail along the bottom, then bend it up.
- Fold back the wings.
- And that's it! A simple swan is ready!

This craft (paper swan) does not take much time and does not require expensive materials. The made figurine can be given to the child for playing, or you can put it on your desktop.
snow winter ball
We will prepare everything you need in advance. This:
- Small transparent jar with a lid.
- Glitter of different colors.
- Sequins.
- Water.
- Glycerin - 1 cap.
- Little toy.
Instruction:
- We attach a toy to the bottom of the lid.
- Pour water into the jar, a little short of the rim. We also add glycerin.
- The more glycerin we add, the slower our snowflakes will sink to the bottom of the jar. Pour glitter and glitter into the water. You can also add small foam balls.
- Close the jar with a lid and shake well so that all the contents of the jar are mixed. It turns out fabulous beauty.

The next craft is called "Wadded House". For it we need:
- Cotton buds.
- Sheet of white cardboard.
- Cotton wool.
- Double sided tape.
Instructions: We attach cotton wool to a sheet of cardboard with a thin layer. Then we begin to build a house of cotton buds, stacking them like logs. For the roof, we attach cotton swabs to a piece of cardboard bent in half. For the entourage, you can make a snowman from rolled up cotton balls and a Christmas tree in the same place. We do it as follows: we take a piece of white plasticine and stick the cut ends of cotton buds into it.
We wish you pleasant days and evenings with your family and loved ones!
Good afternoon. Today we will do crafts on New Year from paper and cardboard with their own hands. I collected the most accessible and easy-to-use crafts for children and adults. You can find here ideas for kindergarten activities for the new year (applications and paper crafts). Also here you will get ideas for home decor for the new year from paper and cardboard.
Let's start doing New Year's fairy tale with our own hands, we will turn paper into a smart New Year for our family. Let's apply our good mood And skillful hands and spin a round dance of New Year's crafts.

Candlestick for the New Year
(from colored paper and white cardboard).
These cute cardboard snowman candlesticks can decorate your New Year's interior.

Each paper snowman unfolds like a regular postcard. And it can be placed vertically on the edge (like a postcard). Punctured holes in cardboard allow you to use this paper craft for the New Year as a festive candlestick. Let me tell you in detail, step by step, how to make such a quick and simple craft with your own hands.

How to make this New Year paper candlestick craft.
Step 1 - on plain paper (draft), print or draw any graphic pattern (the one you want to pierce on the snowman's abdomen)
Step 2 - From thick white cardboard (preferably glossy, double-sided), cut out the silhouette of the snowman's body. This will be a silhouette in the form of a hill with rounded edges, growing from left to right (as in the photo above).
Step 3 - we apply our draft with a pattern to this silhouette and fasten it with paper clips. I put it on the table terry towel in 2-3 additions. On a towel we put a cardboard with a draft, a patterned draft side up. We pierce the drawing on the draft with a needle. So that the needle passes through the draft, through the cardboard silhouette of the snowman's body lying under it, and sticks into the towel. We cut off the whole drawing in all places.
Step 4 - from the same cardboard we cut out the oval hands of a snowman and a round head. Cut out a nose, a cap, eyes, and a mouth from colored paper. We paint the cap with colored felt-tip pens or markers. We assemble the craft entirely from these paper parts. And we get beautiful gift for the New Year from paper, made by hand
And from the remnants of white cardboard, you can make just such a clamshell craft for the New Year. From colored paper we make candle flames and green holly branches with red berries.

It is also very beautiful to make Puff crafts in the form of houses and Christmas trees from white thick paper for the new year. Placed on the ribs of the folds, they will be held vertically straight - between the rows of houses you can decompose Christmas garland and turn it on - the lights of the garland will illuminate the windows, draw out the silhouettes.

Snowman for the New Year
from paper.
From white paper rounds you can make funny puffy SNESHARIKOV. Decorate them with hats of different styles, tie them with colored satin ribbons(like scarves). Glue the paws and noses and draw a dotted smile and eyes with a black marker.
This craft is perfect for kids. middle group in kindergarten. Only the ribbons will need help to tie.

You can make a snowman from three cardboard circles different sizes. Between the layers of the rounds, lay a three-dimensional gasket (a thick piece of cardboard, a folding paper spring, thick Velcro tape, etc.). So the snowman will be voluminous puff. We attach paper paws to the first lower layer, put a scarf on the second round, and a nose, eyes, and a hat on the upper round. This paper craft for the New Year is suitable for children. senior group kindergarten.

Here is a craft idea for the little ones. On a sheet of blue cardboard we attach a white snowdrift at the bottom. We stick a leaflet with a calendar print on it (it can be printed from the Internet and photocopied according to the number of children in the group).
It remains for children to glue round snowman muzzles, round pens on top of the calendar sheet. Then cover your head with a hat, add eyes, nose - draw a smile later with a marker. Decorate the blue background of crafts with paper snowflakes.

And from large sheets of paper (A2 format) you can make a beautiful craft to the window. Such a snowman can decorate the window frames in your child's nursery. And kindergarten workers can turn the group windows into a whole series of funny adventures of the snowman Vasya- here he is sweeping snowflakes with a broom, here he is showing an acrobatic number, here he is with birds, here he is juggling snowballs, here he is sleeping under the tree. The poses are easy to fold and change, just turn the body of the leg and head - and now the snowman himself has turned, rolled over - oh yes, Vasya!

And since we started making crafts for the New Year from white paper, let's continue. And let's see what else can be done from an inexpensive landscape or office paper.
Craft - a wreath for the NEW YEAR
(white paper + pizza box).
Here's what beautiful work can please your children this New Year. From plain white paper and an old cardboard box, you can make a New Year's miracle. Wreath with white lace New Year's silhouettes. All details are cut out separately - and from the side it seems that this is a single large paper cut-out.

How to make the basis for a New Year's wreath.
We take a box from a large pizza. We put on it the largest lid from the pan (or a round dish). Outline with a pencil. We get the contours of the outer ring. We put a smaller plate in the center, circle it with a pencil - we get the contours of the inner ring, that is, a hole. Cut out.
Note - to get an even-sided ring for a wreath, you need to put a small plate (for a hole) exactly in the center - so that the right and left and above and below the plate have the same distance to the edge of the ring.
From ordinary white office paper we cut out the details-symbols of the New Year:
- 3 large snowflakes
- 8 silhouettes of Christmas trees
- 4 house silhouettes
- 1 white ring (2 halves of the ring are possible - from two sheets of paper)
This white ring will lie on top of our round dance of houses of Christmas trees and snowflakes. AND by inner diameter this white paper ring match the inner circle of our cardboard base wreath(which we cut out of a pizza box).
The process of assembling the New Year's crafts.
On our cardboard gray ring we paste in a circle - in any order - all the Christmas trees, houses, snowflakes. We make a round dance of silhouettes - not bringing them much closer to the inner edge of the wreath (since there they will close too much with a white paper ring). The thickness of the ring should not greatly overlap the New Year's paper silhouettes - but only cover their lower part.
We glued the silhouettes in a round dance and then put a white paper ring on top of them - also on glue. It is better to work with a glue stick - it is drier and the cardboard does not warp from moisture and the paper does not wrinkle from dampness.
And here's a snowflake template to help you , which is perfect for this paper craft for the New Year. To reduce the size of the template, press and hold the ctrl button and at the same time turn the mouse wheel - towards you (or away from you) to change the size. Then put a sheet of paper on the monitor screen and circle the contour of the snowflake glowing through the paper.


And here are some more ideas for silhouette round appliqués made of paper for do-it-yourself decorations for the New Year.
Cut out a ring from black cardboard. At the bottom we glue a semicircular white snowdrift. - we attach white silhouettes of Christmas trees to it. With a hole punch in the form of snowflakes or stars, we make a small scattering of stars and stick them on a black ring. Q-tip and with white gouache we put small white dots on a black background.
Or we cut out the silhouette layers from white paper (a number of houses), and red paper (Santa Claus's sleigh and horse). Fold the layers within the round silhouette.

carved crafts
from paper for the New Year.
If the paper cuts are bent from their incised place, then we will get the effect of a voluminous paper craft. Below we see a paper Christmas tree made using this technique. A sheet of paper was folded in half - along the axial vertical line. And they made oblique cuts - 2 small ones at the top, then two more larger ones below, two more more, and so on. Then they unfolded the paper and folded each incised section down - it turned out a carved Christmas tree made of paper for the New Year (left photo below).
You can only make small CORNER cuts with a paper knife - and bend these corners, getting the shape of triangular teeth.

In the same technique, you can make three-dimensional. In the same technique, you can make three-dimensional 3D crafts. This is how it's made Christmas trees for the New Year from paper or white cardboard.
We take a flat triangular piece of cardboard - with a knife or blade we make it on it vertical notches(without touching the edges of the triangle with scissors). And then we bend these cuts - one forward, the other back, the third forward, the fourth back and so on - with alternation. Before starting to bend, we need to fold our triangle in half along the central vertical line - then all these bends will have an even central edge - both in front and behind.
If the cut lines are not straight-horizontal (as in the left photo), but wavy or oblique as on other Christmas trees with a photo, then we will get interesting silhouette volumetric crafts of Christmas trees made of paper.

And also a flat paper part can be turned into a voluminous convex Christmas tree (3D craft) in this way (as in the photo below).
We cut the usual flat cardboard round in a spiral - (we draw a snail on it, and make a cut along the line with scissors). And then we raise the middle of this snail up and teach a spiral-spring in the shape of a Christmas tree.

So that the Christmas tree does not fold back, it can be supplemented with a ROD - an axis holder, so to speak (as it is done in the right photo below). There, a wooden stick on top holds the center of the spiral (on glue), and at the bottom the stick is based on a piece of plasticine or another pedestal.
And pay attention - that the edges of the Christmas tree from the photo are curly to the right (with a lace border). This is achieved if the spiral snail is drawn not with straight lines, but with wavy ones, and cut accordingly along these lines.
And we also have a very large and detailed article on our website. There you will find a lot of ideas for creating paper Christmas trees for the New Year.
And in this article I will give the idea of a very simple Christmas tree made of paper discs. Cut paper circles - 2 pieces of each size. Fold each paper circle in half. We put halves of the same size into each other - a corner in the shape of the roof of a house. It turns out 5 corners of different sizes. And from them we begin to collect our paper Christmas tree - first we paste the TOP PAIR of the smallest on the sheet, then inside it - we put a little more, then even more and so on until we collect the Christmas tree - a great idea for the New Year from white paper, which is always in excess.

Crafts for the New Year
FROM STRIPS OF PAPER.
And here are a couple of ideas for you on how you can make original Christmas wreaths with your own and children's hands from paper cut into short strips.
In the first master class, we cut green (double-sided in color) paper into strips 10 cm long. Fold each strip into a bell jar. From the pizza box, cut out the ring-base in the shape of a donut. And on this base we glue our pots of paper strips - we glue them with a serrated "scallop" up (as shown in the photo below).

And here is another idea for the New Year from paper - also from stripes and also in the form of a wreath craft. You can cut each strip on both sides into 2 cloves (like a flag). And just glue them on the base ring for the wreath. We glue them - wrapping around the ring and glue the two sides of the flag together. We decorate a paper wreath with sparkles with fluffy balls,
From two long strips of paper, you can roll up a SPRING - glue a bright light from colored yellow and red paper to it - and you get a candle.

Craft-CARD
for the New Year from paper.
For this folding bed craft in the form of Santa Claus, you need bilateral red paper - and a sheet of white or blue cardboard.
- Glue a red silhouette onto a rectangular sheet of paper so that its HANDS extend wide open beyond the edges of the blue cardboard sheet.
- Then it remains on this red silhouette of Santa Claus to stick a white silhouette of a beard, with a pompom and in the middle of the beard, stick a pink face detail.
- With a black marker draw eyes, buttons, pockets. Draw a nose with a red marker. And then draw a line on which the children will glue the chain of flags.

So I drew the outlines of all the details of this New Year's paper craft. You can outline the details of Santa Claus by placing a sheet of paper directly on the glowing monitor of your computer. To enlarge or reduce an image– roll the mouse wheel while holding down the CTRL button on your keyboard.

You will find even more ideas for creating Santa Claus paper crafts and more in our special article dedicated only to this character beloved by all children.
Paper accordion crafts
for the new year.
An ordinary paper fan that children love to fold in hot weather can warm you with a flame of warm ideas on cold New Year's days.
You can make such a multi-tiered Christmas tree out of paper for the New Year. In it, each tier-floor is a long wide strip of paper folded into a small accordion. Each harmonica is glued overlapping each other - starting from the bottom, and slowly moving to the top.

And if such a strip is twisted in a circle, we get the shape of a corrugated pancake. Different sizes of such corrugated rounds will give us a pyramid in the form of an elegant Christmas tree made of paper. For the new year, you can put a real masterpiece made by yourself in the center of the table. Tiers of colored paper can be sprinkled with hairspray and quickly sprinkled with fine nail glitter.

Such a Christmas tree made of paper will look elegant and beautiful if as paper material take the usual gift wrapping - it will already have a beautiful color pattern - for example, in cheerful polka dots, as in the photo below.

And from such round accordion fans you can make beautiful New Year's crafts in the form of a snowman or decorative paper snowflake pendant.

We make a round fan out of musical paper (before this we artificially age the paper, yellow tea or grease it with a brush dipped in coffee, dry it, smooth it with an iron). In the center of the round fan on hot glue from a gun klim shop plastic snowflake. And from the old New Year's card cut out a round element of the picture and paste it in the center - it turns out a paper snowflake craft for the New Year.
Your round fan does not need to be in the shape of an EVEN CIRCLE. You can give the fan a patterned shape - jagged edges, openwork holes (as in the photo with the snowflake craft below).

Below I found a diagram that shows how to create such a patterned round fan in stages. Please note that the edge cloves are obtained from the fact that the fan, still folded, from one end is CUT OFF.
Holes are obtained from triangular slots in the side of the fan. And so that the fan itself can easily be assembled into a circle, we see a round hole punctured with a needle - from the opposite end of the fan - in this place all the blades are threaded through on a needle and thread - and thanks to this, the fan is pulled together tightly in its center and fixes this screed with a knot of the ends of the thread.


You can of course do and without thread with a needle- fold a round fan from several coal fans. Here is a photo diagram below showing how it is done by hand.

The shape of the teeth of the fan gives interesting shapes to such paper snowflakes. In the photo instructions below, we see different variations of such paper crafts for the New Year. Each new pattern of cuts and cuts gives us an interesting new snowflake when unfolded.


Angels for the New Year
From paper and cardboard.
Using the fan fold technique, you can make an angel craft from white office paper. First, fold a round fan out of white paper (just like we made it for a tiered Christmas tree above - also with the assembly of the middle on a thread). Then, on this fan circle, outline the outlines of an angel (head, wings, dress) on it and cut it off along the drawn line. You get a paper angel craft for the New Year as in the photo below.

And for children at school, you can do these simple crafts angels from a narrow paper cone. The wings are a semicircle with two notches in the middle - the top of the cone is threaded through them (see photo below).
Then a face is glued to the top of the cone (a semicircle made of cardboard). Then we make hair - we bend the rectangle of paper - into two unequal parts - a short fold for the bangs, a long one for the back of the hair. We cut each part into a fringe.

You can make such a solid angel from thick paper with a foil side or from shiny cardboard for the New Year. For this craft, we make only one flat blank (as in the photo below). We make 2 cuts with scissors - then we wind the two sides of this workpiece back, dock and put the cuts on each other. It turns out voluminous New Year's craft Angel (as in the photo below).

But a paper angel - as a window sticker for the New Year. Below I give a diagram for carving such an angel onto a window. You can translate a picture with a pencil directly from the laptop screen by placing a sheet of paper directly on the monitor screen. If you want to enlarge or reduce the drawing diagram, you just need to rotate the mouse wheel while holding down the Ctrl button on your keyboard.


If you have lace paper napkins, you can make from this openwork paper Here is such an elegant angel for the New Year. They can decorate a postcard, front door, or use as a toy on Christmas tree.

And even more ideas for crafts in the form of angels you will find in our special article.
Paper crafts for the New Year,
cut into strips.
And here is a bag of ideas for crafts for the New Year from paper strips. From colored paper (double-sided coloring), cut out strips of the same width. And by gluing them in a given position of the folds, we get curly-shaped frames - in the form of a snowman's hat, in the form of his body, the head of his hands. By connecting the strip frame parts with each other, we get a solid colored paper craft for the New Year.
For crafts from thin frame parts, it is better to use strips of paper glued to each other (3-4 pieces each, or cardboard (two-color) - this way we get a dense craft that will not deform under the weight of itself.

For the same technique (paper strips), you can use not only colored paper as an ornamental material, but also any other. Ordinary strips of paper can be cut out of a magazine, gift wrapping - as was done in the example of a snowflake scoundrel in the photo below.
After gluing the craft, the end edge of the cut is flat, you can first dip it in glue, and then in nail glitter.

It is not necessary to be a quilling master to make an elegant paper snowflake. It is enough just to cut strips of paper of the same length, then glue the loops out of them (they will also turn out to be the same size). And then fold these loops in a circle (gluing to the center) - and we get a round base for a snowflake (as in the photo below). We decorate the glued loops in the center with cardboard snowflakes (or plastic ones purchased at the store), then with roundels and small paper fans.

You can come up with a different pattern of paper loops of different sizes - and get new results. For example, you can hang such a paper star for the New Year as a Christmas tree toy.

New Year from paper
for quilling.
In the shops of the city you can find kits for children's creativity using the Quilling technique - these are packages with strips of colored paper - already cut evenly. From these strips you can fold any New Year's paper crafts. Already have ready-made schemes Snowflakes in quilling technique, with a ready-made number of stripes of the desired color.

Or you can simply buy multi-colored quilling sets (without reference to a specific craft) and create your own fantasy works for the New Year from them. From paper, you can create whole little masterpieces. Look at the photo below - nothing complicated or scary - all shapes are simple (drops, circles, curved drops). A small Christmas picture inside a single ring.
By the way, the ring can be made from a round wide sleeve from adhesive tape. With a knife (or better with a file), saw off a narrow ring from the scotch sleeve. Paint it in white gouache, spray it with hairspray (to fix the color) or wrap it with a shiny ribbon. And then inside this closed form, create your own new year picture. So you will get a Christmas tree pendant made by hand for the New Year from plain paper.

You can make DENSE cast crafts from quilling material. This New Year's penguin is a large winding in the form of a droplet.

Several droplets of different shapes create the image of an angel using the quilling technique.

By the same principle, you can make Santa Claus crafts from paper rolls.


The youngest children, who are just starting to learn the basics of quilling techniques with their own hands, will be able to try their hand at crafts in the form of a simple laying of droplets. Round. In the form of a Christmas wreath.


Non-standard quilling technique
In crafts for the New Year.
Paper strips can be laid not in round twists, but in puff layers. In this laying technique, the Christmas flower craft was made from the photo below.
You can do the same thing with a regular comb.

Here in the photo below we see a master class on this craft. The paper is twisted through the teeth of an ordinary flat comb (or a special quilling comb).

In this technique, you can make elegant round decorations for the Christmas tree. Or create a decor for a postcard. Decorate the packaging of a gift for the New Year, with your own hands.

These are the ideas I have collected for you today in our article.
I am sure that you will find your craft for the New Year from paper and the magic of your hands. May the holiday be joyful and successful for the accomplishment of good deeds and good desires.
Olga Klishevskaya, especially for the site ""
If you like our site, you can support the enthusiasm of those who work for you.
Happy New Year to the author of this article, Olga Klishevskaya.
Helpful Hints
To decorate a Christmas tree or a house, it is not necessary to buy a lot of toys and decorations.
If you have colored paper, cardboard, glue, and a few extra simple materials, you can create a huge number of Christmas crafts.
Here is just a small part paper crafts for the new year:
On our website you will also find:
What can be made of paper for the New Year: tube decoration

You will need:
2 sheets of cardstock in different colors or 2 sheets of scrapbooking paper
Scissors
PVA glue
Ring with chain attachment (optional)
1. From one sheet of cardboard, cut out 14 squares with a side of about 2.5 cm.
2. From the second sheet of cardboard, cut out 14 squares with a side of about 3 cm.

3. Start folding the opposite ends of the squares as shown in the image - one end on top of the other. In the place where the ends overlap each other, add a little glue.


4. Cut out a circle with a diameter of 5 cm from any sheet of cardboard. Mark its center.

5. Apply glue to the circle and start gluing the prepared tubes - first large tubes, and then small ones - they are glued on top of the large tubes.

* Try to glue the tube evenly to the tube.
* You may not need all the prepared tubes for crafting - this is normal.


* Glue a few rhinestones to the craft as additional decorations (this is not necessary).
6. Add a ribbon - it can be glued or threaded into a ring attached to the decoration.
DIY paper cones

You will need:
Colored paper or cardboard
Ruler and pencil
Scissors
PVA glue or pins
Styrofoam ball
* If you did not find a foam ball, then it can be replaced with a crumpled sheet of paper in the form of a ball, wrapped with a thread that secures the shape.
1. Cut out strips 2.5 cm thick from paper or cardboard.

2. Cut each strip across into small pieces 2.5 cm wide - you will get several squares.
3. Fold each square as shown in the image - make an arrow by bending the opposite ends.

4. Prepare the ball and start gluing (or pinning) paper blanks to it as shown in the image. Do everything in layers - first the bottom row, then move up, creating new rows.

5. Glue a ribbon to the top of the head so that the tree can be hung on the tree, and you can also add some artificial leaves as a decoration.
New Year paper crafts in quilling style

You will need:
Pages from old magazines or newspapers
PVA glue
Baking tins (optional)
Thread or braid and bead.
1. Cut out strips 4-5 cm wide from paper.
2. Fold each strip in half lengthwise. Unfold the strip and bend again, but this time each side to the center, and then the entire strip in half again (see image).
2. Prepare the glue and start twisting the strips into circles, adding a little glue so that they do not come apart.


3. Take another paper strip and bend it as in step 2. Prepare a baking dish (in this example, it is in the shape of a star) and put a paper strip into it, carefully laying it out inside the mold.
4. Now start laying out the twisted paper circles inside the molds. Apply glue to them so that all the circles are connected to each other and to the strip inside the mold.


4. When the glue dries, remove the blank from the mold. You can add more glue to make the workpiece even stronger.
5. Pass the thread or braid through the craft and add a bead for beauty. Tie a knot.
* For such crafts, you can use different molds, a heart, for example.
Wall decoration made of colored paper for the New Year

You will need:
10 paper plates
20 sheets of green paper
stapler
Double sided tape
Scissors
Cardboard decorations (can be cut from old postcards or drawn and cut)
White braid (optional).

1. Cut out large squares from green paper - one square from one sheet. The square must fit inside paper plate. If necessary, reduce its size.
2. Fold each paper square like an accordion, and then in half.
3. Fasten the ends of the accordion folded in half to get a semicircle.
4. Repeat steps 1-3 with other paper.
5. Connect the two semicircles together with double-sided tape or a stapler to form a circle.
6. Using double-sided tape, attach the circle to the middle of the paper plate. Glue double-sided tape or apply glue to the back of the plate so that you can stick it to a wall or other surface (you can stick it to plywood, a wooden tablet, cardboard and then put it on a shelf or hang it on the wall).
7. Make 10 similar blanks.
8. Start making Christmas tree decorations. Cut out paper Christmas decorations and glue them together to form a circle. After making several circles (3-4 pieces), they can be glued to the plates, like Christmas decorations.
* You can add a white braid to the top of the Christmas tree, on which the Christmas tree supposedly hangs on the wall.
Christmas decorations made of paper: 3D paper droplet

INwe will need:
colored paper
Pencil
Scissors
1. Draw a large droplet on cardboard and cut it out.
2. Use the drop template to create a few more - place a cardboard drop on paper, trace and cut out.

3. Put a few drops into one stack, fold the stack in half and cut out a circle in the middle (see image).
4. Start gluing the sides of each drop to end up with one voluminous drop. In this example, it took 16 drops to make one voluminous, but more can be done.
* You can add thread or ribbon to hang the decoration on the Christmas tree.

Christmas paper toys: cone balls

You will need:
Paper (can be old magazines)
Scissors
Thread and needle
Double sided tape or glue.
1. Cut paper circles of the same diameter (choose any size)
2. Make a cut along the radius in each circle.

3. Make two cones from each circle - twist the paper from one and the other end (from the notch) to the middle, and fix the workpiece with glue or tape (see image).
4. Also make two cones from each of the remaining circles.

5. Prepare a thread with a needle and thread them through each blank so that in the end a ball is obtained from 10 blanks. Tie a knot.

6. Add string or ribbon to hang the toy on the Christmas tree.

How to make Christmas lanterns out of paper

You will need:
Stationery knife
Pencil and ruler
Thick colored or decorative paper
Needle and thread

1. Prepare a sheet of paper, fold it in half and cut it into two rectangles.
2. Lay one rectangle on a flat surface that can be cut. Using a clerical knife, make several transverse cuts from one end of the paper to the other - the distance between the cuts is the same, and they should lag about 1.5-2 cm from the edges.


* You may need to first mark where the cuts will be. Use a pencil and ruler.
3. Roll the paper into a tube as shown in the image. Secure the ends with tape.
4. Take a needle and thread and start threading them alternately over and under the strips that formed after the cuts.
5. When you have wrapped the entire workpiece with thread, tighten it and tie a knot.

Today we will learn how to interesting and original crafts from paper with or for children.
And first, let's see what we need for this:
To create crafts, we will use different types paper and cardboard:
napkins for decoupage on boxes;
newspaper to create balloons from papier-mâché;
old magazines for crafts with beads;
crepe and wrapping paper;
colored double-sided paper;
corrugated and plain cardboard;
paper plates, cardboard tubes, various boxes and much more.
For creativity, the child will need such basic materials and tools as scissors, glue, paints and felt-tip pens.
Does it happen to you that you collect a lot of small necessary items, but there is nowhere to put them? Let's make a fun pocket in which everything will fit and which can be hung in a conspicuous place.
Paper crafts for kids: USEFUL POCKET
What will be required:
colored paper
pencil
lace scissors glue
Work sequence:
Draw the outline of the muzzle of an animal, such as a bear.
Cut out two such shapes along the contour. Make details for the ears and nose, as shown in the photo.

Apply glue along the edge, connect the parts to make a pocket inside. Punch two holes.

Glue on the ears and nose. Draw a ribbon for hanging.

This pocket is perfect for storing small items: hairpins, combs or stationery.

Paper Craft for Kids: RACE RACE
Did you know that you can make unusual racing cars with your own hands? Let's create them and have a real race. I wonder what car number will win?
What will be required:
cardboard tubes of paint, felt-tip pens
colored paper, cardboard
glue scissors
Work sequence:
Color the tubes in bright colors.

Cut out parts for cars from colored and white paper (for wheels, it’s better to take black cardboard - then your “car” will stand firmly). Use a felt-tip pen to draw what you need.

Make a hole in the straw as shown in the picture (you can ask an adult to help).

Now glue all the details. Wait until it dries - and go ahead, play!

Paper crafts for kids: PAPIER-MACHE BALLOONS
Who doesn't dream of flying in a hot air balloon? Someday you will definitely do it. Now let's try to make an unusual balloon from an ordinary newspaper.
What will be required:
glue bead
needle spoke
cream paint
Work sequence:
Inflate the balloon, lubricate it with any cream. Prepare a newspaper for crafts - for this you need to tear it into small pieces. Wetting them in water, glue the ball so that there is no gap.

Now apply a layer of glue on the ball and glue it again with pieces of newspaper soaked in water - so you need to do 2-3 layers. You may need the help of an adult.

When the ball is completely dry (for this you will need to wait 1-2 days), pierce it with a needle - we don’t need it now - and cut the ball, as shown in the photo.

Now color the ball with paints.

Now let's make a basket. To do this, the newspaper sheet was divided into 4 parts to make rectangular blanks. Then, starting from the bottom corner, roll the newspaper into a tube with a knitting needle, and glue the tip.

Take 5 tubes and put them side by side, and stretch the sixth tube across under the first, over the second, under the third, etc., alternating. The next tube must be weaved in reverse: what was below will be on top.

To secure our base, take one tube and weave it around, also passing it between the other tubes through one.

Now you can make the basket itself: to do this, bend all the ends up and start weaving them around in the same way as you did before. Weave 4 rows.

Unnecessary ends weave on top and glue, some you can just cut off. Color the basket with gouache.

Make holes at the bottom of the ball and secure the basket with a thread. Balloon ready!

FUNNY ANIMALS
It turns out that you can quickly and easily make yourself a striped friend. And in order to be able to play with friends, let's find out how to make not only a tiger, but also other animals.
What will be required:
colored paper
glue scissors
Work sequence:
Take a sheet of colored paper and fold it as shown in the picture. Glue the ends to make a strip.

Bend the strip "accordion" in three places to get the letter "M".

Cut out blanks for the animal from colored paper.

Glue the blanks to the base. Ready! You have a tiger.

HOME THEATER
But what if you arrange a real theater in your home? It will be possible to invite adults to the performance and show them some kind of fairy tale, for example, "Gingerbread Man". I think they will definitely appreciate your skill!
What will be required:
colored paper compasses scissors glue
markers stick
Work sequence:
Draw a blank on a sheet of colored paper, as shown in the photo.

Cut out the blank and glue.

Cut out the base for the animal from colored paper
Glue the pieces to the base. Look who we got

Take your favorite animal fairy tale as a base and make all the characters out of paper. If sticks are glued to the blanks, it will be possible to show a performance from behind a screen, as in a puppet theater.
Paper crafts for kids: FUNNY CATERRORS AND SPIDERS
Have you ever seen a real spider? And the caterpillar? Let's make funny animals with furry legs out of a cardboard egg box. They will look like the real thing!
What will be required:
egg carton
glue scissors
colored paper
wire
Work sequence:
Cut out blanks from a cardboard box: three cells for caterpillars, one for bugs and spiders.

Color the blanks with gouache.

Prepare details for animals: cut out eyes from colored paper, make legs from fluffy wire.
Make holes in the blanks and stick the legs. Then glue on the eyes.

Try to make them exactly the same.

AMAZING MASQUERADE
You can celebrate your birthday in an unusual way by throwing a masquerade. Invite your friends and have everyone make an animal mask for themselves. It will be fun!
What will be required:
cardboard plates
colored cardboard and paper
scissors
Work sequence:
Color the plate blue.

Cut out the ears and color them too.

Prepare parts for a bunny from colored paper.
Cut out holes for the eyes and glue the pieces as shown.


PAPER BEADS
What girl doesn't love jewelry? Let's try to make beads from old magazines. You will get bright ones that you can wear with your favorite dress or give to your mother.
Work sequence:
Cut out the details from the magazine sheet: strips about 1 cm wide and elongated triangles.

Wind the blanks on the knitting needle - these will be paper beads. Glue the tip well.

Make as many beads as you need for the entire decoration. Take a needle and thread and carefully thread all the beads onto the thread.

This is how easy it is to make unusual ones: original multi-colored beads, bright bracelets. You can even give them to someone: what girl would refuse such beauty?!
Paper Crafts for Kids: PRINCESS DECORATIONS
All girls dream of becoming real princesses. What is a princess without a crown? Let's make it from a regular cardboard roll.
What will be required:
cardboard tubes of paint
colored paper
scissors
Work sequence:
Cut out the crown from the roll. You can do a few things.

Color the blanks in different colors.

Decorate crowns. To do this, you can use beads, ribbons and laces.
Make holes on the sides and thread the elastic so that the crown can be put on.

You can make a decoration for a real princess from an ordinary hoop: use colored paper to turn it into a beautiful diadem.
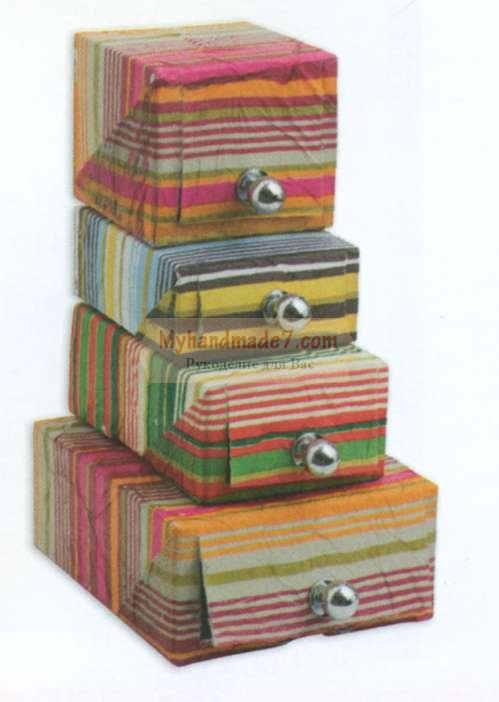
Paper craft for kids: TOY LOCKER
Probably, like all children, you have a lot. Sometimes there are so many of them that it becomes difficult to neatly fold. Let's make a beautiful storage cabinet for small toys.
What will be required:
boxes of different sizes
white gouache
patterned napkins
stationery knife
tassel pen
Work sequence:
Paint the boxes white so that the pictures and text on them do not show through.

Glue the box on all sides with a napkin. To do this, put it on the box, pressing along the edges, and with a brush, apply a thick layer of glue on top so that it sticks.

Cut out the doors with a clerical knife - here you will need the help of an adult. Glue the handles with superglue and fasten the boxes together to make a cabinet.
All! Our dresser is ready. Now you can put your toys there. Mom will be delighted when she sees what order you have!
CREATIVE BOX
Do you like to draw? Or maybe you like to carve or craft something? This is cool! Let's make a creative bag-box where you can put everything you need for creativity.
What will be required:
shoe box
wrapping
colored paper
adhesive lanyard
Work sequence:
Tape the box and lid on all sides. If it's hard for you, ask one of the adults about it.

Make blanks inside the box. At the bottom of a sheet of colored paper folded in half, make an incision to the middle, as shown in the photo. Cut two pieces of the same length as the width of the box from top to middle.

Insert the blanks into each other and place them in the box - these will be the compartments of our bag.
Make holes on the sides of the box: they should be at such a level that the box can be closed with a lid. Make the handles of the same length from the cord so that the box is comfortable to take in your hand.

HANDMADE PHOTO ALBUMS
Where did you last go on holiday? Maybe it was a trip with your parents to the sea or a vacation in the village with your grandmother? You must have some memorable photos. Let's make a suitcase-shaped photo album for them.
What will be required:
colored paper and cardboard
hole punch scissors lace
Work sequence:
For the cover of the photo album, take a sheet of colored cardboard and fold it in half.

For pages, take sheets of double-sided paper of different colors and also fold in half.

Now connect the cover and pages together: for this, fold everything together and make holes on the side with a hole punch. Tie the sheets with a rope or cord.

Cut out the details for the suitcase from colored cardboard and glue them to the photo album.


Paper Crafts for Kids: FUNNY BOOKMARKS
What is your favorite book? Or maybe several? It's great that you love to read. Let's make an interesting bookmark for the book.
What will be required:
colored paper
Work sequence:
Use a ruler to draw three squares on a sheet of colored paper, as shown in the photo. The triangles that are filled in are not needed.

Cut out the piece.

And it, as shown in the photo: first bend it to the inner corner, then another on top of it. Glue them together. Cut out the details from colored paper.

It turned out great, right? Now it will be easy to find the place in the book where you finished reading. You can also make a bookmark in the form of another animal, such as a dinosaur with sharp teeth.

CARDBOARD BAG
Do you know how from regular box Can you make a colorful bag? Very simple! Let's dream up and make a handbag that you can take with you outside in sunny weather.
What will be required:
cereal box
colored paper
glue scissors
Work sequence:
Color the box with gouache.

Cut out a bag with handles from the box. This may require the help of an adult.

Cut out a strip and a circle from colored paper - this will be the core of the flower. Fold the strip with an accordion and glue the ends. To keep the flower, stick it on a small square. Glue the core on top.

For butterflies, cut out blanks from 1 colored paper. To make the figure voluminous, you need to make 5-6 identical parts. Glue them together in the middle. Glue all the pieces to the box.

DIY Paper Crafts: Pencil Stand
Do you want to give a gift to a friend, but don't know what to choose? Don't be upset, I have an idea! Make an original stationery stand out of an ordinary cardboard box. Your friend will definitely love this gift!
What will be required:
boxes
the same width
white and colored paper, cardboard
adhesive tape
Work sequence:
Build a ship out of boxes: cut off the lids and cut them to height. Make the bow of the ship and pipes out of cardboard.

Tape each piece with colored paper inside and out.

Cut out and glue the windows, lifebuoy, steering wheel, anchor.

Glue the boxes together and glue them to the base, cut along the contour.

PUZZLE APPLICATION
Do you have unnecessary puzzles in which a lot of details are already lost? I have an idea how they can be applied. Let's make an amazingly colorful application with autumn leaves.
What will be required:
unnecessary puzzles crepe paper
paint glue
Work sequence:
Color the puzzles in bright colors autumn leaves: yellow, orange, red.

Cut out a brown rectangle from crepe paper - this will be a tree trunk - and make green grass.

Glue the brown blank in the form of a trunk: for this, somewhere you need to compress the paper in layers, and straighten it somewhere.
Make a crown of a tree from the prepared puzzle pieces. Also glue several layers of grass to make it voluminous.


Paper crafts for kids: 3D PICTURE
Do you want to make a large application? It's quite easy! You will get a real picture that you can give to your grandparents.
What will be required:
candy box
corrugated cardboard
double tape adhesive
Work sequence:
Cut out the necessary details for the picture from corrugated cardboard.

Glue the first layer of applique on the bottom of the box - what will be in the background.
Paste other details on top.

What a beauty! It turned out to be a real big picture. In this way, you can make a city where there are cottages and high-rise buildings, or an underwater world with shells, algae and fish.

BOUQUET IN A POSTCARD
Do you want to give your mom unusual flowers? Let's make a card-bouquet of colored paper. Trust me, she'll love it.
What will be required:
double-sided colored paper
scissors ribbon
Work sequence:
Draw a blank on a sheet of colored paper, as shown in the figure.
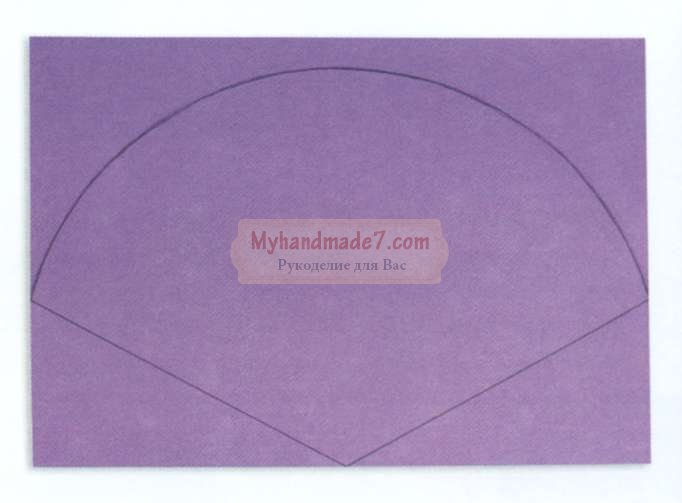
Cut out the blank and separately a triangle.
Glue a small triangle on the bottom, and fold the large part as shown in the picture.

Draw, and then cut out flowers of different sizes and colors. Make leaves for the bouquet.

Glue flowers inside our postcard in the form of a bouquet, tie a ribbon at the bottom.


3D POSTCARD
Surely you watched the cartoon in 3D and noticed how the characters come to life with a three-dimensional image. It turns out that making objects three-dimensional is quite simple. Let's try to make a postcard with a 3D effect.
What will be required:
colored cardboard, double-sided colored paper
scissors ribbon
Work sequence:
Take two sheets folded in half: one is cardboard, the other is colored paper.

On a sheet of colored paper, make cuts on the fold side, as shown in the photo. You should get 3 even squares of different sizes.

Now what you cut, push forward and inward. You should get a ladder, as if from boxes.
Glue the blank onto a sheet of colored cardboard. Decorate the boxes: glue colored paper and ribbons.

By this principle, you can make a card with balloons

CARD WITH PALM
Do you want to make another unusual postcard? You don’t need anything special for this: just a sheet of colored paper and cardboard, scissors, glue and your wonderful pens.
What will be required:
colored cardboard and paper
Work sequence:
Circle your palm on a piece of cardboard.

Cut out the piece with scissors. You will need two of these items.
Cut out a strip of colored paper and fold it like an accordion.

Glue one end of the accordion to one "hand" and the other to the other. Cut out from colored paper or write a congratulation with felt-tip pens.

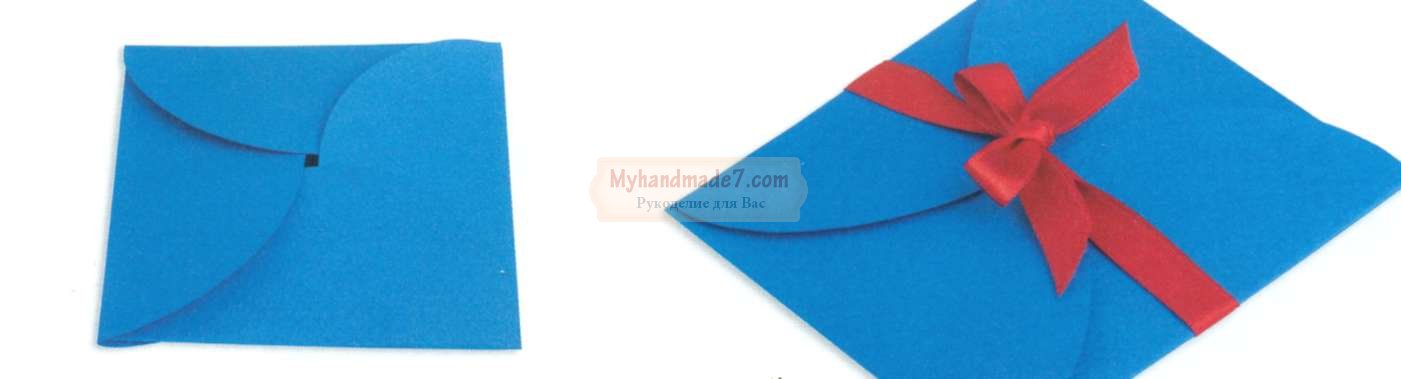
ENVELOPE
Do you know how to decorate a small gift? You don't have to be an adult to do this, and you don't need any special equipment. Repeat after me and you will definitely succeed!
What will be required:
colored paper glue
ribbon
Work sequence:
Draw 4 identical circles on a sheet of colored paper. This is easy to do if you take a mug, put it upside down and circle it.

Cut out the circles and fold them in half.

Glue the circles together as shown in the picture.

Bend the free halves of the circles so that one turns out on top of the other. Then pull the bottom from one side up.
SWEET GIFT
Have you ever seen a gift shaped like a candy? Maybe they gave you something similar? Let's make such a surprise, and you can "treat" someone to them.
What will be required:
cardboard tube
wrapping paper glue
scissors ribbon
Work sequence:
Cut out a square from the wrapping paper. In size, it should be larger than a cardboard tube.

Cover the tube with paper. Tie one end of the candy with a ribbon.

Put candy in a gift and tie the other end.
3D FIGURINES
Have you ever wanted to decorate your room in an unusual way? Let's make voluminous figurines-decorations from colored paper. They can be placed on a bedside table or hung on a string from a chandelier.
What will be required:
colored paper glue
scissors ribbon
Work sequence:
Draw a half of an apple on a piece of colored paper folded in half, as shown in the photo.

Cut out the blank and, using it as a template, make 5 such copies. Additionally, cut out the details for the apple.

Glue the blanks together, as shown in the photo.

Glue the rest of the details.

Fruits and vegetables can be anything!
Crafts from cardboard and paper: bright flowers
Do you want to grow bright flowers in your window? Let's make them out of cardboard tubes, but in such a way that no one guesses what material they are from.
What will be required:
cardboard tubes of paint
colored paper glue
scissors skewers
Work sequence:
Make cuts on both sides of the tube so that they do not reach the middle.

Color the tubes in different colors.

When the blanks are dry, straighten the petals, as shown in the photo.
Glue the centers cut out of colored paper.

Paste the skewer with colored paper, cut out the leaves.
Connect all the details. Poke a hole in the center of the flower with a skewer.
Such a flower can be put in a vase and presented to someone.

FRAME OF UNUSUAL FLOWERS
Do you have a boring monochrome frame at home? Let's make it a real masterpiece!
What will be required:
egg carton
glue scissors
Work sequence:
Cut out petal blanks from the cells of a cardboard box, as in the picture.

Color them the same color. You should have 15-18 such sets of different colors (depending on the size of the frame).

Glue the petals together in the middle, carefully press and let them dry.
Glue the flowers to the frame. You won’t be able to attach everything at once, so do it in stages and wait until everything dries.

The frame is ready. Now you can insert your favorite photo into it.
CUTE CACTUS
How do you like such a cute cactus? It is completely safe for children because the thorns are painted on it. Let's make such a cactus and put it on the windowsill.
What will be required:
markers
Work sequence:
Draw a cactus in a pot on cardboard.

Color the picture on both sides and make another one exactly the same.

Make cuts: on one cactus from the bottom to the middle, and on the second - from the top to the middle.

Insert the blanks into each other. The cactus is ready.
In the same way, you can make a rocket or a teddy bear.
COLORED LANTERNS
Your birthday is coming up and you want to decorate your room to make it festive and beautiful? Then let's make unusual colored lanterns.
What will be required:
toilet paper tubes
crepe paper
ribbons
glue scissors
Work sequence:
Cut out a square of crepe paper and glue one side of the tube.

Make blanks from crepe paper: cut out strips and make cuts on one side along the entire length.

Start taping the tube from the bottom. You should get a skirt, as in the photo.
Thus, glue the entire flashlight. Make holes on the top sides and thread a ribbon through them so that the craft can be hung.

Such lanterns can be not only decoration, but also a useful thing. For example, at a holiday you can arrange a game with prizes: hang lanterns on a rope and put something valuable in them by gluing the bottom. Each blindfolded guest must cut off a gift with scissors.

ROOM DECORATION
Would you like to have a bird? Of course, nothing compares to the real one, but still an unusual and beautiful bird can be made from ordinary colored paper. See how it's done.
What will be required:
double-sided colored paper
crepe paper scissors
ribbons
wire
Work sequence:
Draw bird silhouettes on a sheet of paper.

Cut them out. Make a few of these. They must be different colors.

Make wings out of crepe paper: to do this, cut out rectangles of different colors and fold them like an accordion.
Make cuts in the blanks of the birds and insert the wings there. Tie ribbons to the figures and hang them on a circle made of wire.